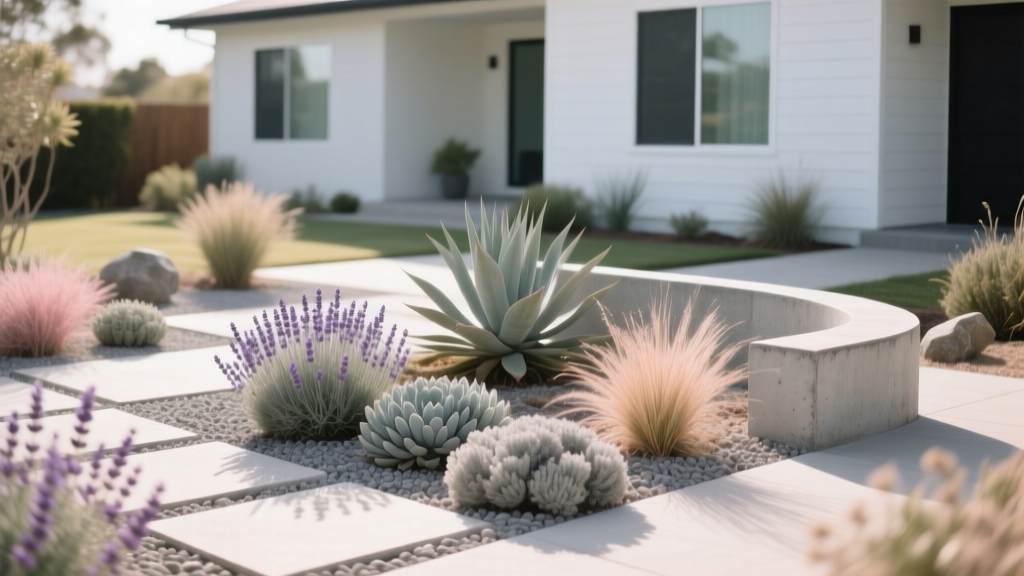
Front Garden Low-Water Landscape
The first time you notice it, it’s usually from the sidewalk: a front yard that looks tired by July. Crispy lawn edges. A hose snaking across the walkway. A few shrubs doing their best, surrounded by bare, baking soil. You want curb appeal, but you don’t want to spend your weekends hand-watering—or pay for it on your utility bill. The good news is that a low-water front garden doesn’t have to look like gravel with a cactus in the middle. With a clear layout, the right plants, and a few smart details, you can build a front landscape that looks intentional in every season and asks for far less water than a traditional lawn.
Let’s walk through a designer’s approach: assess the site, set a clean layout, group plants by water needs, and build a front garden that’s easy to care for—even if you’re renting.
Start With the Site: A 20-Minute Walk-Through That Saves Months of Regret
Before we talk plants, we need to understand what your front garden is doing on a typical day. Stand outside at three times: morning, mid-afternoon, and evening. Watch where sun hits, where shade lingers, and where water naturally moves after a rain.
Measure what you actually have (and design to it)
A common front planting zone is about 20 ft x 10 ft (200 sq ft) between walkway and house, or a strip along a driveway. Sketch it on paper with basic dimensions. Note constraints: utility boxes, hose bibs, window sightlines, and the path people take from curb to door.
- Keep a clear path: Main walkway should feel comfortable at 36–48 inches wide.
- Foundation clearance: Keep mulch and plants 6–12 inches away from siding to reduce moisture and pest issues.
- Sun mapping: “Full sun” is typically 6+ hours of direct sun; many low-water plants perform best at 6–8 hours.
Know your soil’s relationship with water
Low-water landscapes succeed when water can soak in quickly and roots can breathe. Do a simple infiltration test: dig a hole about 6 inches deep, fill with water, and see how long it takes to drain. If it’s still holding water after 4 hours, plan to amend soil and/or create slightly raised planting areas.
Also, remember that reducing lawn can dramatically reduce irrigation demand. The U.S. Environmental Protection Agency notes that outdoor water use can account for roughly 30% of household water use on average, and much higher in dry regions (EPA, 2023). That’s why front-yard choices matter.
Layout Strategies: Make It Read Well From the Street
A front garden is viewed in motion—from the car, the sidewalk, the steps. The layout should be simple enough to read quickly, but layered enough to feel lush up close.
Principle 1: Use a “dry-core, hydrated-edge” zoning plan
This is one of my favorite low-water tricks: place your most drought-tolerant plants in the hottest, farthest zones (often near the curb or along reflective driveway edges). Reserve slightly higher-water plants closer to the house where downspouts, shade, or runoff provide a little extra moisture.
- Zone A (Dry core): 0–1 deep watering per week in summer once established.
- Zone B (Moderate): deep watering every 7–10 days in peak heat.
- Zone C (Accent/containers): small areas you can water by hand as needed.
Principle 2: Draw a strong “spine” line, then plant in drifts
A spine can be a path edge, a boulder line, a strip of steel edging, or a repeated plant row. Once you have that, group plants in drifts of 3, 5, or 7 of the same variety. Drifts look calmer and are easier to maintain than one-of-everything planting.
Principle 3: Choose 2–3 hardscape materials, max
Low-water doesn’t mean “all gravel.” Instead, build a simple palette:
- Mulch: shredded bark or wood chips in planting beds (typically 2–3 inches deep).
- Inorganic accent: decomposed granite (DG) or gravel for a small seating pad or dry creek detail.
- Edging: steel, stone, brick, or even a clean spade-cut edge for DIY budgets.
A Simple, Buildable Front-Garden Plan (With Real Dimensions)
Here’s a layout I use often for a straightforward front bed of about 20 ft x 10 ft. It creates structure, seasonal bloom, and low irrigation demand.
- Create a 4 ft-wide entry “arrival zone” near the walkway: a small pad or widened planting pocket for a focal plant (like a compact shrub or ornamental grass).
- Define a planting bed with a gentle curve that stays 18–24 inches off the walkway edge, so plants can grow without flopping into your path.
- Place 1–2 anchor shrubs toward the back (near the house) with mature size in mind—set them 3–5 ft apart depending on variety.
- Mass mid-height perennials in drifts: place 5 plants of the same variety at 18–24 inches on center for quick coverage.
- Use low groundcovers at the front edge at 12–18 inches on center to soften the border and reduce weeds.
- Mulch deeply (2–3 inches) and leave a 2–3 inch gap around plant crowns.
- Install simple irrigation: dripline or inline drip tubing (0.6 gph or 0.9 gph emitters are common) run in loops around plant groupings.
Budget snapshot for that 200 sq ft bed (typical mid-range DIY): $350–$900 depending on plant sizes and materials. If you hire installation, labor can quickly push total project cost to $1,500–$4,000 in many markets.
Plant Selection: Specific Varieties That Look Good and Don’t Beg for Water
The best low-water front garden plants share a few traits: deep roots (once established), leaves that reduce transpiration (small, gray, or waxy foliage), and a growth habit that stays attractive without constant clipping.
Anchors (structure year-round)
- Arctostaphylos ‘Howard McMinn’ (Manzanita) — Evergreen structure, great for mild-winter regions; sculptural branching looks designed even without flowers. Plant spacing: 6–8 ft. Best in 6+ sun hours, excellent drainage.
- Dodonaea viscosa ‘Purpurea’ (Purple hopseed bush) — Fast, upright screening with minimal water once established. Spacing: 4–6 ft. Works well for modern designs.
- Ceanothus ‘Yankee Point’ — Blue spring flowers, evergreen foliage; excellent for slopes and curbside zones. Spacing: 6–8 ft. Needs sun and drainage; avoid overwatering.
Mid-layer perennials (color without fuss)
- Salvia ‘Caradonna’ — Vertical purple spires, tidy habit, long bloom. Spacing: 18 inches. Pollinator magnet with low summer water.
- Lavandula angustifolia ‘Hidcote’ (English lavender) — Gray foliage, fragrance, strong curb appeal. Spacing: 24–30 inches. Needs 6–8 hours sun and sharp drainage.
- Achillea ‘Moonshine’ (Yarrow) — Soft yellow blooms and feathery foliage; thrives in heat. Spacing: 18–24 inches. Great for the “dry core” zone.
- Gaura lindheimeri ‘Whirling Butterflies’ — Airy movement, long bloom season, graceful along paths. Spacing: 18–24 inches.
Grasses and grass-like plants (movement + low-water reliability)
- Festuca glauca ‘Elijah Blue’ (Blue fescue) — Compact mounds, crisp color contrast. Spacing: 12–18 inches. Perfect at the bed edge.
- Muhlenbergia rigens (Deer grass) — Architectural clumps; looks great all year and handles heat. Spacing: 3–4 ft. Excellent near driveways.
- Lomandra longifolia ‘Breeze’ — Clean, strap-leaf texture; highly durable in streetside conditions. Spacing: 2–3 ft.
Groundcovers (weed suppression and a finished look)
- Dymondia margaretae (Silver carpet) — Tough, low, silver-green; good between stepping stones in sun. Spacing: 8–12 inches.
- Thymus serpyllum (Creeping thyme) — Fragrant, softens edges, flowers for pollinators. Spacing: 12 inches.
- Rosmarinus officinalis ‘Prostratus’ (Trailing rosemary) — Evergreen spillover, excellent on low walls or slopes. Spacing: 4–6 ft.
Why these work: they’re visually strong without needing constant fertilizer or summer water. The UC ANR guidance on drought-tolerant landscaping emphasizes matching plants to site conditions and using hydrozones to water efficiently (University of California Agriculture and Natural Resources, 2017).
Comparison Table: Three Low-Water Looks (And How They Behave)
| Style | Best For | Hardscape/Surface | Plant Feel | Typical Watering After Establishment |
|---|---|---|---|---|
| Mediterranean | Sunny fronts, classic homes | Mulch + stone accents | Lavender, salvia, rosemary; fragrant and tidy | Deep soak every 7–14 days in peak heat |
| Desert-modern | Hot exposures, reflected heat | DG/gravel with bold boulders | Agave, yucca, grasses; sculptural forms | Deep soak every 10–21 days depending on soil |
| Native/pollinator | Habitat value, seasonal waves | Mulch-heavy, minimal gravel | Yarrow, ceanothus, native sages; dynamic bloom cycles | Deep soak every 10–14 days first summer; less later |
A Note on Water: The Goal Is Deep, Infrequent, and Targeted
Low-water landscapes don’t mean “never water.” They mean you water in a way that builds deep roots and avoids waste. Drip irrigation is ideal because it places water where it’s needed and reduces evaporation. EPA’s WaterSense program highlights that irrigation efficiency and smart scheduling can significantly reduce outdoor water waste (EPA WaterSense, 2023).
“Hydrozoning—grouping plants with similar water needs—is a cornerstone of water-efficient landscaping because it allows irrigation to match plant demand instead of forcing the entire landscape into one schedule.” — University of California Agriculture and Natural Resources (UC ANR), 2017
Three Real-World Front Garden Scenarios (And How I’d Design Each)
Low-water design isn’t one-size-fits-all. Here are three common front-yard realities, with practical layouts and plant moves that work.
Scenario 1: The tiny townhouse strip (4 ft x 16 ft) with harsh sun
This space is basically a heat runway: narrow, bright, and easy to overcomplicate. Keep it graphic. I’d run a simple repeating rhythm: three clumps of Lomandra ‘Breeze’ spaced 30 inches apart, underplanted with creeping thyme at 12 inches on center. Add a single focal accent near the door—like Agave attenuata (where climate allows) or a large ceramic pot with lavender.
Cost control: Use 1/2-inch gravel mulch in the hottest section instead of bark (it won’t break down as quickly). Expect materials around $150–$400 DIY if you plant small 1-gallon sizes.
Scenario 2: The rental front garden where you can’t install irrigation
If you’re renting, you need portable impact. Think containers + a simple mulched bed that can be reversed. Use two 18-inch wide pots flanking the entry with tough plants like Salvia ‘Caradonna’ or dwarf olive (where appropriate), and a bed of drought-tolerant perennials that can survive occasional hand-watering.
DIY alternative to drip: Use 2-gallon watering cans and water deeply once a week in summer—about 10–15 minutes total if the bed is mulched properly. Add 2–3 inches of mulch to stretch the interval between waterings.
Scenario 3: The classic suburban front yard (30 ft x 20 ft) with a thirsty lawn you hate
Here we go bigger, but we keep it disciplined. I’d reduce lawn to a purposeful shape—say a simple rectangle or oval—then turn the perimeter into planting. A common win is converting 300–500 sq ft of lawn into hydrozoned beds. Place anchor shrubs at the corners for structure, then fill with drifts of lavender, yarrow, and grasses for movement.
Budget reality: Sheet-mulching to remove lawn (cardboard + compost + mulch) is cheaper than hauling sod. For 400 sq ft, plan roughly $80–$200 for compost and mulch depending on local bulk pricing, plus plants. If you add a basic drip kit, many homeowners land in the $600–$1,500 range DIY for a substantial transformation.
Step-by-Step Installation: A Practical Weekend Plan
If you’re DIY-ing, you’ll get the best results by doing the messy parts first (grading, soil, irrigation), then planting last.
- Mark the bed lines with a hose or marking paint; step back to check curves from the sidewalk.
- Remove turf/weeds (sheet mulch or sod cutter). For sheet mulch: overlap cardboard by 6 inches and wet it thoroughly.
- Fix drainage and soil: in compacted areas, loosen soil to 8–12 inches. Add compost if your soil is extremely sandy or lifeless, but don’t over-amend clay—aim for structure, not soup.
- Lay drip irrigation (if allowed): run a mainline, then loop inline drip tubing through planting zones. Keep tubing 6–12 inches from plant crowns.
- Place plants while still in pots: start with anchors, then mid-layer drifts, then groundcovers. Check sightlines from windows and the street.
- Plant and water in: soak each plant deeply at planting time.
- Mulch 2–3 inches: keep mulch pulled back from stems.
- Stake or protect new plants if foot traffic is a risk; small wire cages can prevent accidental trampling near walkways.
Maintenance Expectations: What You’ll Actually Do Each Week
A low-water front garden is not zero maintenance—it’s low drama. Here’s what I tell clients to expect once plants are established (usually after the first growing season).
- Weekly time: plan on 20–40 minutes per week for quick weeding, deadheading, and checking irrigation (or hand-watering in rentals).
- Spring: cut back perennials (like salvia and yarrow) and comb out grasses; refresh mulch where thin.
- Summer: deep water on schedule; deadhead lavender lightly (don’t cut into old wood); watch for stressed plants near reflective heat.
- Fall: the best planting season in many climates—add new plants, divide grasses if needed, and top-dress mulch before winter rains.
- Winter: minimal work; prune structure plants lightly and remove storm debris.
During the first year, you’ll water more often as roots establish. A practical rule: water deeply, then let soil dry slightly between cycles. Most failures in “drought-tolerant” landscapes come from overwatering plus poor drainage, not underwatering.
Budget Choices That Don’t Look Cheap
If you’re balancing cost and aesthetics, prioritize layout and spacing over plant size. A small plant in the right place looks more designed than an expensive plant placed randomly.
- Buy 1-gallon plants instead of 5-gallon: you’ll save significantly (often by 50%+) and they frequently establish faster.
- Use bulk mulch instead of bagged where possible: many areas deliver by the cubic yard, and you’ll get more consistent coverage.
- DIY edging: a crisp spade-cut edge costs nothing and instantly makes the bed look intentional. If you upgrade later to steel edging, your shape is already set.
- Choose one “hero” item: a boulder, a specimen plant, or a pot. Spend there; keep everything else simple and repeated.
If you want the look of a designed garden without a full redo, start with a “phase 1” plan: remove a 4 ft x 10 ft lawn section near the entry and build one complete planting bed. Once it’s thriving, expand. Front gardens reward momentum.
When the heat hits and neighbors drag sprinklers across their lawns, your front garden should still hold its shape: grasses catching light, lavender staying silver-green, salvia sending up another round of bloom. You’ll be watering less, yes—but more importantly, you’ll be looking at a space that feels composed from the curb and welcoming at the door, with plants placed like they belong there.
Citations: U.S. Environmental Protection Agency (EPA) WaterSense, 2023; University of California Agriculture and Natural Resources (UC ANR) drought-tolerant landscaping guidance, 2017.