Backyard Compost System and Garden Bed
The back door swings open and you step onto the patio with a bowl of veggie peels in one hand and a half-formed plan in the other. The trash can is right there, easy. But so is that nagging thought: “This could be soil.” Meanwhile, the yard is doing what yards do when they aren’t designed—sunny patches nobody uses, a shady strip that grows weeds, and a garden bed that always seems to run out of steam mid-summer.
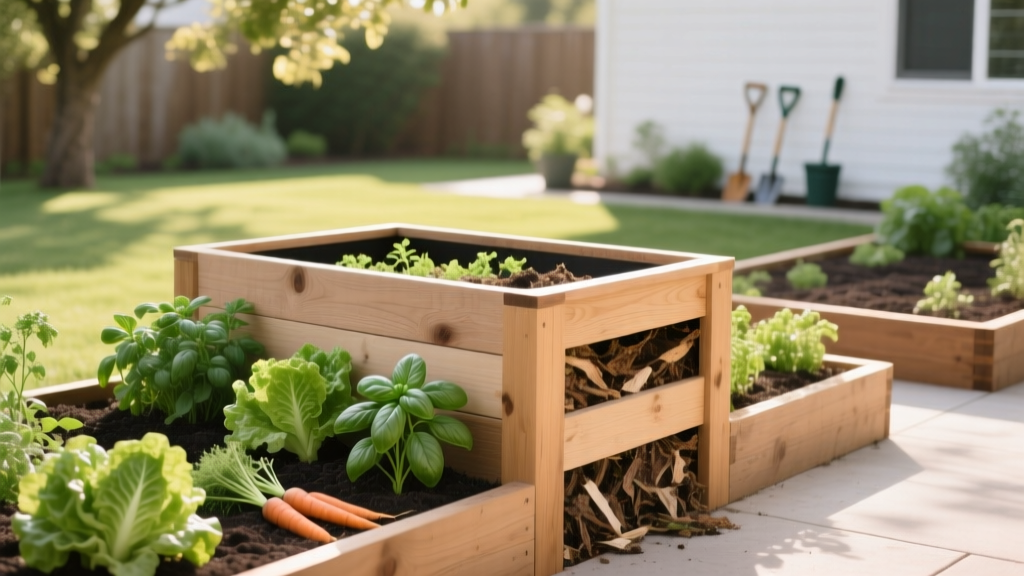
Here’s the project: pair a compact compost system with a productive garden bed so your kitchen scraps become the fertility engine for the plants you actually want to grow. This is less about buying fancy bins and more about placing things where they’ll get used. A good layout makes composting feel effortless and makes your beds easier to water, weed, and harvest.
Start With Flow: The 3-Step Path From Kitchen to Compost to Bed
When I design backyard edible spaces, I’m looking for friction points. Composting fails most often because it’s inconvenient: too far from the door, too messy, too hard to turn, or too confusing to manage. So the first principle is a simple sequence you can walk in slippers.
Design principle: Put the compost where your feet already go
Aim to place the compost system 15–30 feet from the kitchen door if possible—close enough to use daily, far enough that you’re not stepping around it on the patio. Keep it on a firm surface (pavers, compacted gravel, or bare soil) and within hose reach.
Sun matters. Compost runs faster in warmth, but it doesn’t need full sun. A spot with 4–6 hours of sun is a sweet spot in many yards: warm enough for activity, not so hot it dries out constantly.
Design principle: Make the garden bed the “front yard” of your compost
The compost area and bed should feel like one small working zone. Ideally, the bed sits 3–10 feet from the compost so you can toss on finished compost, grab browns (mulch/leaves), and manage both without crisscrossing the yard.
Design principle: Build in a clean/dirty boundary
Even a neat composter has moments: spilled leaves, a damp patch, a wheelbarrow parked mid-task. I like a 3-foot-wide access path that you can sweep or rake clean. Use wood chips, gravel, or a couple of stepping stones set 18–24 inches apart.
Choose Your Compost System: Size, Speed, and How Much You’ll Actually Turn It
The “best” compost system is the one you will maintain. If you have space, a simple bin can outperform complicated gadgets. If you’re tight on space or renting, enclosed options reduce mess and complaints.
| System | Footprint (typical) | Good for | Hands-on effort | Approx. cost (USD) |
|---|---|---|---|---|
| DIY 3-bin pallet system | 6' x 3' (three 3' bins in a row) | Homeowners with space; steady output | Turning with fork every 1–2 weeks | $0–$80 (often free pallets + screws) |
| Single enclosed bin (plastic) | 2' x 2' | Small yards; neat look | Light turning; harvest can be fiddly | $70–$200 |
| Tumbler | 3' x 2' | Fast mixing; renters who want tidy | Easy spin, but limited capacity | $120–$300 |
| Worm bin (vermicompost) | 1.5' x 2' | Apartments/patios; winter composting | Low odor if managed; no yard turning | $50–$150 |
If you’re deciding between a bin and a tumbler, remember capacity. A productive garden bed can easily absorb compost; the bottleneck is often how much you can make. As a reference point, many compost educators recommend an active pile be at least 3 feet x 3 feet x 3 feet to retain heat and decompose efficiently (Cornell Waste Management Institute, 2021).
“A minimum size of about one cubic yard (3' x 3' x 3') helps a compost pile hold heat and maintain active decomposition.” — Cornell Waste Management Institute compost guidance (2021)
Layout Strategies: Three Designs That Fit Real Backyards
Below are three layouts I use all the time. Each assumes you want a compost system and at least one primary garden bed, plus a clean way to move between them.
Scenario 1: The small urban yard (or tight rental) — “The Slim Work Zone”
Space: a 10' x 12' corner or side yard strip. Goal: keep it tidy, quiet, and low-complaint.
Layout: Place a 2' x 2' enclosed bin or tumbler at the back corner. Run a 3'-wide mulch path along the edge. Install a single raised bed 2' x 8' parallel to the path, leaving 30 inches between bed and compost for working room.
Why it works: You can manage everything from one corridor. The bed is narrow enough to reach from both sides (no stepping in soil), and the compost stays visually contained.
Scenario 2: The typical suburban backyard — “Compost + Two-Bed Loop”
Space: roughly 20' x 20' available near a hose bib. Goal: enough production for a family, with a system that matures compost continuously.
Layout: Build a DIY three-bin system along a fence line: total footprint about 6' x 3'. In front, create a U-shaped work path (wood chips) with 3 feet of clearance. Add two raised beds 4' x 8' set like open books, with a 4-foot central aisle for a wheelbarrow. Place a small tool hook board or deck box nearby—if your shovel lives across the yard, compost won’t get turned.
Why it works: The three-bin system lets you keep “fresh,” “cooking,” and “finishing” compost separate. That means cleaner harvesting and less temptation to dig into half-done material.
Scenario 3: The shady yard with a single sunny pocket — “Sun Trap Bed, Shade-Friendly Compost”
Space: scattered light, maybe only 5–6 hours of sun in one spot. Goal: locate the bed for sun, locate compost for convenience.
Layout: Put the bed in the sun pocket—even if it’s not near the fence. A 3' x 12' bed fits well along a driveway edge or patio line. Place compost in partial shade closer to the door (compost doesn’t need full sun). Connect them with a simple stepping-stone line so you can carry a bucket without trampling grass.
Why it works: You don’t sacrifice plant performance for the sake of symmetry. Compost thrives in shade as long as moisture and aeration are right; crops need the sun more.
Step-by-Step Setup: Build the Compost-and-Bed Zone
This is the sequence I’d follow on a real install. It keeps you from building the bed first and realizing later you can’t comfortably turn compost or move a wheelbarrow.
- Pick the “daily drop” route. Walk from kitchen door to the spot you’ll empty scraps. If it’s annoying, you won’t do it. Mark the compost location with a stake.
- Check sunlight. Observe or use a sun-tracking app. Put the bed where you get 6–8 hours for fruiting crops (tomatoes, peppers), or 4–6 hours for leafy greens. Compost can sit in partial shade.
- Mark clearances. Give yourself 36 inches of working space in front of bins and at least 30 inches along the bed for weeding and harvesting.
- Install the path first. Cardboard down, then 3–4 inches of wood chips or 1–2 inches of gravel. The path is your “clean zone.”
- Set up compost system. For bins, set posts or assemble pallets. For tumblers, level the base. For worm bins, put them in shade and close to a water source.
- Build the bed. A raised bed height of 10–12 inches is a practical sweet spot: enough depth for roots, easy to amend. Fill with a soil blend and top with 1–2 inches of compost when available.
- Create a “browns” station. Keep a lidded trash can of shredded leaves or straw next to the compost. This single move prevents odor and flies because you can cover food scraps immediately.
- Add water access. If the hose doesn’t reach, consider a 50-foot expandable hose or install a splitter so you can irrigate beds while moistening compost.
Plant Selection: Varieties That Pair Especially Well With Home Compost
Compost-fed beds shine when you plant crops that respond quickly to steady fertility and improved soil structure. The following are reliable performers with common home-compost inputs, and they’re easy to layout in small spaces.
For a 4' x 8' bed: “High return” warm-season lineup
Tomato: ‘Sungold’ (cherry) or ‘Celebrity’ (slicer). Both are productive and forgiving. Plant 2 tomatoes spaced 24–30 inches apart along the north side, trellised. Compost helps with moisture retention and nutrient buffering—especially potassium and micronutrients—without forcing soft, over-fertilized growth.
Pepper: ‘California Wonder’ (bell) or ‘Shishito’ (snack pepper). Space 12–18 inches apart; plan 4–6 plants in a row. Peppers like consistent fertility and warmth; compost improves early root establishment.
Basil: ‘Genovese’ or ‘Prospera’ (downy mildew resistant). Tuck basil between tomatoes and peppers at 10–12 inches spacing. Basil thrives in compost-enriched soil and makes the bed feel lush while you wait for fruiting crops to size up.
Marigold: ‘Gem’ series (small, tidy). Edge the bed at 8–10 inches spacing to attract beneficial insects and add a clear border. (Marigolds aren’t a magic pest cure, but they’re excellent design-wise: they mark the bed edge and bring pollinators in.)
For a 2' x 8' bed: cool-season “repeat harvest” plan
Lettuce: ‘Salad Bowl’ or ‘Rouge d’Hiver’. Plant in bands, thinning to 8–10 inches. Compost supports fast leaf growth and keeps soil from crusting.
Kale: ‘Lacinato’ (dinosaur kale). Space 12 inches apart; harvest outer leaves weekly. Kale tolerates a wide range of conditions and keeps producing in many climates.
Carrot: ‘Napoli’ (sweet, reliable). Sow thickly, thin to 2 inches. Use compost sparingly in the root zone—finished, screened compost is best so you don’t get forked roots from chunky material.
Perennial edges that make the layout feel intentional
Thyme: ‘English Thyme’ as a drought-tolerant edging near the path. It handles foot traffic brushes and keeps the working zone fragrant.
Chives: easy clumps that come back yearly and act as a soft border. Place one clump at each bed corner—this is a designer’s trick: corners anchor the geometry.
Compost Recipe That Stays Neighbor-Friendly (and Actually Breaks Down)
Most backyard compost problems are balance problems. Food scraps are high in nitrogen; you need “browns” (dry leaves, shredded paper, straw) to keep airflow and prevent odor. The U.S. Environmental Protection Agency notes composting as an effective strategy for diverting food waste and yard waste from landfills (EPA, 2023).
Simple, practical ratio: Add 2–3 buckets of browns for every 1 bucket of kitchen scraps. If you see flies or smell ammonia, add more browns and mix.
Moisture target: like a wrung-out sponge. Too dry = stalled pile. Too wet = smells and slow decomposition.
Turning schedule: For an active bin pile, turn every 7–14 days. If you can only turn monthly, that’s fine—just expect slower finishing times.
Budget Planning: Two Ways to Build It
You can build a handsome, hardworking compost-and-bed zone on a shoestring, or you can spend for convenience. Either can look clean and intentional if the layout is right.
Lean DIY budget (approx. $120–$250)
Raised bed: DIY 2' x 8' or 4' x 8' bed using untreated cedar or locally available rot-resistant wood. Costs vary, but expect $60–$150 depending on lumber prices.
Compost: free-standing wire ring or pallet bin: $0–$50.
Path: cardboard + bulk wood chips (often free from municipal piles or chip-drop services): $0–$40.
Convenience budget (approx. $350–$750)
Compost tumbler: $120–$300 for a quality unit that spins smoothly.
Raised bed kit: $150–$350 depending on material and height.
Soil delivery: bulk soil/compost blend delivery can run $60–$150 in many regions, depending on volume and distance.
DIY alternative that looks polished: If you hate the look of a compost bin, build a simple screen: two posts and a slatted panel, or a line of tall ornamental grasses in containers. The key is leaving airflow and access—don’t entomb your compost behind a wall you’ll resent opening.
Maintenance Expectations: What This System Asks of You
A well-placed system reduces effort, but it still needs a rhythm. Plan on 30–60 minutes per week total for compost + bed during the growing season. Some weeks it’s ten minutes; spring and peak summer ask more.
Weekly tasks (growing season)
Compost: 5 minutes to add scraps and cover with browns; 10–15 minutes to turn (if actively composting). Check moisture and add water during hot weeks.
Bed: 15–30 minutes to harvest, spot-weed, and check irrigation. Mulch reduces weeding dramatically—aim for 2–3 inches of straw or shredded leaves around established plants.
Seasonal tasks
Spring: top-dress beds with 1 inch finished compost; refresh paths with chips; restart compost with a layer of coarse browns at the bottom for airflow.
Summer: keep compost from drying out; harvest regularly; prune tomatoes for airflow if needed.
Fall: stockpile leaves (your best “brown”); plant garlic; cover beds with leaf mulch. This is when your compost operation can quietly set you up for next year.
Winter: in cold climates, decomposition slows. Keep adding browns and scraps if you can, or switch to a small worm bin indoors/garage to keep composting year-round.
Troubleshooting Through Design (Not Just Advice)
If compost smells: your system is too wet, too nitrogen-heavy, or too compacted. The design fix is a browns station right next to the bin and enough clearance to turn comfortably. Add dry leaves and mix.
If pests are a concern: use an enclosed bin or tumbler, and avoid adding meat, dairy, and oily foods. If rodents are common in your area, line the base with 1/2-inch hardware cloth before placing the bin.
If the bed dries out fast: compost helps, but layout matters too. Position beds to reduce wind exposure, and consider drip irrigation. A simple drip kit can be $30–$60 and saves time.
Three Mini Case Examples From Real Life Yards
Case 1: The renter with a patio and a landlord who hates “mess.” We used a compact tumbler placed behind a container screen, plus a 2' x 8' bed made from a kit that can be disassembled. The path was two lines of stepping stones set in mulch. Result: tidy, quiet composting; enough output to top-dress greens and herbs every few months.
Case 2: The family yard where the garden kept getting “forgotten.” The compost bins were originally at the far back fence—too far. We moved them to 20 feet from the kitchen door and built two 4' x 8' beds in a loop with a wheelbarrow aisle. Result: compost got turned because the shovel was right there; the kids helped dump leaves in fall; the beds stayed productive longer because feeding them became automatic.
Case 3: The shady yard with one bright corner. The sunny patch was oddly placed near the driveway, so the owners resisted putting a bed there. We placed a long 3' x 12' bed in that sun pocket, planted ‘Sungold’ tomatoes and ‘Prospera’ basil, and kept compost near the back door in partial shade. Result: the bed finally produced (light solved), and composting stuck because the daily route was easy.
The best backyard compost system isn’t the one that looks most impressive on day one—it’s the one that earns a permanent place in your routines. Set the compost where you’ll use it, give yourself a clean path and working clearance, and build a bed that matches the sun you actually have. By midsummer, when you’re spreading a dark, crumbly layer of finished compost around tomatoes and basil, the layout will feel less like a “project” and more like the yard finally making sense.
Sources: Cornell Waste Management Institute Composting guidance (2021); United States Environmental Protection Agency (EPA) food waste and composting resources (2023).