Backyard Garden Lighting Design Ideas
You step outside after dinner to water a pot of herbs—and the yard disappears into a flat, dark void. The path is a guess, the steps are a trip hazard, and the nicest part of your garden (that little bench under the tree) might as well be on another planet. Good backyard lighting isn’t about making everything bright. It’s about shaping what you can see, where you can safely walk, and which plants you notice first.
When I design lighting for a backyard, I start the same way I start a planting plan: with the experience. Where do you stand? Where do you move? Where do you want to pause? Once those answers are clear, the layout nearly draws itself—and the fixtures become small, strategic brushstrokes instead of a random set of solar stakes.
Start with the nighttime “walk-through”
Before buying anything, do a 10-minute site check at night. Bring a flashlight and a notepad. Stand at three places: the back door, the main seating area, and the farthest corner you ever use (shed, compost, gate). Notice where you feel unsafe, where you wish you could linger, and what you want to highlight.
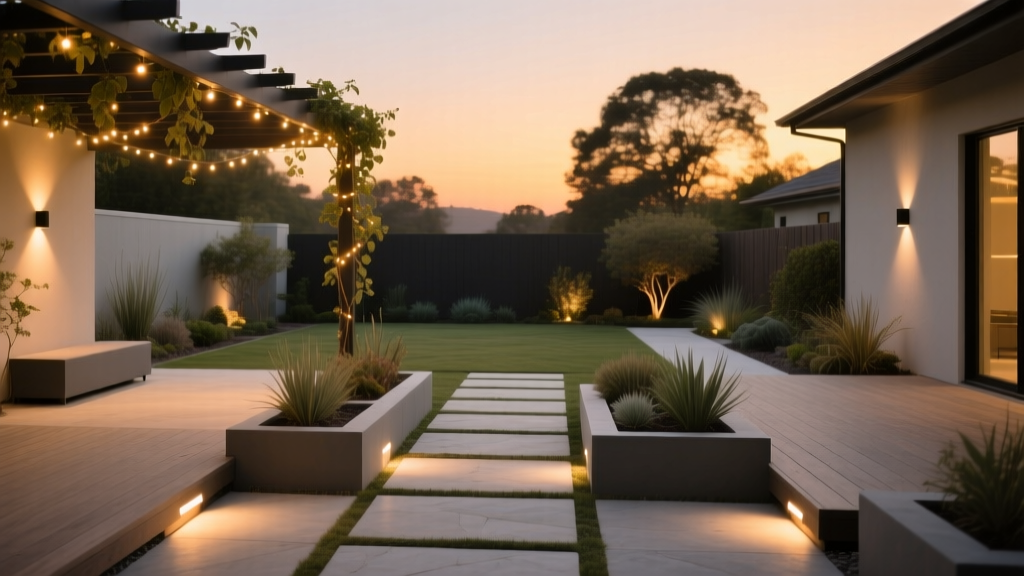
Map three lighting zones (and don’t mix their jobs)
Most backyards work best when you divide lighting into three functional layers:
- Safety + circulation: paths, steps, transitions (door to patio, patio to lawn).
- Task lighting: grill, potting bench, outdoor dining table, shed door.
- Atmosphere + focal points: trees, specimen plants, water features, art, textured walls.
Keeping these layers separate is the trick that makes a yard feel designed. Path lights that are too bright ruin the mood; string lights alone leave steps dangerous. Each zone gets its own fixture style and brightness level.
Layout strategies that make small spaces feel bigger
Lighting changes perceived depth. Use it to pull the eye outward, beyond the patio, and your yard will feel larger than it is—even if you’re working with a 12 ft x 20 ft rental patio or a narrow side yard.
Use the “dark middle” on purpose
Designers often avoid lighting every square foot. Leaving a darker strip of lawn or planting bed between the patio and the back fence can create depth—your eye jumps to the lit background. Aim to light:
- the immediate walking surface (softly), and
- a focal point at the far edge (more dramatically).
As a practical target, if your patio is 14 ft deep, try placing your far focal light 16–22 ft from the back door (often near the back fence line). That spacing gives you a foreground and a destination.
Angle fixtures like you’re painting with shadows
Up-lighting (from below) is dramatic; down-lighting (from above) is natural and comfortable. Whenever possible, use down-lighting for seating areas—especially if people will look up while talking.
“Glare is the enemy of good outdoor lighting; the source should be hidden or shielded so you see the effect, not the lamp.” — Illuminating Engineering Society (IES) guidance on controlling glare (IES, 2020)
If you’re using spotlights, keep them low and aimed across texture (bark, ornamental grasses, stone). A beam hitting a flat wall head-on often looks harsh; a grazing angle reveals character.
Light levels, color temperature, and power choices
Backyard lighting lives or dies by comfort. Too cool (bluish) and your garden looks like a parking lot. Too bright and it feels exposed.
Choose warm-white light for plants and people
For a welcoming garden, look for LEDs labeled 2700K to 3000K. That range keeps foliage looking rich rather than gray. It’s also easier on the eyes when you’re seated.
For task lighting at a grill or potting bench, 3000K is a sweet spot—clear enough to see food color, still warm enough for ambiance.
Solar vs low-voltage vs plug-in (quick comparison)
| System | Best for | Typical cost | Reliability | DIY difficulty |
|---|---|---|---|---|
| Solar stake/spot | Renters, quick accents | $10–$40 per fixture | Medium (depends on sun) | Very easy |
| Low-voltage (12V) with transformer | Paths, trees, cohesive design | $250–$800 for a starter kit + fixtures | High | Moderate |
| Plug-in string/pendant | Patios, dining areas | $25–$150 per run | High (if weather-rated) | Easy |
If you own your home and want consistent results, low-voltage is the workhorse. If you rent, plug-in and solar can still look intentional—just use fewer fixtures, placed with purpose.
Know the sunlight minimum for solar
Most solar fixtures need strong direct light to fully charge. As a rule of thumb, plan on 6–8 hours of direct sun for reliable all-evening performance. If your yard gets only 3–4 hours, solar can still work—but expect shorter run time and more seasonal variability.
Solar panels can often be separated from the lamp with an extension cord; that’s a renter-friendly hack to move the panel into the sun while the light stays in shade.
Three real-world backyard lighting layouts (with dimensions)
Let’s walk through three common yards and what I’d install first. Each one is a “minimum effective” layout you can expand later.
Scenario 1: Small rental patio (12 ft x 20 ft) with container plants
Goal: cozy dining + safe step at the door, no permanent wiring.
Layout: Run weather-rated plug-in string lights overhead in a simple rectangle. Keep them high enough to clear sightlines—typically 8–9 ft above the patio if attached to a fence post and a balcony rail or shepherd hooks.
Fixtures:
- One 24–48 ft strand of LED café lights ($30–$90)
- Two solar or rechargeable uplights for pots ($20–$60 each)
- One motion-sensor plug-in wall light at the door ($25–$70)
Plant pairing: use plants that look good in low light and catch highlights. Place the brightest foliage nearest the seating zone so it reads at night.
Scenario 2: Suburban backyard (30 ft x 50 ft) with lawn, patio, and a shade tree
Goal: guide movement and make the tree a centerpiece, without overlighting.
Layout: A low-voltage system with a transformer near an outlet (often at the house). Use:
- Path lights spaced 6–8 ft apart along the main route from patio to gate.
- Two to three uplights aimed into the tree canopy from different sides, set 18–24 inches from the trunk to avoid a “flashlight up a pole” look.
- One downlight mounted in the tree (if allowed) or from an eave to wash the seating area gently.
Estimated starting cost: $450–$1,200 depending on fixture quality and whether you add a smart timer. If you install yourself, you can keep labor near $0; a pro install often starts around several hundred dollars because trenching and cable routing takes time.
Scenario 3: Long narrow side yard (6 ft x 40 ft) that feels like a tunnel
Goal: make it feel wider and safer, reduce harsh shadows.
Layout: Skip evenly spaced path stakes (they exaggerate the corridor). Instead:
- Use wall wash: two to four low, shielded fixtures aimed to graze the fence or wall, placed about 10–12 ft apart.
- Add one step light or low bollard at any grade change.
- Finish with a brighter focal point at the far end (a planter with an uplight or a small tree lit from below).
This “light the sides, not the center” strategy visually widens tight spaces.
Step-by-step: a practical DIY setup plan
Here’s a process I use with homeowners because it prevents the most common mistake: buying fixtures first and trying to force them into the yard.
- Sketch your yard to scale. On graph paper, make 1 square = 1 ft. Mark doors, steps, and the seating area.
- Mark the walking route. Highlight the most-used path (back door → patio → gate/shed). Add lighting dots only where feet actually go.
- Pick one focal point. Choose a tree, a multi-stem shrub, a trellis, or even a sculptural pot. Put it at least 15–25 ft from the main viewing spot if you can.
- Choose your power approach. Renters: plug-in + solar. Owners: low-voltage transformer system for the backbone, then add plug-in accents.
- Mock it up at night. Use a flashlight placed on the ground to simulate uplighting and a clamp light to simulate downlighting. Move it until it feels calm.
- Install lighting in this order: steps first, then paths, then focal points, then atmosphere (string lights, lanterns).
- Add controls. Use a timer or smart plug so lights come on predictably (and so you don’t “forget” to use them).
If you want one “starter package” that works in most medium backyards: 6 path lights, 2 uplights for a tree, and 1–2 downlights for seating. That’s enough to read the space without turning it into a stadium.
Plant choices that look better after sunset (with specific varieties)
Lighting is only half the picture. Plants that catch and reflect light make a backyard glow with fewer fixtures. I like to build a “night palette” near seating and along lit paths.
Silver and variegated foliage (reflects light, reads from a distance)
- Artemisia ‘Powis Castle’ (soft silver foliage): excellent for moonlit edges; drought-tolerant once established. Space about 24–36 inches apart for a continuous drift.
- Brunnera macrophylla ‘Jack Frost’ (silver-veined leaves): brightens shade near downlights; likes part shade and even moisture.
- Euonymus fortunei ‘Emerald Gaiety’ (variegated evergreen): holds structure year-round; good for renters in containers or small beds.
Ornamental grasses (movement + shadow play)
- Pennisetum alopecuroides ‘Hameln’ (dwarf fountain grass): seedheads catch uplight beautifully; space 24–30 inches apart.
- Calamagrostis x acutiflora ‘Karl Foerster’: upright form makes a clean “screen” when backlit; space 18–24 inches apart.
White and pale blooms (pop at dusk)
- Hydrangea paniculata ‘Little Lime’: large pale blooms glow in warm LEDs; more sun = sturdier stems. Aim for 4–6 hours of sun minimum.
- Nicotiana alata (flowering tobacco): evening fragrance and light-catching flowers; wonderful near seating in summer containers.
- Gaura lindheimeri ‘Whirling Butterflies’: airy white blooms that shimmer in a breeze; great along paths.
Evergreen structure (keeps lighting design working in winter)
- Ilex crenata ‘Sky Pencil’ (upright Japanese holly): narrow accent that takes uplighting well; ideal in tight side yards.
- Buxus microphylla (boxwood): classic for low hedges; use small downlights to create gentle shadow relief.
A quick design trick: put the brightest foliage within 6–10 ft of the seating area. Farther away, use larger-leaved or more structural plants that read as silhouettes.
Wildlife-friendly and neighbor-friendly lighting
Good backyard lighting respects darkness. The goal is “just enough,” fully shielded where possible, and timed so it’s not on all night.
The International Dark-Sky Association recommends using warm color temperatures (generally 3000K or lower) and shielding to reduce glare and skyglow (International Dark-Sky Association, 2023). This matters in residential neighborhoods where light trespass becomes a quality-of-life issue.
Also consider energy use. The U.S. Department of Energy notes that LEDs use at least 75% less energy and last up to 25 times longer than incandescent lighting (U.S. Department of Energy, 2022). That’s a strong argument for LED fixtures even when you’re trying to keep costs down.
Budgeting: where to spend and where to save
If you’re prioritizing dollars, put your best fixtures where weather and visibility punish cheap hardware: along paths and steps. A $12 solar stake that fails in six months is more expensive than it looks when you replace it twice.
Three realistic budget tiers
- Under $150: plug-in café lights + 2 solar uplights + a timer. Great for renters and small patios.
- $300–$700: starter low-voltage kit + 4–8 path lights + 1–2 uplights. Best “value” tier for most homeowners.
- $800–$1,500: higher-grade brass fixtures, more focal points, smarter controls, and better beam control. This is where the yard starts to feel like a designed landscape at night.
DIY alternatives that still look intentional
- Use planters as lighting anchors. Hide a small solar spotlight behind a tall pot of ornamental grass for a cleaner look.
- Lantern clusters. Group three LED candles or rechargeable lanterns at different heights near seating—more atmospheric than one bright source.
- Reflective mulch or gravel bands. A 12-inch ribbon of pale gravel along a path edge catches light and improves navigation with fewer fixtures.
Maintenance expectations (what it really takes)
Lighting doesn’t have to be fussy, but it does need small check-ins. Plan on 15–30 minutes per week in the main outdoor season if you want things to look polished—mostly repositioning fixtures, wiping lenses, and trimming plant growth that blocks beams.
Monthly quick care
- Wipe lenses and solar panels (dust can noticeably reduce output).
- Re-aim uplights as plants grow—especially grasses and hydrangeas that flop after rain.
- Check timers and smart plugs after power outages.
Seasonal tasks
- Spring: edge around path lights so mulch doesn’t bury them; inspect wires for accidental cuts from spades.
- Summer: prune to prevent leaves from touching hot fixtures (even LEDs can warm up inside sealed housings).
- Fall: clear leaves off step lights and solar panels; adjust for earlier sunset with your timer.
- Winter: in freezing climates, ensure fixtures aren’t pushed out of alignment by frost heave; consider swapping to a shorter lighting schedule.
Troubleshooting the most common lighting problems
If your yard feels “glary”: hide the lamp source. Add shields, rotate the fixture away from eye level, or switch to downlighting from an eave or pergola. Glare is almost always an angle problem, not a brightness problem.
If your path still feels dark: aim lights across the path, not straight down the center. Two softer edges read brighter than one hot spot.
If solar lights disappoint: move panels into full sun, clean them, and reduce expectations in winter. Shorter days and lower sun angles mean less charging time.
A lighting plan you can grow over time
The best backyard lighting designs aren’t installed all at once—they’re edited. Start with the safety spine (steps and main path). Then add one focal point so your eye has a destination. After that, build atmosphere in the places you actually sit: a warm canopy of string lights, a soft downlight from above, and a few plants chosen specifically to catch the glow.
When you get it right, you’ll notice a funny change: you’ll stop thinking about the fixtures entirely. You’ll just find yourself outside more—watering, talking, reading, walking barefoot across the patio—because the yard finally feels like a space you can use after sunset.