Small Balcony Garden Layout for Maximum Yield
The first time you try to “grow food on a balcony,” it usually starts the same way: a few cute pots, a tomato plant that looks happy for two weeks, and then a messy tangle of stems fighting for light beside a chair you still want to sit in. By midsummer, you’re watering twice a day, harvesting three cherry tomatoes, and wondering how people pull off those lush balcony gardens you see online.
Let’s design this like a miniature landscape project—measured, intentional, and built for yield. The goal isn’t to cram plants everywhere. The goal is to choreograph light, airflow, root volume, and access so each square foot produces steadily, without turning your balcony into an obstacle course.
Start with the “balcony briefing”: measure, sun, wind, and weight
Before we place a single pot, we need a clear site plan. Grab a tape measure and a notepad. Most high-yield balcony failures come down to underestimating sun exposure or under-sizing containers.
Measure the usable footprint (and keep a walking lane)
Common small balcony sizes I see in apartments are around 3 ft x 8 ft (24 sq ft) or 4 ft x 10 ft (40 sq ft). If you can, protect a 18–24 inch clear walking lane so you can reach every pot without stepping around them. Access is yield: if it’s hard to water or harvest, you’ll do it less.
Track direct sun hours
For fruiting crops (tomatoes, peppers, cucumbers), aim for 6–8 hours of direct sun. Leafy greens can produce with 3–5 hours. Track sun for a weekend: check at 9am, noon, 3pm, and 6pm and note when sun hits the balcony floor and railing.
Extension guidance repeatedly lands on this range: vegetables generally need at least 6 hours of sun for best results (University of Minnesota Extension, 2020).
Respect wind and heat reflected off walls
Balconies can be wind tunnels. If your railing is open metal and you’re above the 5th floor, plan for faster drying and more stem breakage. A simple wind buffer (reed screen or outdoor fabric) can reduce stress—but keep airflow around leaves to prevent mildew.
Confirm weight limits and drainage rules
Large containers full of wet soil can get heavy quickly. If you’re renting, check your lease rules about dripping and water runoff. Use saucers, or better, self-watering containers to keep water contained. If you’re unsure about load limits, stick with multiple medium containers rather than a single massive planter.
Design principles that turn a balcony into a high-yield garden
Think of your balcony like a tiny farm bed: we’re going to layer vertically, assign “prime real estate” to the sunniest zone, and make maintenance frictionless.
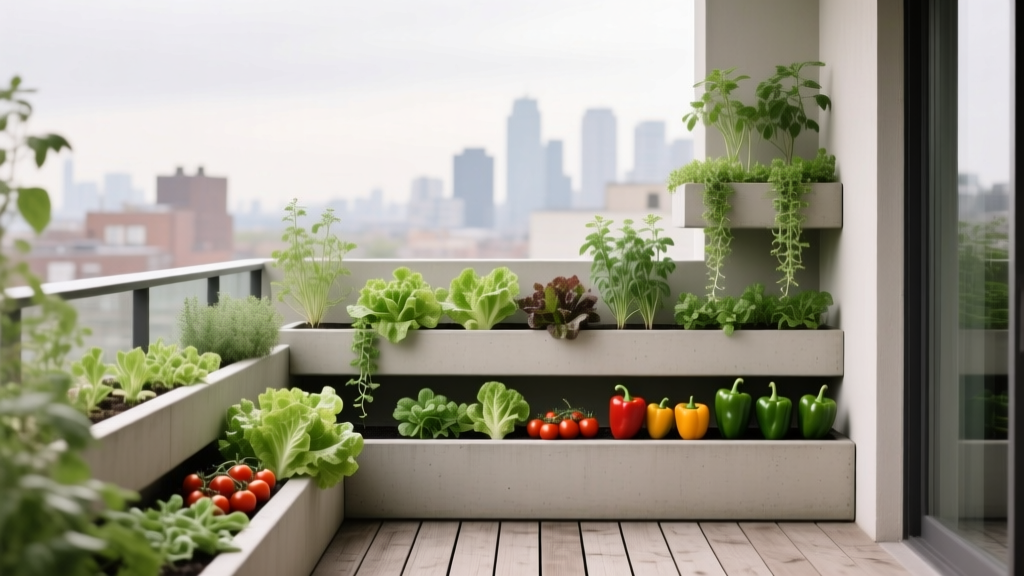
Principle 1: Put tall crops on the back line, not the front edge
Place trellised or tall plants (tomatoes, cucumbers, pole beans) against the wall side so they don’t shade everything else. The railing edge stays for low growers (greens, herbs) that still benefit from light but won’t cast shade.
Principle 2: Use root volume as a yield lever
In containers, roots are the governor on productivity. A tomato in a 3-gallon pot can live, but it won’t produce like the same plant in a 10–15 gallon container. As a practical benchmark:
- Tomatoes: 10–15 gallons per plant
- Peppers/eggplant: 5–7 gallons per plant
- Cucumbers (trellised): 5–7 gallons per plant
- Leafy greens: 6–8 inches soil depth
These container ranges align with common extension recommendations for vegetables grown in pots (University of Georgia Extension, 2013).
Principle 3: Design for “one-hand harvest”
If you can’t reach fruit clusters without moving pots, you’ll miss harvest windows and invite pests. Keep high-harvest crops (cherry tomatoes, cut-and-come-again greens) at the most accessible spots—typically near the door.
Principle 4: Stagger maturity for continuous harvest
Maximum yield isn’t only about peak season; it’s about weeks of production. Build a planting calendar that mixes:
- Fast crops (lettuce, arugula, radishes): 25–45 days
- Medium crops (bush beans, basil): 50–70 days
- Long crops (tomatoes, peppers): 70–90+ days to first harvest
Three high-yield layout strategies (pick the one that matches your balcony)
Below are three real-world layouts I use often, each tuned to a specific constraint: narrow footprints, limited sun, or renter-friendly rules.
Layout A: The “Narrow Runway” (3 ft x 8 ft balcony, 6+ sun hours)
This is the classic skinny balcony where every inch matters. We’ll create a back-line trellis zone and a front-line salad zone.
Plan:
- Back line (against wall): 2 tall containers (10–15 gallons each) with vertical trellis
- Front line (railing side): 3–4 railing planters or window boxes for greens/herbs
- Corner: 1 compact pepper in a 5–7 gallon pot
Spacing notes: keep tomato containers 18–24 inches apart for airflow and access. In railing planters, sow greens on a 4–6 inch spacing for heads, or denser for baby greens you’ll cut weekly.
Layout B: The “Bright Shade” (4 ft x 10 ft balcony, 3–5 sun hours)
If you’re getting morning sun only, stop fighting it with large fruiting crops. Go heavy on greens, herbs, and a couple of “low-light performers.”
- Two 24-inch-long trough planters (greens + scallions)
- One 7-gallon pot with a compact pepper (only if you get at least 4–5 hours)
- One vertical pocket planter for herbs (mint in its own pocket/container to prevent takeover)
Yield here comes from frequency: harvest greens twice per week, reseed every 2–3 weeks, and treat the balcony like a salad bar.
Layout C: The “Renter-Friendly, No-Drip” (any size, strict rules)
When water runoff is the issue, self-watering containers and saucer discipline make the difference.
- 2 self-watering planters (typically 10–12 gallons capacity) for tomatoes or cucumbers
- 2–3 fabric grow bags set in rigid trays (to catch seepage)
- Drip-free watering routine: water slowly, wait 5 minutes, then top off
“The most successful small-space edible gardens are designed around consistent care—easy access to water, simple trellising, and enough soil volume to buffer stress.” — Royal Horticultural Society guidance on small-space and container gardening principles (RHS, 2021)
Plant selection for maximum yield (with specific varieties that behave well in pots)
On a balcony, we want compact, disease-resistant, high-output varieties. We also want plants that won’t outgrow the trellis in a month. Below are reliable performers for containers.
Tomatoes: go compact and productive
Best balcony types: dwarf, patio, or determinate cherry tomatoes. They ripen earlier and handle container life better than sprawling beefsteaks.
- ‘Sungold’ (cherry): famously high-yield and sweet; needs a sturdy trellis and a 15-gallon pot for best production.
- ‘Bush Early Girl’: compact habit, earlier harvest; a good match for a 10-gallon container.
- ‘Tiny Tim’: very compact for tight spaces; ideal when you only have a 5-gallon pot, though total yield is smaller than larger-rooted types.
Peppers: steady producers that love containers
- ‘Lunchbox’ mini sweet peppers: compact plants with frequent harvests; great for snacking and salads.
- ‘Shishito’: fast, prolific, and forgiving; harvest young and often to keep production rolling.
- ‘Jalapeño’ (compact strains): productive with 6+ sun hours and a 5–7 gallon pot.
Cucumbers: choose trellis-friendly varieties
- ‘Diva’: tender, productive, and well-suited to vertical growth; a strong choice for containers with consistent watering.
- ‘Patio Snacker’: bred for containers; shorter vines that still climb.
Give cucumbers a vertical trellis and train them early. One plant in a 7-gallon container can outperform two cramped plants in small pots.
Leafy greens: the yield champions in limited sun
- ‘Black Seeded Simpson’ lettuce: fast and reliable for cut-and-come-again harvest.
- ‘Red Russian’ kale: tender leaves, good cool-season performance.
- Arugula (‘Astro’): quick cycles; reseed every 2 weeks for continuity.
- Swiss chard (‘Bright Lights’): long harvest window; handles heat better than many greens.
Herbs: small plants, big returns
- Basil (‘Genovese’ or ‘Prospera’): ‘Prospera’ offers downy mildew resistance—worth it on humid balconies.
- Parsley (‘Giant of Italy’): steady producer, tolerates partial sun.
- Chives: perennial in many climates; low effort, constant harvest.
- Mint: only in its own pot; it spreads aggressively.
A quick comparison: which container approach fits your balcony?
| Container Approach | Best For | Typical Cost (USD) | Watering Frequency (summer) | Yield Potential |
|---|---|---|---|---|
| Standard plastic/ceramic pots + saucers | Most balconies, flexible layouts | $8–$25 per pot (12–20") | Daily in heat waves; 3–5x/week otherwise | High if pot size is adequate |
| Fabric grow bags + trays | Renters, easy storage, strong root aeration | $4–$12 per bag (5–15 gal) + $5–$15 tray | More frequent (bags dry faster) | High, especially for tomatoes/peppers |
| Self-watering containers | No-drip rules, busy schedules | $35–$90 per unit | Refill reservoir every 3–7 days | Very high and consistent |
| Railing planters/window boxes | Greens, herbs, strawberries | $12–$40 each | 3–6x/week (shallow soil dries fast) | Medium-high (excellent for greens) |
Step-by-step: set up a maximum-yield balcony garden in a weekend
This is the exact order I use to avoid redoing work later.
- Measure and sketch your balcony. Mark door swing, railing height, and a 18–24 inch walking lane.
- Map sun. Note direct sun hours; label your sunniest 2–3 ft zone as “fruiting crop territory.”
- Choose your top 3 crops. Example: cherry tomatoes, cucumbers, and salad greens. Don’t pick 10 crops and expect each to thrive.
- Buy containers sized to the crops. Commit to at least 10 gallons for tomatoes you want to produce heavily.
- Use quality potting mix. Plan on roughly 1.5–2 cubic feet of potting mix for a 10–15 gallon container. Avoid digging up garden soil; it compacts in pots.
- Install trellises before planting. A 5–6 ft trellis anchored in the pot is far easier now than later.
- Plant and label. Keep tags—balcony microclimates vary, and you’ll want notes next season.
- Mulch the surface. A 1-inch layer of straw or fine bark helps slow evaporation.
- Set a watering system. At minimum: a dedicated watering can. Ideal: a small watering wand or a drip kit if allowed.
- Start a simple feeding routine. Containers leach nutrients; plan to feed every 7–14 days once plants are established.
Budget and DIY alternatives (so yield doesn’t require luxury planters)
You can build a productive balcony garden on a modest budget, but you can’t skip container volume and decent mix. Here are realistic cost ranges for a small, high-yield setup:
- Potting mix: $12–$20 per 2 cu ft bag; a balcony with 3 large pots may need 6–8 cu ft total ($36–$80).
- 3 large containers (10–15 gal): $30–$150 total depending on material.
- Basic trellis materials: $10–$30 (bamboo stakes + garden twine) or $25–$60 for a sturdier metal trellis.
- Seeds/starts: $3–$6 per seed packet, or $4–$8 per transplant. A practical starter plant list often runs $25–$60.
DIY swaps that still look good:
- Food-safe 5-gallon buckets (often free or under $5) can grow peppers, herbs, even compact tomatoes. Drill drainage holes and use a saucer.
- Repurpose a shelving unit as a vertical herb stand—just ensure each pot can drain into a tray.
- Make a trellis from 1x2 lumber in an “A-frame” form; it’s stable and folds flat in winter.
Three real-world balcony scenarios (and how I’d lay them out)
Scenario 1: The renter with a strict HOA and a 3 ft x 8 ft balcony
Constraint: no dripping, and the balcony must stay visually tidy.
Design: Two self-watering planters on the wall side (one ‘Bush Early Girl’ tomato in a 12-gallon reservoir planter; one ‘Diva’ cucumber in another). Along the railing: two 24-inch window boxes of lettuce + basil, kept clipped and neat. Add a slim storage bench that doubles as potting supply storage.
Why it yields: reservoir planters stabilize moisture, which keeps fruiting crops from stalling. Greens fill in the gaps with frequent harvests.
Scenario 2: The hot, windy high-rise (7th floor, 6+ sun hours)
Constraint: wind dries pots and snaps stems.
Design: Use heavier containers (or grow bags placed in sturdy trays) grouped in a cluster to reduce exposure. Install a breathable wind screen on the railing side. Choose sturdier crops: ‘Shishito’ peppers, Swiss chard, and a compact cherry tomato like ‘Sungold’ staked early with soft ties every 8–10 inches of growth.
Why it yields: reduced water stress plus consistent staking prevents growth setbacks. Chard keeps producing even when tomatoes slow during heat spikes.
Scenario 3: The part-sun balcony (only 4 hours of sun, mostly morning)
Constraint: not enough light for heavy tomatoes.
Design: Go all-in on greens and herbs. Two trough planters for lettuce/arugula succession sowings, one pot of ‘Bright Lights’ chard, one pot for parsley and chives, and a compact pepper only if the sun is strong. Add reflective help: a light-colored wall or a removable reflective panel behind plants to bounce morning light deeper into the balcony.
Why it yields: fast crop turnover. You’ll harvest bowls of greens weekly instead of waiting on a few fruits that never fully ripen.
Maintenance expectations: what it really takes to keep yield high
Balcony gardens aren’t hard, but they’re rhythmic. Miss a week in peak summer and production drops.
Weekly time: plan on 45–90 minutes per week total, split into small visits. In very hot weather, you may do 5–10 minutes daily for watering checks.
Your simple weekly routine
- Water: check moisture daily in summer; water deeply when the top 1 inch is dry.
- Feed: liquid fertilizer every 7–14 days for fruiting crops; greens can be lighter-fed but appreciate consistency.
- Train and prune: tie tomatoes and cucumbers to the trellis; remove yellowing leaves to improve airflow.
- Harvest: pick frequently. For basil, harvest tips weekly to keep it branching.
- Pest check: look under leaves for aphids/spider mites; catch them early with a strong water spray or insecticidal soap if needed.
Seasonal tasks (the quiet work that boosts next season’s yield)
- Spring: refresh potting mix (top-dress with compost), sanitize stakes and pots.
- Mid-summer: reseed greens in a shadier spot or switch to heat-tolerant greens like chard.
- Fall: plant cool-season greens again if you have 3+ sun hours; they often perform better in cooler weather.
- Winter: store trellises, dry out saucers, and plan next year’s crop rotation (don’t put tomatoes in the same potting mix repeatedly without refreshing nutrients).
Small details that quietly add a lot of yield
Go vertical early. The first two weeks of vine growth decide whether a cucumber becomes a tidy climber or a sprawling trip hazard.
Choose a consistent watering method. Irregular watering is a common contributor to blossom end rot in tomatoes; steady moisture is easier with mulch and larger pots.
Plant fewer, better-supported plants. One well-lit tomato in a 15-gallon pot can outperform two stressed tomatoes in small containers, and it will be easier to manage.
When the layout is right, you’ll feel it: you’ll step outside, water without rearranging anything, clip greens for dinner, and watch the tall crops climb neatly where you intended. That’s the moment a balcony stops being “a place with pots” and starts functioning like a designed, productive garden room—one that earns its keep in every harvest.
Citations: University of Minnesota Extension (2020); University of Georgia Extension (2013); Royal Horticultural Society (2021).