Balcony Wind-Resistant Plant Choices
The first time the wind really tests a balcony garden, it’s rarely subtle. One afternoon it’s calm; the next morning your trellis is leaning, a pot is tipped like a spilled drink, and the petunias you planted yesterday look like they spent the night in a tumble dryer. If you’re on the 6th floor or facing an open corridor, you’ve already learned the main truth of balcony gardening: wind is not a minor detail—it’s the design brief.
The good news is that you don’t have to “give up and plant nothing but succulents.” A wind-smart balcony can be lush, layered, and colorful—if you design for airflow, weight, anchoring, and plant structure from the start. Think of this as a small landscape project with constraints that actually make it more interesting.
Start With the Wind Map: Microclimates on a 40-Square-Foot Stage
Before you buy a single plant, spend two days watching your balcony like a site survey. Wind doesn’t behave evenly; it accelerates at corners, funnels through railings, and slams into the wall then rebounds. Your goal is to locate “high stress” zones and “sheltered pockets.”
Quick balcony wind assessment (10 minutes, no tools)
- Corner check: Stand in each corner for 30 seconds. Corners often feel 20–30% gustier because air wraps around the building edge.
- Railing test: If you have open slats, wind will shear through at pot level—tough on stems and flowers.
- Door zone: The area right by the door is usually calmer (and warmer in winter), a great spot for tender herbs.
If you want one concrete measurement, hang a cheap ribbon “tell-tale” on the railing and another at head height. If the lower ribbon snaps constantly but the upper one is calmer, your plants are being hit with ground-level turbulence—use denser windbreaks at the railing line, not above it.
Sun and wind work together
Wind increases water loss. In full sun—6+ hours of direct light—a breezy balcony can dry containers in a single day. If you get 3–5 hours, you still need wind-tough plants, but you can lean more on leafy textures over flowering annuals.
Design Principles That Keep Pots Upright and Plants Unshredded
Wind-resistant planting is less about “tough plants” and more about a system: stable containers, protected geometry, and plant forms that flex rather than snap.
1) Build a windbreak that slows air, not blocks it
A solid barrier can create a turbulence pocket that’s worse than no barrier. A porous screen slows wind and reduces leaf tearing.
“Windbreaks are most effective when they reduce wind speed gradually; barriers with some porosity typically avoid the strongest turbulence on the leeward side.” — University of Minnesota Extension, 2020
On a balcony, that “porosity” can be a slatted bamboo screen, lattice, or even a line of tightly grouped evergreen containers. Aim for a windbreak height that covers your plant zone: 36–48 inches tall protects most balcony containers without feeling like a wall.
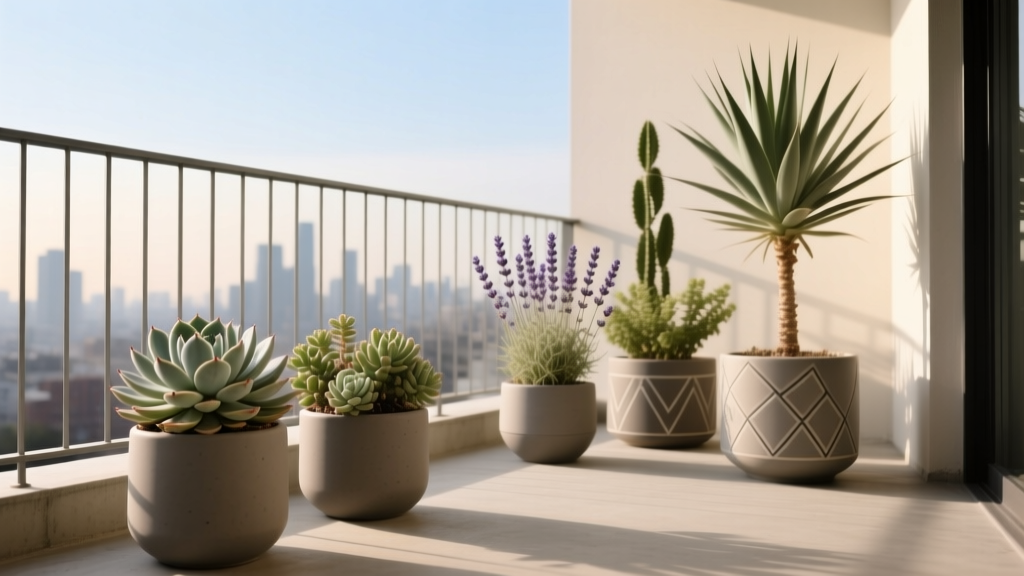
2) Choose containers with weight, width, and low center of gravity
Lightweight plastic is convenient—until it becomes a sail. For windy balconies, prioritize:
- Wider-than-tall pots (example: 16–20 inch diameter bowls)
- Heavier materials (fiberstone, terracotta, thick resin, or glazed ceramic with a broad base)
- Ballast: add 1–2 inches of gravel at the bottom only if your pot has ample drainage and you’re not overloading weight limits
Budget note: a stable 18-inch fiberstone pot often runs $45–$90, while a comparable lightweight plastic pot may be $15–$30. If you’re renting, buy fewer large anchors and fill gaps with smaller, grouped pots.
3) Group pots like a single “island” instead of scattered pieces
Wind finds edges. When you cluster containers—touching or within 2–3 inches—they brace each other and reduce exposed surface area. Leave a narrow maintenance lane of 18 inches (enough for your feet and a watering can), and pack the rest into stable groupings.
4) Keep tall elements tied, triangulated, or backed
Any plant over 30 inches needs a plan. Use:
- Wall backing (place tall pots within 4–6 inches of a wall to reduce gust leverage)
- Soft ties (stretchy garden tape to avoid stem damage)
- Tripod staking for small shrubs (three bamboo stakes, tied in a triangle)
Three Layout Strategies That Work in Real Balconies
Let’s walk through layouts I use over and over—because they protect plants and make the balcony feel designed, not improvised.
Layout A: The “Railing Windbreak + Inner Oasis” (best for very windy, sunny balconies)
Footprint: works well on a 4 ft x 10 ft balcony.
Place a porous screen or a tight row of wind-tolerant evergreens right along the railing, then layer flowering and herbs behind it. Think of it as coastal dune planting in miniature.
- Install a bamboo or lattice screen along the railing, 36–48 inches tall (zip ties or railing clamps; budget $25–$80 depending on length).
- Set 3–4 heavy “anchor” pots along the rail (each 16–20 inches wide).
- Behind anchors, cluster smaller pots in a staggered line, leaving an 18-inch walkway.
- Add one low table or plant stand in the calmest corner to lift tender herbs away from turbulent floor wind.
Layout B: The “Corner Fortress” (best for narrow balconies and wind funneling)
Many balconies act like a wind tunnel from one end to the other. In that case, I build a thick planted corner at the windward end (the side the wind hits first). This breaks speed early.
- Identify the windward end using your ribbon test.
- Place the largest pot in the windward corner (an 18–22 inch diameter pot is ideal).
- Add two medium pots directly adjacent, forming a “C” shape that catches and slows gusts.
- Plant flexible, dense foliage in those three pots; save delicate flowers for the leeward half of the balcony.
Layout C: The “Wall Garden + Low Base Layer” (best for renters with limited floor space)
If floor area is tight, go vertical—but keep the heaviest weight low. A wall-mounted trellis or railing planter should be treated as an accent, not the main mass.
- Use two floor pots as anchors (each at least 14–16 inches wide).
- Mount a trellis to the wall (not just the railing) if possible; aim for 24–30 inches wide.
- Choose one climber that tolerates wind (like star jasmine in mild climates) and tie it loosely every 8–10 inches as it grows.
- Keep railing planters small and shallow, planted with compact, trailing wind-tough species.
Wind-Resistant Plant Picks (With Specific Varieties) and Why They Hold Up
Wind tolerance comes from flexible stems, small or leathery leaves, and a growth habit that doesn’t act like a sail. Below are plants that reliably perform on breezy balconies, with notes on placement and spacing.
Compact evergreens and structural plants (your “anchors”)
- Boxwood (Buxus microphylla ‘Winter Gem’): Dense, small leaves reduce tearing; great as a living windbreak. Space one per 16–20 inch pot.
- Dwarf mugo pine (Pinus mugo ‘Mops’): Naturally compact and wind tolerant; looks intentional year-round. Give it a 20 inch pot and minimal pruning.
- New Zealand flax (Phormium ‘Bronze Baby’): Strappy leaves flex with gusts; dramatic color. Best in 6+ hours sun; one plant per 14–18 inch pot.
- Rosemary ‘Arp’: More cold-tolerant than many rosemaries and naturally adapted to coastal winds. Give 12–16 inches spacing in a trough or one per 12–14 inch pot.
Flowering plants that don’t collapse in a breeze
- Lavender (Lavandula angustifolia ‘Hidcote’): Short stems, narrow leaves; thrives in sun and wind if drainage is sharp. Space 12–18 inches.
- Geranium (Pelargonium ‘Calliope Dark Red’ or similar zonal types): Thicker stems and leaves than petunias; dependable in containers. Space 10–12 inches.
- Gaura (Oenothera lindheimeri ‘Whirling Butterflies’): It looks delicate but moves with wind rather than fighting it. Best behind a windbreak; space 12–18 inches.
- Sea thrift (Armeria maritima ‘Splendens’): Coastal classic; low mound and tidy blooms that don’t shatter. Space 8–10 inches.
Grasses and groundcovers (the unsung heroes of wind design)
- Blue fescue (Festuca glauca ‘Elijah Blue’): Compact, flexible, and drought tolerant. Space 8–12 inches; perfect for trough edges.
- Sedge (Carex oshimensis ‘Evergold’): Handles part sun and wind; great for bright shade balconies. Space 10–12 inches.
- Creeping thyme (Thymus serpyllum ‘Elfin’): Low profile reduces wind stress; fragrant and pollinator-friendly. Space 6–8 inches.
Small shrubs that behave in containers
- Potentilla (Potentilla fruticosa ‘Goldfinger’): Wind-tough, long bloom season, compact. Needs sun; one per 18-inch pot.
- Japanese euonymus (Euonymus japonicus ‘Microphyllus’): Small leaves, tolerates pruning into a dense form—excellent for a living screen. One per 16–20 inch pot.
Comparison Table: Wind-Resistant Balcony Plants at a Glance
| Plant | Best Sun | Wind Strength | Container Size | Why It Works |
|---|---|---|---|---|
| Lavender ‘Hidcote’ | 6–8 hrs | High | 12–16 in pot | Narrow leaves, woody stems, drought tolerant |
| Rosemary ‘Arp’ | 6+ hrs | High | 12–14 in pot | Coastal heritage; sturdy stems |
| Blue fescue ‘Elijah Blue’ | 4–8 hrs | High | 8–12 in pot | Flexible blades; compact mound |
| Carex ‘Evergold’ | 3–6 hrs | Medium-High | 10–14 in pot | Arching foliage; tolerates part shade |
| Sea thrift (Armeria maritima) | 6+ hrs | High | 10–12 in pot | Coastal native habit; low and tight |
Three Real-World Balcony Scenarios (and the Planting Plan for Each)
Here are three setups I’ve designed variations of—because your wind exposure, light, and landlord rules shape everything.
Scenario 1: High-rise, full sun, constant gusts (the “flag test” balcony)
Conditions: 10th floor, south-facing, 7–8 hours sun, gusty afternoons.
Goal: A green screen plus steady bloom without daily replanting.
- Windbreak row: 3 boxwoods (‘Winter Gem’) in 18-inch pots, set tight to the railing.
- Behind them: Lavender ‘Hidcote’ + blue fescue in alternating pots (lavender spaced 14 inches apart if in a trough).
- Accent color: Pelargoniums in the calmest pocket near the door.
Costs: Expect $250–$450 for three large pots, soil, and starters if you buy mid-size shrubs; you can cut that by using smaller liners and growing in over a season.
Scenario 2: Narrow rental balcony with wind tunnel effect and part sun
Conditions: 3 ft x 12 ft, wind funnels from the building corridor; 4–5 hours sun.
Goal: Keep a walkable lane and still have a “garden feel.”
- Corner fortress: One dwarf mugo pine ‘Mops’ in a 20-inch pot at the windward end, flanked by two Carex ‘Evergold’ in 12–14 inch pots.
- Mid zone: Trough planter (24 inches long) with creeping thyme and sea thrift, spaced 8 inches apart.
- Leeward zone: One pot of gaura (tied loosely to a short stake early on) for movement and bloom.
DIY alternative: Instead of a purchased screen, attach a 6 ft length of reed fencing to the railing with UV-resistant zip ties ($15–$35).
Scenario 3: Coastal balcony with salt air and bright light
Conditions: Strong onshore wind, salt spray, intense sun reflected off water; often 6+ hours sun.
Goal: Plants that don’t brown at the edges or snap mid-season.
- Structural plants: Rosemary ‘Arp’ and New Zealand flax ‘Bronze Baby’ (both tolerate wind; rosemary is especially at home in coastal conditions).
- Low fillers: Sea thrift and blue fescue—both naturally wind-adapted.
- Container approach: Use heavier pots and rinse foliage with fresh water every 1–2 weeks to reduce salt buildup.
Step-by-Step: Setting Up a Wind-Resistant Balcony Planting (Designer Workflow)
- Measure the usable zone. Don’t count the door swing. A common working area is about 40 sq ft on a small balcony.
- Choose 2–4 anchor containers first. These are your heavy, stable “furniture” pieces; place them before anything else.
- Add a porous windbreak. Screen, lattice, or a tight evergreen row at 36–48 inches tall.
- Plan plant spacing realistically. Most balcony crowding fails by mid-summer. Use 10–12 inches between medium perennials; 6–8 inches for tight groundcovers.
- Use a soil mix that resists drying. Add moisture-retentive components (like coir) but keep drainage strong; wind and soggy roots are a bad combination.
- Stake early, not late. A plant tied from week one grows with support; a plant staked after it leans often snaps.
- Finish with a top-dress. A 1-inch layer of gravel or fine bark reduces evaporation and keeps soil from blowing out.
Maintenance Expectations: How Much Time This Actually Takes
A wind-ready balcony garden is surprisingly manageable once the structure is in place.
- Weekly time: plan on 30–45 minutes per week in mild weather; 60 minutes during hot, windy weeks because watering becomes the main job.
- Watering: In summer, many windy balconies need water 4–6 days per week, especially in 12-inch pots. Larger 18–20 inch containers may hold moisture for an extra day or two.
- Deadheading: Pelargoniums and gaura look best with 10 minutes of cleanup weekly.
- Seasonal tasks:
- Spring: slow-release fertilizer application and re-tying to stakes.
- Mid-summer: shear lavender lightly after bloom (don’t cut into old wood).
- Fall: tighten screens and check pot stability before storm season; refresh mulch/top-dress.
- Winter: group pots together near the wall; reduce watering but don’t let evergreens dry out completely.
Budget Planning and Smart DIY Swaps
You can build a wind-resistant balcony garden on a range of budgets—what matters is investing in stability first.
- Priority spend #1: stable containers. If you buy only two expensive items, make them the anchor pots. You can keep initial plant costs low by starting with smaller sizes.
- Priority spend #2: windbreak material. A purpose-built balcony screen is tidy; reed or bamboo fencing is the cost-effective choice.
- DIY ballast trick (renter-friendly): Place a heavy paver (12 in x 12 in) in the bottom of a large pot only if drainage remains open; alternatively, hide a sandbag in a decorative cachepot to add weight without blocking drainage.
- Cut plant costs: Use “plug” sizes for thyme, fescue, and sea thrift. They fill in fast and cost less than gallon pots.
Two Practical Notes Backed by Research
First, wind increases plant water demand by accelerating transpiration and soil drying. The Royal Horticultural Society notes that wind “increases moisture loss from the leaves and the soil,” which is why wind-exposed gardens need more frequent watering and shelter (RHS, 2023).
Second, container plants are vulnerable because their roots can’t chase moisture deeper. Wind protection that slows airflow at pot level does more than protect stems—it stabilizes moisture and temperature around the root zone (University of Minnesota Extension, 2020).
If you design the balcony like a small, layered landscape—with anchors, a porous windbreak, and plants chosen for flexible structure—the garden stops fighting the site and starts using it. You’ll still hear the gusts, but you won’t wake up to toppled pots. Instead, you’ll step outside to a planted space that feels calm, intentional, and surprisingly generous for a strip of concrete in the sky.