Deck Gardening: Making the Most of Your Space
The sliding door sticks for half a second, then gives way—warm air, a square of sun, and a deck that feels smaller every year. There’s the grill that can’t move, two chairs that always catch a toe, and a railing that looks out at… possibility. You want green, fragrance, maybe tomatoes you can pick with coffee in hand. But you also want to walk through the space without doing a sideways shuffle. Deck gardening works when you treat the deck like a room: you plan circulation, you place “furniture” (containers), and you make sunlight and weight your design constraints.
I’m going to walk you through a deck layout the way I would with a client—starting with what your deck needs to do, then shaping plant choices around light, wind, and how much time you truly want to spend each week. Along the way, you’ll see three real-world scenarios and a few cost-conscious swaps that keep things renter-friendly.
Start with a quick site check: the three constraints that decide everything
1) Sunlight hours (measure before you buy)
For one day, note when the deck first gets direct sun and when it loses it. Most fruiting plants need 6–8 hours of direct sun to perform well; leafy greens can produce with 3–5 hours. If your deck is bright but shaded (lots of sky light, little direct sun), treat it as part shade.
If you’re estimating, remember that buildings and railings cast longer shadows in spring and fall. A pot of basil that thrives in July can stall in September if the sun window shrinks.
2) Wind and heat reflection
Decks are windy. Upper-floor decks especially create a “wind tunnel” effect that can dry containers in hours. South- or west-facing decks with glass and siding reflection can run hotter than your yard. A simple windbreak—like a trellis panel or tall planter on the windward side—often improves plant performance more than fertilizer does.
3) Load and water management
Before you set down six large pots, check building rules and use common sense. Water-saturated containers get heavy fast. A typical 20-inch diameter container can weigh 40–70 lb when wet depending on material and soil mix. If you rent or have an older deck, spread weight with pot feet or a low plant stand and avoid clustering all heavy pots in one corner.
Also plan for drainage: saucers protect deck boards, but standing water invites mosquitoes and root rot. Use pot risers and empty saucers after watering, or use self-watering containers where overflow is managed.
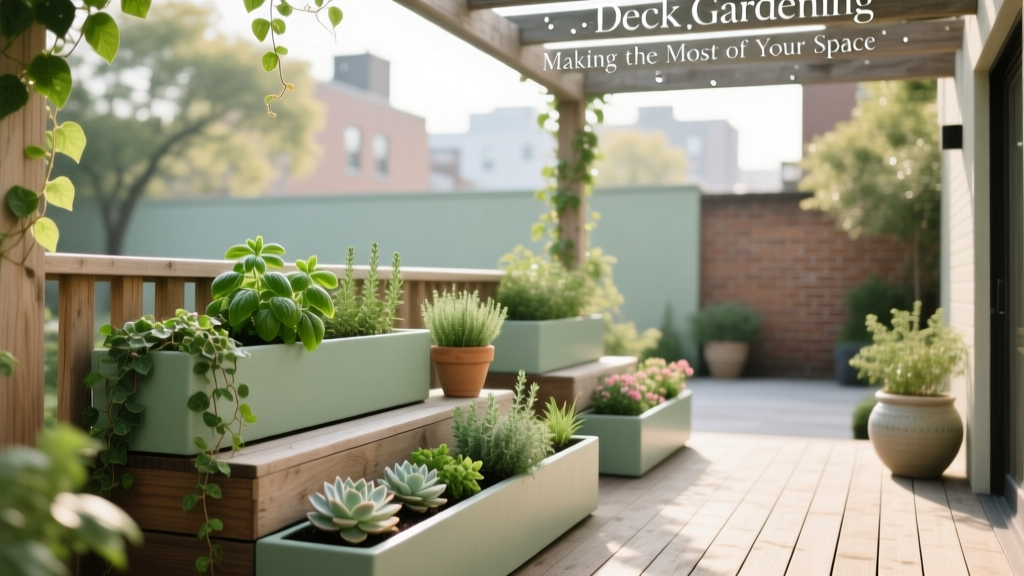
Layout strategies: design your deck like an outdoor room
Map circulation first (yes, even on a tiny deck)
Circulation is what makes a deck feel calm instead of crowded. As a rule, aim for a clear walking path of 30–36 inches from door to seating. If space is tight, 24 inches can work, but you’ll feel it when carrying a tray.
Here’s the designer trick: place containers where furniture would go—corners, edges, and as “walls”—and keep the center or a single corridor open.
Use the “three heights” rule for instant structure
Deck gardens look intentional when you mix three height zones:
- Low (6–12 inches): trailing plants at the edge, shallow bowls of herbs.
- Mid (18–30 inches): most flowering annuals and compact edibles.
- Tall (4–6 feet): trellised vines, dwarf citrus, columnar shrubs in big pots.
This makes the space feel layered without eating up floor area.
Think in “modules,” not scattered pots
Instead of 12 random containers, build 2–3 modules: each module is a cluster of 2–5 containers that reads as one unit (like a planted vignette). Modules reduce visual clutter and make maintenance easier—water and prune in zones.
A solid starter module for a sunny deck: one tall trellis pot (vertical), one mid-size flowering pot (color), one low trough of herbs (harvest).
Vertical gardening that actually works on a deck
Vertical is your square-foot multiplier, but it has to be stable in wind and safe for renters. Skip flimsy leaning ladders unless they’re anchored. Better options:
- Freestanding trellis in a heavy pot (staked into the container and tied to the railing with soft ties).
- Railing planters sized to fit your rail width (check building rules for overhang).
- Wire grid panel mounted to two weighted planters (no drilling required).
“In small spaces, plants are your walls and ceiling. Vertical structure creates privacy and microclimate, which is as valuable as square footage.” — Dr. David Hemenway, Harvard T.H. Chan School of Public Health, discussing gardening benefits and engagement (2004)
Container choices and spacing: what fits, what thrives, what you’ll water constantly
Pick container sizes based on root needs (not what looks cute)
If you want less daily watering and better yields, size up. These are practical minimums:
- Tomatoes: 10–15 gallons per plant; stake or cage immediately.
- Peppers: 5 gallons per plant.
- Herbs (basil, parsley): 1–3 gallons each; combine compatible herbs in a 24-inch trough.
- Strawberries: 8–10 inches deep; great in railing planters.
- Dwarf citrus/fig: 15–25 gallons (and a plan to overwinter).
Soil and drainage: a lightweight mix is not optional
Use a potting mix designed for containers—never garden soil. For planters that dry quickly, blend in water-holding amendments like coconut coir. The U.S. Environmental Protection Agency notes that containerized plants generally need more frequent watering than in-ground plantings due to limited soil volume (EPA WaterSense, 2023). This is the reality of deck gardening—design around it.
A quick cost reality check (and where to save)
Deck gardens can be built on a tight budget or outfitted like an outdoor showroom. Here are typical costs you can plan around:
- Quality 12–14 inch plastic pot: about $8–$18
- 20–24 inch resin or ceramic-look pot: about $35–$90
- Bagged potting mix (2 cu ft): about $10–$18
- Self-watering container: about $25–$60
- Simple drip kit for containers: about $30–$70
DIY savings: use food-safe 5-gallon buckets with drilled drainage holes (and a saucer) for peppers or dwarf tomatoes; wrap them in reed fencing or place them in a basket sleeve to upgrade the look.
Plant selection: deck-ready varieties that earn their keep
Sunny decks (6–8+ hours): go for flavor, fragrance, and vertical yield
Tomato (compact): ‘Patio Choice Yellow’ or ‘Tumbling Tom’ work in containers and don’t demand a raised bed. Give each plant 18–24 inches of breathing room and a sturdy cage.
Pepper: ‘Lunchbox’ (sweet) stays compact and is dependable in pots. Space 12–18 inches apart in separate containers for easiest watering.
Herbs: ‘Genovese’ basil for big leaves, ‘Munstead’ lavender for fragrance and pollinators, and ‘French tarragon’ if you want a perennial herb that feels chef-level. Keep mint in its own pot—always.
Flowers that handle heat: ‘Supertunia Vista’ petunias (vigorous spillers), lantana for sun and drought tolerance, and geraniums (Pelargonium) for reliable bloom on hot decks.
Part-sun decks (3–5 hours): focus on greens and bright shade-tolerant color
Leafy greens: ‘Bright Lights’ Swiss chard is both edible and ornamental; ‘Red Sails’ lettuce keeps color in lower light. Sow every 2–3 weeks for steady harvest.
Herbs: parsley, chives, cilantro (best in spring/fall), and lemon balm (in its own container; it spreads).
Color: begonias and impatiens are reliable in bright shade; add coleus for foliage drama without demanding sun.
Windy or exposed decks: choose tougher stems and smaller leaves
Wind shreds tender foliage and snaps top-heavy growth. Look for plants with flexible stems and compact habits:
- Rosemary (‘Arp’): sturdier and more cold-tolerant than many types.
- Thyme (‘Creeping’): low profile, fragrant, and windproof.
- Ornamental grasses (compact): add movement without breaking.
Comparison table: container strategies that match your lifestyle
| Approach | Best for | Typical footprint | Watering frequency (summer) | Estimated cost (starter setup) |
|---|---|---|---|---|
| Standard pots + saucers | Flexible layouts, renters, easy swaps | 3 pots ≈ 2 ft x 5 ft module | Every 1–2 days in heat | $60–$180 |
| Self-watering containers | Busy schedules, travel, hot decks | Similar to standard; slightly bulkier | Every 3–7 days | $90–$240 |
| Railing planters + one tall pot | Very small decks, want open floor | Minimal floor; uses railing length | Daily (small soil volume) | $50–$160 |
| Container drip irrigation (timer) | Frequent travel, consistent growth | Any layout; needs hose hookup | Timer-controlled | $70–$200 |
Three real-world deck scenarios (and exactly how I’d lay them out)
Scenario 1: The renter’s 6 ft x 10 ft apartment deck (morning sun, no drilling allowed)
Constraint: You need a layout that’s reversible and won’t damage railings or boards. You also need clear access to the door and any utility closet.
Design move: Create one lush “green corner” and keep the rest open. Place a tall trellis pot in the back corner (furthest from the door), then step down in height toward the seating area.
Recommended layout:
- Back corner: 1 x 15-gallon pot with a trellis and ‘Tumbling Tom’ tomato (or clematis if you prefer ornamental).
- Along the railing: 2–3 railing planters with strawberries (‘Seascape’) and trailing nasturtiums.
- Near the door (sun edge): a 24-inch herb trough with basil, chives, and parsley.
Why it works: You keep a 30-inch path clear, you get vertical yield, and everything can move with you. Watering is manageable because only one container is large and thirsty.
Scenario 2: The family deck that must still host dinner (12 ft x 14 ft, full sun, grill stays)
Constraint: This deck has to function like a patio first. Plants can’t block traffic to the grill, and you don’t want soil spilled where kids run.
Design move: Build two “planter banquettes” to frame the dining zone—green without clutter. Use matching containers for visual calm.
Recommended layout:
- Two long sides of the deck: 4–6 identical mid-size pots (think 16–18 inch diameter), spaced 18–24 inches apart.
- One tall anchor pot near the stair/entry corner: dwarf citrus (if overwintering is possible) or a columnar evergreen in a 20–24 inch container.
- A narrow cart or shelf near the door for herbs—easy to snip while cooking.
Planting recipe: In the identical pots, repeat a simple combo: ‘Munstead’ lavender (thriller), ‘Supertunia Vista’ (spiller), and a compact salvia (pollinator draw). Reserve two of the pots for edibles: one ‘Lunchbox’ pepper and one basil.
Why it works: Repetition reads tidy, and the deck stays usable. Edibles are “sprinkled in” rather than taking over.
Scenario 3: The shaded townhouse deck (8 ft x 12 ft, 2–4 hours of sun, bright ambient light)
Constraint: Fruiting crops will frustrate you. If you chase tomatoes here, you’ll end up with gorgeous vines and few fruits.
Design move: Treat it like a foliage lounge with edible accents. Use big-leaf texture and consistent container style to make shade feel intentional, not like a compromise.
Plant list that performs:
- ‘Bright Lights’ chard (edible, colorful stems)
- Leaf lettuce mixes (succession sowing every 2–3 weeks)
- Coleus varieties for bold foliage
- Begonias for season-long bloom
- Ferns (if sheltered from wind) for softness
Why it works: You get a full, layered look without fighting the light. Harvest comes from greens and herbs, which are genuinely happy in part shade.
Step-by-step: set up a deck garden that looks designed (not accidental)
- Sketch your deck to scale. Mark door swing, grill zone, and a clear path of 30–36 inches.
- Mark sun zones. Note where you get 6+ hours vs. 3–5 hours. Place edibles in the sunniest pocket.
- Choose a container style “family.” Pick 1–2 colors/materials max. Mixing sizes is fine; mixing five styles looks cluttered fast.
- Build 2–3 modules. Each module should include one tall element (trellis or shrub), one mid element (flowering/edible), and one low/trailing element.
- Stage before you fill. Place empty pots first. Walk the path, sit in the chair, open the grill lid. Adjust until it feels easy.
- Add drainage protection. Use saucers, pot feet, or a waterproof mat under clusters. Avoid constant standing water.
- Plant with spacing in mind. Give tomatoes 18–24 inches; don’t cram six basil plants into one pot unless you want mildew.
- Mulch container tops lightly. A 1-inch layer of fine bark or coconut husk chips slows evaporation.
- Set a watering plan. Hand-watering is fine—until it isn’t. If you travel, consider a self-watering container or a $30–$70 drip kit.
Maintenance expectations: what it really takes (and how to make it easier)
For a typical deck garden of 8–12 containers, plan on 30–60 minutes per week for basic care, plus quick watering checks in hot weather. In peak summer, watering can take 5–10 minutes daily if you’re hand-watering smaller pots.
Weekly routine (growing season)
- Water checks: push a finger 2 inches into the mix; water when dry at that depth.
- Deadheading: 10 minutes keeps petunias, geraniums, and many annuals blooming.
- Feeding: container plants often need regular nutrition; a liquid feed every 7–14 days is common for heavy feeders like tomatoes.
- Pest scan: check undersides of leaves for aphids and spider mites—especially on windy, hot decks.
Seasonal tasks (the “don’t skip this” list)
- Spring: refresh potting mix in top 2–3 inches of perennial containers; clean saucers; check trellis ties.
- Mid-summer: prune leggy annuals back by 1/3 to restart bloom; top up mulch.
- Fall: pull spent annuals, sanitize stakes/cages, and decide what overwinters indoors.
- Winter (cold climates): move tender plants inside; cluster hardy pots against the house wall for protection.
Budget-smart design: where to spend and where to improvise
If you only splurge in one place, make it on large containers or a watering system. Bigger soil volume buffers heat and missed waterings—your plants look better with less effort.
Spend here: one or two statement pots (they anchor the design), a sturdy trellis, and a quality potting mix.
Save here: DIY bucket planters, secondhand containers (just ensure drainage), and propagating herbs from cuttings (rosemary, mint, oregano can be started this way).
If you’re renting, keep everything reversible: use soft ties on railings, freestanding screens, and avoid anything that requires drilling. A cohesive look comes from repetition and placement, not permanence.
A deck garden is at its best when it supports your life—coffee, dinner, a soft boundary of leaves—and doesn’t punish you when you miss a day. Keep your path clear, build in vertical structure, choose plants that match your light, and let containers do the heavy lifting. Step outside in a week and you’ll feel it: the deck hasn’t gotten bigger, but it will start to live larger.
Citations: Environmental Protection Agency (EPA) WaterSense, “Watering Can Be Water-Efficient,” 2023. Hemenway, D., Harvard T.H. Chan School of Public Health discussion of gardening engagement and health context, 2004.