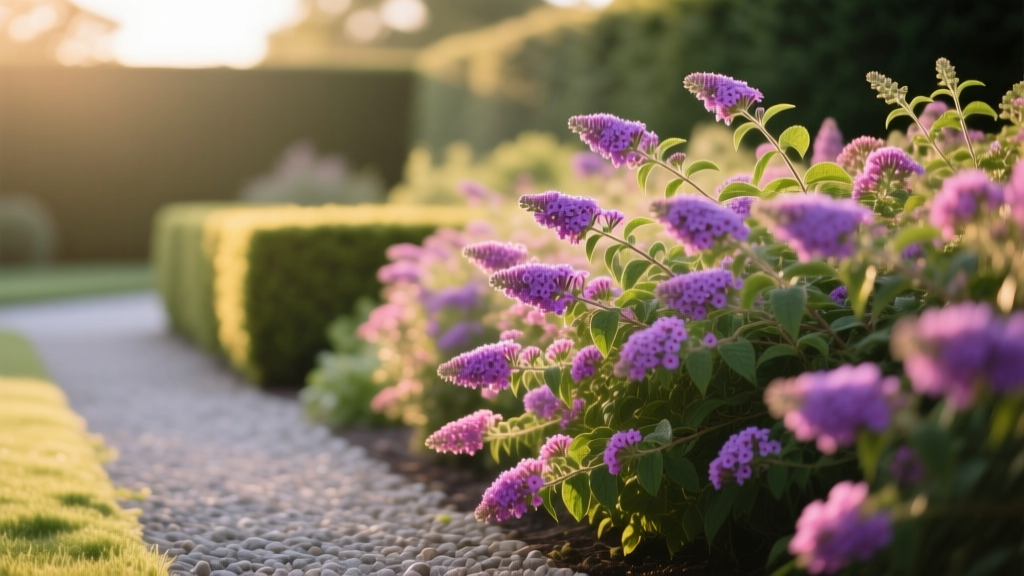
Front Year Butterfly Bush Border
The front walk is fine—until mid-summer, when the view from the street turns flat. The foundation shrubs sit like green furniture, the mulch looks tired, and there’s that hot strip by the driveway where nothing thrives. You want color and movement, but you also want it tidy enough for curb appeal and practical enough that you’re not deadheading every evening. This is where a butterfly bush border earns its keep: it reads as intentional from the sidewalk, blooms for months, and brings butterflies close enough to watch while you pick up the mail.
This design is written as a buildable project, the way I’d walk a client through it: choose a border footprint, anchor it with butterfly bush in the right size, layer supporting plants for a long season, then keep it looking crisp with simple maintenance rhythms.
Start with the problem you can see from the curb
Front-yard borders have two jobs that backyard beds don’t. First, they must look good from a distance (the “drive-by view”). Second, they must behave: not flopping into the sidewalk, not swallowing windows, not becoming a mosquito jungle. Butterfly bush (Buddleja) is a strong middle layer for these demands—if you pick the right cultivar and give it a layout that controls its enthusiasm.
Before you buy plants, stand at the street and identify your “viewing triangle.” Most people see your front border from about 25–40 ft away, and from a lower angle than you realize. Plants with upright structure and repeated forms read clearly at that distance; fussy little annuals do not.
Design principles that make a butterfly bush border look intentional
1) Right-size the butterfly bush (so it doesn’t eat the house)
Classic Buddleja davidii can reach 6–10 ft tall and wide in warm climates—too big for many front yards. Newer cultivars stay compact while keeping the flower power. Treat butterfly bush like a “featured shrub,” not a filler.
As a rule of thumb, keep the mature height below the bottom of your front windows. If the sill is 42–48 inches off the ground, choose cultivars that mature around 3–5 ft and plan for annual spring pruning.
2) Use a layered border: tall-to-short, back-to-front
A clean front-yard border reads best with three layers:
- Back layer (structure): 3–5 ft shrubs/perennials that hold the line near the house or fence.
- Mid layer (feature): butterfly bush and repeat companions at 24–48 inches tall.
- Front edge (neatness): low, mounding plants 6–18 inches tall that keep mulch from showing and prevent “leggy shrub syndrome.”
This layering also keeps butterflies in view without turning the whole bed into a shaggy thicket.
3) Repetition beats collection
One butterfly bush surrounded by twenty different plants can look like a yard sale. Repeat forms instead: three of the same grass, five of the same edging perennial, and a limited palette of flower colors. In front yards, repetition is what reads as “designed.”
4) Design for bloom sequence, not one moment
Butterfly bush typically blooms summer into fall, but your border should have spring and early summer interest too. Aim for at least three peak moments: spring bulbs or early perennials, summer butterfly bush + companions, and fall seed heads or late flowers.
5) Keep the border readable with clear dimensions
Most front-yard borders fail because they’re too narrow. You need enough depth to layer without crowding. Here are workable targets:
- Minimum border depth: 4 ft (tight but doable)
- Comfortable border depth: 6–8 ft (ideal for layering)
- Planting setback from sidewalk: 12–18 inches for anything that will spill (catmint, coneflower)
For sunlight, butterfly bush performs best with 6+ hours of direct sun. If your front yard gets only 4–5 hours, you can still do the design—just lean harder on part-sun companions and pick the sunniest micro-spot for the butterfly bush.
Layout strategies: three front-yard templates you can copy
Template A: The classic foundation border (6 ft deep x 20 ft long)
This is the “most people” layout: a straight or gently curved bed along the front of the house. At 6 ft x 20 ft you have 120 sq ft—enough room to layer properly.
Spacing strategy: Place butterfly bushes 4–5 ft apart center-to-center for compact varieties, and keep them 24–30 inches off the foundation to allow airflow and pruning access.
Template B: The driveway-hot-strip border (4 ft deep x 16 ft long)
If your “problem zone” is heat and reflected glare, use butterfly bush as the resilient anchor and choose companions that don’t sulk in dry soil. Keep the plant palette tight so it doesn’t look like survival gardening.
Mulch note: In heat strips, mulch matters. A 2–3 inch layer helps even out moisture and soil temperature.
Template C: The renter-friendly modular border (containers + a narrow bed)
If you’re renting or you’re not ready to commit to digging up turf, build the border with a narrow in-ground strip (or existing bed) plus containers that can move with you. Use a compact, sterile butterfly bush cultivar in a large pot and repeat smaller pots along the edge.
Container sizing: Plan on a 20–24 inch diameter pot for a compact butterfly bush, with consistent watering.
Step-by-step setup (DIY, designer-style)
- Mark the bedline. Use a hose to sketch a gentle curve; step back to the street and adjust until it looks smooth. Avoid tight wiggles.
- Measure and calculate plants. For a 20 ft run, with butterfly bushes 5 ft apart, you’ll use 3–4 butterfly bushes depending on end spacing.
- Remove turf or weeds. For DIY, a sharp spade and patience works. For speed, rent a sod cutter for about $90–$120/day (varies by region).
- Improve the soil only where needed. Butterfly bush tolerates average soil; avoid over-fertilizing. If your soil is heavy clay, mix in 2–3 inches of compost across the bed and avoid creating a “bathtub” planting hole.
- Place plants in pots on the soil first. Set the butterfly bushes, then the mid-layer repeats, then the edging. Walk to the curb and check spacing.
- Plant and water in. Water each plant deeply after planting; for the first 2–3 weeks, water 2–3 times per week if rainfall is light.
- Mulch and edge. Install a crisp edge (spade-cut or metal edging). Apply 2–3 inches of mulch, keeping it off plant crowns.
- Add a simple irrigation option. A soaker hose or drip line saves the design in year one; expect $25–$60 for a basic DIY setup for a 20 ft bed.
Plant selection: butterfly bush varieties and the supporting cast
The goal is a border that reads neat, feeds pollinators, and fits a front yard without constant policing. Two key notes:
- Choose sterile or low-seed cultivars where possible to reduce unwanted spread.
- Match the mature size to your space so you’re pruning for shape, not fighting a monster.
Butterfly bush picks (with size and best use)
| Variety | Mature size (approx.) | Flower color | Best front-yard use | Notes |
|---|---|---|---|---|
| Buddleja ‘Pugster Amethyst’ | ~2 ft tall x 2–3 ft wide | Purple | Small borders, driveway strips | Chunky blooms on compact plant; easy to repeat. |
| Buddleja ‘Pugster White’ | ~2 ft x 2–3 ft | White | Modern, clean palettes | Brightens hot spots and reads well from the street. |
| Buddleja ‘Miss Ruby’ | ~4–5 ft x 4–5 ft | Deep pink | Anchoring larger foundation beds | More presence; give it room and prune annually. |
| Buddleja ‘Blue Chip’ | ~2–3 ft x 2–3 ft | Blue-purple | Low-maintenance borders | Compact habit; works nicely with grasses. |
Companion plants that keep the border polished
These are chosen for structure, long bloom, and a “tidy from the sidewalk” habit. Spacing assumes typical garden conditions; in rich soil, give a little extra room.
- Catmint (Nepeta x faassenii ‘Walker’s Low’): Soft lavender haze, mounding habit; plant 18–24 inches apart along the front/mid edge. Great at knitting the design together.
- Purple coneflower (Echinacea ‘PowWow Wild Berry’ or ‘Magnus’): Upright, long bloom, sturdy stems; space 18 inches apart. Seed heads feed birds later.
- Black-eyed Susan (Rudbeckia fulgida ‘Goldsturm’): Reliable summer color; space 18–24 inches apart. Strong curb appeal.
- Feather reed grass (Calamagrostis x acutiflora ‘Karl Foerster’): Vertical punctuation; plant 24–30 inches apart. Looks intentional even in winter.
- Salvia (Salvia nemorosa ‘Caradonna’): Dark stems, upright purple spikes; space 12–18 inches apart. Great contrast with butterfly bush blooms.
- Edging evergreen option (Lavandula angustifolia ‘Hidcote’ in suitable climates): Crisp, fragrant edging; space 18 inches apart. Needs sun and drainage.
Why these work: Butterfly bush brings height and continuous bloom; salvias and catmint create repeated purple/blue notes that feel cohesive; coneflower and rudbeckia add warm color blocks; grasses provide structure when flowers pause.
A note on invasiveness and responsible planting
Some butterfly bush species (especially Buddleja davidii) can be invasive in parts of North America. Many universities and extension resources recommend checking local status and choosing sterile cultivars where possible. North Carolina State Extension lists butterfly bush (Buddleja davidii) as invasive in many southeastern settings (NCSU Extension, 2023). The USDA’s National Invasive Species Information Center provides guidance and links to state resources for invasive plants (USDA NISIC, 2024). If your area restricts it, substitute with summersweet (Clethra alnifolia), buttonbush (Cephalanthus occidentalis), or native pollinator shrubs suited to your region.
“Choose plants that match the site conditions and won’t create problems beyond the garden—right plant, right place is the foundation of sustainable design.” — Principles echoed in extension-led horticulture guidance (NCSU Extension, 2023)
Three real-world scenarios (and how I’d adjust the design)
Scenario 1: Small front yard, short setback, HOA expectations
Space: 4 ft deep x 12 ft long border near a walkway; you need it neat and not too tall. Use 2 compact butterfly bushes (like ‘Pugster Amethyst’) spaced about 4 ft apart, then stitch the front with catmint and salvia. Add one grass as a “corner marker” near the steps.
Color plan: Purple + white reads calm and upscale. Pair ‘Pugster White’ with ‘Caradonna’ and a simple white edging like sweet alyssum as a seasonal filler if you want extra polish.
DIY trick: Skip expensive edging stone—spade-cut a clean trench edge every spring. It costs $0 and instantly sharpens curb appeal.
Scenario 2: Sunny driveway strip that bakes and dries out
Space: 4 ft x 16 ft alongside concrete. The mistake here is installing thirsty plants and expecting weekly watering to be enough.
Planting plan: Use 3 compact butterfly bushes (2–3 ft varieties) and lean on drought-tolerant companions: salvia, lavender (if winters allow), and a tough grass. Mulch well and set up a soaker hose the first season.
Spacing: Keep plants 18 inches off the driveway edge so they don’t splay into the concrete. Expect to water deeply once per week after establishment (more during heat waves).
Scenario 3: Part-sun front yard under a street tree (dappled light)
Space: 6 ft x 18 ft, but only 4–5 hours of direct sun due to canopy shade. Butterfly bush may bloom less, so treat it as one accent, not the whole show.
Planting plan: Use 1–2 butterfly bushes in the brightest pocket, then fill with part-sun performers that still look crisp: heuchera (coral bells) for foliage, Japanese forest grass (Hakonechloa) for movement, and asters for late-season pollinator value. You’ll still get butterflies—just don’t expect the same flower density as full sun.
Design note: Under trees, roots compete for water. Plan on an extra deep soak every 7–10 days in summer during the first year.
Budget planning and smart DIY swaps
A butterfly bush border can be surprisingly affordable if you keep the plant palette tight and prioritize perennials over annuals. Here’s a realistic range for a 6 ft x 20 ft border (about 120 sq ft):
- Plants: $250–$650 (depending on pot size and how many you buy at once)
- Mulch: $40–$120 (typically 2–3 cubic yards delivered or bagged)
- Compost/soil amendments: $30–$100
- Soaker hose/drip basics: $25–$60
- Optional edging: $0 (spade edge) to $200+ (metal or stone)
DIY alternatives that look professional:
- Buy smaller plants. 1-gallon perennials fill in fast by year two; you can cut initial plant costs by 30–50% compared to buying 2–3 gallon sizes.
- Use repetition instead of quantity. Five catmints look more designed than fifteen mixed perennials—and often cost less.
- Trade or divide. Many companions (catmint, rudbeckia, coneflower) can be divided every few years, letting your border expand without new purchases.
Maintenance expectations (what it really takes)
Once established, a front-yard butterfly bush border is not fussy—but it does appreciate a rhythm. Plan on 20–40 minutes per week during the active growing season for quick grooming and checking water needs.
Spring (1–2 sessions, plus weekly check-ins)
- Prune butterfly bush in early spring once hard frosts are mostly past. Many gardeners cut back to 12–24 inches to encourage fresh, floriferous growth (timing depends on region).
- Cut back grasses before new growth emerges.
- Refresh mulch to maintain a 2–3 inch layer.
Summer (weekly light grooming)
- Deadhead selectively if you want a sharper look; butterfly bush will bloom without constant deadheading, but removing spent spikes improves appearance near walkways.
- Water deeply during dry spells. After year one, most borders do well with deep watering every 7–10 days in normal summer dryness, adjusting for heat and soil type.
- Edge the border once a month for curb appeal. This is the secret weapon of front-yard beds.
Fall (one tidy session)
- Leave some seed heads (coneflower, grasses) if you like winter interest.
- Top up mulch lightly if winters are harsh, but avoid burying crowns.
Winter (hands-off with a quick check)
- Let structure stand. Grasses and seed heads keep the bed looking intentional when everything else sleeps.
- Check for snow-load breakage and clean up as needed.
Putting it all together: a sample plant-by-plant layout (6 ft x 20 ft)
If you want a ready-to-plant recipe, here’s one that hits a long bloom season and a tidy edge, using repeats:
- 3x Buddleja ‘Miss Ruby’ (or substitute compact Pugster types if you need smaller), spaced 5 ft apart, set mid-bed
- 5x Calamagrostis ‘Karl Foerster’, spaced 30 inches apart, tucked behind and between butterfly bushes for structure
- 7x Salvia ‘Caradonna’, spaced 15 inches apart, repeated in drifts
- 7x Nepeta ‘Walker’s Low’, spaced 20 inches apart, forming the front knit
- 5x Echinacea (‘Magnus’ or similar), spaced 18 inches apart, as mid-layer pops
That sounds like a lot, but in a 120 sq ft bed, it fills in cleanly without overcrowding. The repetition keeps it calm; the butterfly bush gives the “wow” that stops people as they walk by.
If you only do one extra thing beyond planting, do this: keep a crisp edge and a consistent mulch layer. That’s the difference between “nice plants” and “designed border.” By late summer, when the butterfly bushes are throwing color and butterflies are hovering at eye level, the front walk becomes a small daily destination instead of a pass-through.
Sources: North Carolina State University Extension (NCSU Extension), guidance on Buddleja davidii and invasive status considerations (2023). USDA National Invasive Species Information Center (USDA NISIC), invasive species resources and state-by-state guidance (2024).