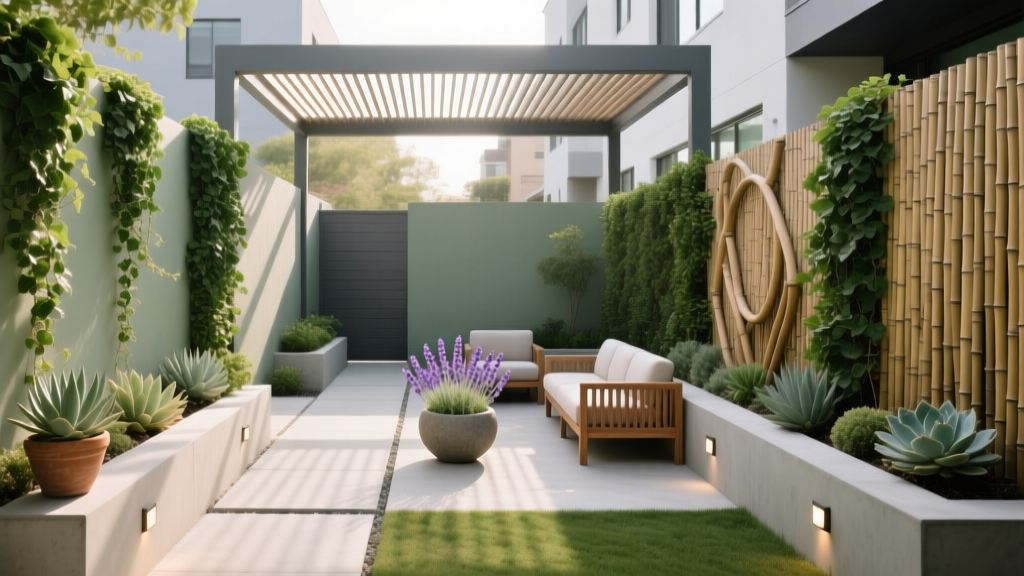
Narrow Side Yard Garden Design Tips
You know the strip: the “between space” where the hose gets tossed, trash bins live, and the dog runs a daily dirt track. It’s usually shaded, windy, and just wide enough to be annoying—3 feet, maybe 5—yet it’s the first thing you see when you open the gate. The good news is a narrow side yard can become one of the most satisfying projects on a property because every inch matters, and small changes show up immediately.
Picture this as a walk-through with me on site: we’re standing at the side gate with a tape measure, looking down a long corridor of fence and siding. Our job isn’t to “fill it with plants.” Our job is to make it functional (trash access, meters, dog run, path), comfortable (less glare and heat, less mud), and intentionally beautiful (a designed view, not a leftover strip).
Start with a quick site read (10 minutes that saves you weeks)
Before you buy a single plant, do three checks: measure width, track sun, and map water. Most narrow side yards are 30–60 ft long and 3–6 ft wide. If yours is 4 ft wide, you can fit a 24 in walking path and still have a planting band—barely—so we’ll design like a ship’s corridor: tidy, efficient, and no wasted motion.
Measure the “working width,” not fence-to-wall
Utilities steal space. Gas meters often require 3 ft of clearance; some HVAC units need 24–36 in open around them (check your unit’s manual). Mark those no-plant zones with painter’s tape. Your design starts after those clearances.
Track sunlight hours the simple way
Use your phone and check the yard at 9 a.m., 12 p.m., and 3 p.m. for two days. Most side yards fall into three buckets:
- Deep shade: under 2 hours of direct sun
- Part shade: 2–5 hours of direct sun
- Sunny corridor: 6+ hours (often on the south side of a fence in the northern hemisphere)
Watch how water behaves
Side yards often collect runoff between rooflines. After a rain, note puddles. If water sits longer than 24 hours, plan on drainage upgrades (permeable gravel, a dry creek, or a slim French drain) before you invest in plants.
“If you can’t describe the site in a few clear sentences—sun, soil moisture, and how people move through it—you’re not designing yet, you’re decorating.” — Susan Morrison, landscape architect (professional practice guidance frequently echoed in landscape design education)
Layout strategies for narrow spaces (make it feel wider, not busier)
In a side yard, layout is 80% of the success. Plants are the finishing layer. Here are the strategies I use most often when the space is tight.
1) Choose one of three path-first layouts
Your path sets the tone. A straight shot feels clean and modern; a gentle offset feels garden-like; stepping pads feel casual and budget-friendly.
| Layout option | Best for | Minimum clear walking width | Typical cost (DIY) | Notes |
|---|---|---|---|---|
| Straight paver run | Trash bin access, frequent foot traffic | 30–36 in | $6–$14 per sq ft | Clean edges; easiest to shovel or sweep |
| Decomposed granite (DG) corridor | Budget builds, good drainage | 30–36 in | $2–$6 per sq ft | Needs edging to stay crisp; occasional top-up |
| Stepping stones in gravel | Renters, quick upgrades | 18–24 in (pads centered) | $1–$4 per sq ft (plus stones) | Fast install; flexible around utilities |
For most homeowners, I aim for a 36 in clear path if the side yard is a main route. If it’s occasional access, 30 in can work. If you’re a renter who needs removable improvements, plan on a stepping route you can lift later.
2) Use the “one wall, one hedge” rule
When both sides are planted, narrow yards feel pinched. Instead, pick one side as the “green wall” (plants climb or stand tall) and keep the other side simple with a narrow planting ribbon or clean gravel strip. This creates an intentional asymmetry that reads wider.
3) Break the tunnel effect with a focal stop
If your side yard is 40+ ft long, add one “pause” element around the midpoint: a slim bench, a tall pot, or a trellis panel. You’re creating a destination so the space feels like a garden, not a hallway.
4) Layer vertically—ground plane, mid layer, then climbers
Side yards reward vertical thinking. A 6-foot fence is basically a blank canvas. A simple trellis panel (even 2 ft x 6 ft) can carry jasmine, clematis, or a compact climbing rose without stealing walkway width.
5) Keep plant footprints honest (respect mature widths)
This is where most side yards fail: plants are installed too close, then swallow the path within two seasons. Use mature widths, not nursery pot sizes. As a practical rule, give shrubs at least 50–70% of their mature spread as planting distance from the path edge, then prune lightly rather than “hedge hard.”
Step-by-step: a designer’s setup sequence (so you don’t redo work)
This is the order I use on real projects because it prevents expensive backtracking.
- Measure and sketch: Draw a simple plan with length and width. Mark doors, gates, meters, HVAC, hose bibs, and downspouts. (A 1/4 inch = 1 ft scale works nicely.)
- Decide the path: Commit to path width (30–36 in) and material. Mark it with a garden hose or painter’s tape.
- Fix drainage next: If puddles persist beyond 24 hours, install permeable base or a drain line now—before plants.
- Define edges: Add steel edging, brick, or rot-resistant bender board. This single step makes narrow spaces look “finished.”
- Improve soil where you’ll plant: Work compost into the planting band (typically 12–18 in wide). Don’t amend under DG or gravel paths.
- Install irrigation (optional but smart): A 1/2 in drip line with inline emitters saves time and keeps foliage dry.
- Plant the structure first: Place taller shrubs/climbers, then perennials, then groundcovers.
- Mulch and light: Mulch 2–3 in deep; add low-voltage path lights if you use the corridor at night.
Plant selection that actually works in a narrow side yard
The best side yard plants do at least two of these: tolerate shade, stay narrow, look good in repetition, and handle reflected heat. I’ll give you specific varieties, plus the reason I reach for them.
Reliable plants for deep shade (0–2 hours sun)
Evergreen backbone keeps the corridor from looking bare in winter, especially in climates with long dormant seasons.
- Sarcococca confusa (sweet box): Evergreen, glossy, and fragrant in late winter; stays relatively narrow with light pruning. Plant spacing: 24–30 in apart.
- Fatsia japonica (Japanese aralia): Bold leaves that read well in a skinny space. Use as a focal “pause” plant. Give it 3–4 ft of width where possible; if your yard is only 3 ft wide, use one specimen in a corner pocket.
- Dryopteris erythrosora (autumn fern): Great texture, coppery new growth. Space 18–24 in apart for a soft mass.
- Helleborus x hybridus (Lenten rose): Winter/early spring flowers, drought-tolerant once established. Space 18–24 in.
- Heuchera varieties like ‘Caramel’ or ‘Palace Purple’: Color in shade without flowers being the main show. Space 12–18 in.
Shade note: many shade plants prefer consistent moisture but not soggy soil. If the side yard is dry shade under eaves, run drip irrigation or choose tougher options like hellebores and some heucheras.
Part shade winners (2–5 hours sun)
- Hydrangea paniculata ‘Little Lime’: More sun-tolerant than bigleaf hydrangeas, sturdy blooms, manageable size. Space 3–4 ft (use sparingly in very narrow yards).
- Camellia sasanqua ‘Yuletide’: Narrow evergreen structure with winter bloom; can be trained flatter with selective pruning. Space 3 ft from the path edge.
- Hakonechloa macra ‘Aureola’ (Japanese forest grass): Cascading habit softens hard edges; excellent in repetition. Space 18 in.
- Trachelospermum jasminoides (star jasmine): Ideal as a climber to save floor space; fragrant, evergreen in mild climates. Plant 18–24 in from fence with a trellis.
Sunny corridor staples (6+ hours sun or reflected heat)
- Lavandula angustifolia ‘Hidcote’: Compact lavender for narrow beds; thrives in heat and reflected sun. Space 18–24 in. Needs sharp drainage.
- Salvia ‘Caradonna’: Vertical spikes that don’t flop into the path. Space 18 in.
- Rosmarinus officinalis ‘Tuscan Blue’ (rosemary, where hardy): Upright form, evergreen, aromatic. Space 3 ft and keep pruned.
- Lomandra longifolia ‘Breeze’: Tough strappy evergreen for tight modern looks. Space 24–30 in.
- Clematis ‘Etoile Violette’: Flowers without taking ground space; give it a trellis and deep watering. Plant base shaded (mulch or a small groundcover).
Plant health and spacing are not just aesthetics. Crowding increases humidity and slows drying, which can raise disease pressure. The Royal Horticultural Society notes that good airflow helps reduce fungal problems like powdery mildew (RHS, 2023).
Three real-world side yard scenarios (with numbers)
Let’s run through common side yard “briefs” and how I’d solve them.
Scenario 1: The 3-foot-wide rental side yard (fast, removable, tidy)
Site: 3 ft wide, 25 ft long, part shade (3 hours morning sun). You can’t dig deeply or install permanent hardscape.
Design move: Create a stepping path on top of landscape fabric with gravel, then add tall pots at intervals to break the corridor.
- Path: 18 in stepping stone route set into 1–1.5 in of gravel (removable).
- Plants (containers): Star jasmine on a freestanding trellis, heuchera, and a compact evergreen like dwarf boxwood (or a boxwood alternative if blight is a concern).
- Estimated DIY cost: $150–$400 depending on pot sizes and stone choice.
Why it works: You keep a clean walking line and introduce vertical greenery without claiming permanent ground space.
Scenario 2: The utility corridor with meters and bins (must stay clear)
Site: 5 ft wide, 40 ft long, deep shade near the house, with a gas meter zone requiring 3 ft clear access.
Design move: Make the utility zone a deliberate “service bay” with gravel, and begin the garden planting after the clearance line.
- Path: 36 in compacted DG path for easy rolling bins.
- Service bay: 6 ft long gravel pad for bins + meter access.
- Plants: Sweet box (Sarcococca) as a narrow hedge, hellebores at the edge, and a fern ribbon to soften the fence line.
Estimated DIY cost: DG and base materials often land around $2–$6 per sq ft. For a 40 ft x 3 ft path (~120 sq ft), that’s roughly $240–$720 plus edging.
Scenario 3: The sunny side yard that bakes (reflected heat + privacy needed)
Site: 6 ft wide, 50 ft long, 7+ hours sun, white fence glare. You want privacy and a place to pause.
Design move: One clean path, one planted “green wall” with climbers, and one small seating nook.
- Path: 36 in pavers in a straight run.
- Green wall: Trellis panels mounted to the fence with star jasmine or clematis (choose based on climate).
- Plants: Lavender ‘Hidcote’ repeated every 24 in, salvia ‘Caradonna’ for vertical rhythm, and a single large pot with an olive (in suitable climates) or a tall ornamental grass as the “pause.”
Estimated DIY cost: Pavers installed DIY commonly run $6–$14 per sq ft. For a 50 ft x 3 ft path (~150 sq ft), budget $900–$2,100 plus trellis materials and plants.
Budget levers (where to spend, where to save)
If you’re choosing where to spend money in a narrow side yard, prioritize what you touch and walk on. A good path makes the space usable in every season.
Spend on these items
- Edging: Keeps gravel and DG from migrating. Steel edging costs more upfront but looks crisp for years.
- Base prep: Skipping base under pavers leads to wobble and weeds.
- One or two “anchor” plants: A quality climber or evergreen shrub sets the tone more than ten cheap annuals.
Save with these DIY alternatives
- Use gravel + stepping stones instead of a full paver runway.
- Choose smaller plants and give them correct spacing. You’ll save now and avoid removal costs later.
- Build a simple trellis from galvanized wire and eye hooks rather than pre-made panels.
- Mulch deeply instead of overplanting. 2–3 in of mulch reduces weeds and watering needs.
Mulch also supports soil health and moisture retention. The USDA notes that organic mulches can moderate soil temperature and reduce evaporation (USDA NRCS, 2020).
Design details that make a narrow side yard feel intentional
These are the finishing moves that separate “a side yard with plants” from “a designed garden passage.”
Repeat a limited palette
Pick 2–3 primary plants and repeat them down the run. Repetition is calming in tight spaces. Save “collector” plants for the backyard where you have room to appreciate variety.
Light the path sparingly
A small number of warm lights is better than runway brightness. Space low-voltage lights around 8–12 ft apart, or highlight only the gate, the midpoint focal element, and the back door.
Keep the ground plane simple
In narrow yards, busy ground patterns can feel like visual clutter. One material underfoot, one edging style, one mulch type.
Maintenance expectations (real time, real tasks)
A well-designed side yard should be easy to keep up because it’s often out of sight—and that’s exactly where messy gardens happen. Here’s a realistic maintenance plan.
Weekly (15–30 minutes)
- Quick sweep or rake of the path (especially DG or gravel).
- Check drip irrigation for clogs and adjust emitters.
- Snip anything leaning into the walking line—keep that 30–36 in clearance.
Seasonal (1–2 hours per season)
- Spring: Top up mulch to maintain 2–3 in; feed container plants; check trellis ties.
- Summer: Deep water climbers; deadhead salvias and lavender lightly (don’t cut into old wood on lavender).
- Fall: Clear leaves from gravel/DG so they don’t compost into weeds; cut back perennials; clean gutters to reduce side-yard runoff.
- Winter: Prune structure plants lightly; check drainage after storms.
If you choose slow-growing evergreens and keep plant spacing honest, most side yards stay in that 15–30 minutes per week range. The moment you overplant, your “quick corridor” becomes a weekly wrestling match.
A final designer’s checklist before you start shopping
Stand at the gate again and answer these five questions. If you can answer them clearly, your design will hold together.
- What is the clear walking width you’re protecting—30 in or 36 in?
- Where is your service zone (bins, meters, hose) and how big is it?
- Is your side yard deep shade, part shade, or sunny corridor based on actual hours?
- What’s your “green wall” element—climber, hedge, or tall repeated plants?
- What’s the one mid-point feature that stops the tunnel effect (pot, trellis, or small seat)?
Once those decisions are made, the narrow side yard stops being a problem strip and becomes a designed passage—one that’s practical on trash day, pleasant on a morning walk, and surprisingly lush for a space most people ignore. The best part is that you don’t need a big yard to get the feeling of a garden; you just need a plan that respects how tight spaces actually behave.
Sources: Royal Horticultural Society (RHS), guidance on plant health and airflow in relation to fungal issues, 2023. USDA Natural Resources Conservation Service (USDA NRCS), soil health and mulching benefits, 2020.