Deck Railing Strawberry Planters
The deck gets the best light in the house—yet it’s often the most underplanted square footage you own. You step out with coffee, and all that sun hits bare boards and a railing that does nothing but frame the view. Meanwhile, your “garden space” is a shrinking patch of lawn, a shared rental yard, or a balcony where every pot competes with your chair. If you’ve ever wanted fresh strawberries without giving up floor space, the railing is your hidden planting bed.
This project is part layout puzzle, part edible design. Done well, deck railing strawberry planters read like a soft green border with white blooms, then a season-long ribbon of fruit you can pick in passing. Done poorly, they become a top-heavy wobble of dry soil and stressed plants. Let’s design it like a landscape designer would: with structure, repeatable modules, and a plan for water, weight, and sunlight.
Start with the deck as a “sun edge,” not a container problem
Railing planters succeed when you treat the railing like a linear planting zone. You’re building a narrow, elevated bed with strict rules: limited soil volume, wind exposure, and fast-drying conditions. The layout strategy is to create consistent planter spacing, predictable irrigation, and a strawberry variety matched to your light and maintenance capacity.
Measure three things before you buy anything
Grab a tape measure and note these dimensions (you only need five minutes, and it prevents 90% of railing-planter headaches):
- Railing width: Common sizes are 1.5–2 inches for metal balusters and 3.5 inches for a 4x4 post cap. Many clamp planters fit 2–4 inches; verify before purchasing.
- Rail height and drop: If your railing is 36 inches high, a 10-inch-deep planter can block sightlines from a seated position. Plan placement accordingly.
- Usable rail length: Count uninterrupted sections. A 12-foot run can hold about six 24-inch planters with gaps for drainage and access.
Also check sun: strawberries produce best with 6–8 hours of direct sun. Less than 5 hours can still grow leaves, but yields drop noticeably. The University of Minnesota Extension notes strawberries perform best in full sun for best yield and fruit quality (University of Minnesota Extension, 2020).
Design principles that make railing strawberries look intentional
1) Repeat modules, not one-offs
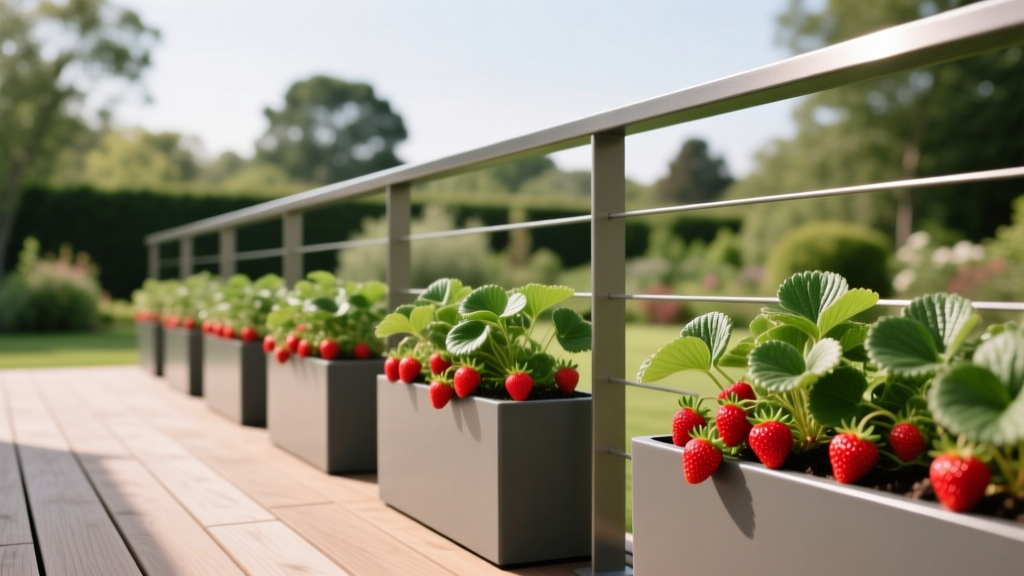
Think in repeating units—two or three planter styles max. If you line up mismatched pots, the deck edge looks cluttered fast. A simple rhythm works: same planter, same spacing, same plant count.
A reliable module is a 24-inch railing planter with 3 strawberry plants spaced evenly. You get a consistent “hedge” effect, and each plant has enough root room to fruit without collapsing into a tangled mat.
2) Keep the center of gravity inside the rail
Wind and watering make planters heavier and more dynamic than they look. If the planter hangs outward, you’ll fight wobble and stress clamps. Choose planters that sit centered on the rail or use bracketed boxes that screw into the inside face of the railing (where allowed).
As a safety note, be mindful of load. Building codes vary, but railings are not always designed for continuous cantilevered weight. If you’re unsure, distribute weight and avoid filling oversized planters with wet soil.
3) Design a water strategy before a plant strategy
Railing planters dry faster than ground beds because wind hits all sides. Strawberries are shallow-rooted, and inconsistent moisture leads to small fruit and stress. A basic plan is to use:
- Water-retentive potting mix (not garden soil)
- Mulch layer (straw, pine needles, or fine bark) to cut evaporation
- Optional drip line for long runs
The National Gardening Association emphasizes consistent moisture for strawberries, especially during flowering and fruiting (National Gardening Association, 2022). On a sunny deck, that often means watering 3–5 times per week in summer unless you automate.
Layout strategies for different deck shapes
Linear runs: the “edible border” layout
If you have a straight 10–20 foot railing, you can treat it like a border planting. Space planters so the foliage touches slightly at maturity—visually continuous, but not overcrowded.
Spacing rule: Place 24-inch planters every 28–32 inches (leaving a 4–8 inch gap). This gap prevents water drips from constantly soaking the deck in one strip and gives you a handhold for lifting/adjusting planters.
Corners: the “fruit at the turn” anchor
Corners are prime visual real estate. Use a slightly larger corner planter (or two short planters meeting at the corner) to create a lush anchor. If your deck corner is exposed to wind, choose compact plants and add a windbreak element—like a small trellis panel on the inside face of the rail—so blossoms don’t get shredded in spring gusts.
Small balconies: the “three-planter triangle”
For renters with a tiny balcony, commit to just three planters and make them count. Two on the sunniest side, one on the adjacent rail. Keep the center open for a chair. This layout gives you enough plants for regular snacking without turning the balcony into an obstacle course.
Choose a planter style that matches your maintenance tolerance
Not all railing planters behave the same. Soil volume dictates how often you water, how stable the planter feels, and how well strawberries can hold a fruit load.
| Planter Type | Typical Dimensions | Soil Volume & Drying Speed | Best For | Approx. Cost (USD) |
|---|---|---|---|---|
| Clamp-on plastic railing planter | 24" L x 7" W x 6.5" D | Low volume; dries fast | Renters, quick setup, lighter rails | $18–$35 each |
| Bracketed wood planter box | 30" L x 8" W x 8" D | Medium volume; steadier moisture | Homeowners, long-term layout | $45–$90 each (DIY can be less) |
| Metal railing trough with coco liner | 24" L x 6" W x 6" D | Moderate drying; liner wicks moisture | Classic look, lighter fruit load | $25–$60 each |
| Half-round “deck rail” planter | 20" L x 10" W x 7" D | Better volume; can be top-heavy | Corner accents, fewer but fuller plants | $20–$45 each |
Design note: For strawberries, aim for at least 6–8 inches of soil depth and enough width that crowns aren’t pressed against the edge. If your planter is only 5–6 inches deep, choose compact varieties and expect more frequent watering.
Strawberry varieties that actually behave in railing planters
Strawberries are not one-size-fits-all. Variety choice affects runner production (messy vs tidy), fruiting window (one big harvest vs steady), and heat tolerance. For deck rails, you want plants that fruit reliably in small root zones and don’t overwhelm the edge with runners unless that’s your aesthetic.
Day-neutral (steady harvest, good for small spaces)
- ‘Albion’ (day-neutral): Large, flavorful berries and strong performance in containers. It’s a favorite for consistent harvests from late spring into fall if fed and watered well.
- ‘Seascape’ (day-neutral): Reliable producer with good heat tolerance. Great when your deck reflects heat off siding or composite boards.
- ‘Tristar’ (day-neutral): Smaller fruit but excellent flavor; compact habit makes it easier to keep tidy on a rail.
Everbearing (waves of fruit, classic choice)
- ‘Ozark Beauty’ (everbearing): Popular, vigorous, good for gardeners who want a hardy plant and don’t mind occasional runner cleanup.
June-bearing (big flush, best for “one-and-done” harvest)
- ‘Jewel’ (June-bearing): Excellent fruit quality and a heavy early-summer harvest. Choose this if you want a strong seasonal moment and can keep up with watering during that peak.
If your goal is maximum fruit in minimum space, day-neutral varieties are usually the cleanest design choice because they can provide a steady trickle of berries without turning into a runner jungle.
“Container-grown strawberries need consistent moisture and fertility because they have limited rooting volume. Fluctuations show up quickly as reduced fruit size and plant stress.” — University of Illinois Extension, container fruit guidance (2019)
Step-by-step setup: a clean install that lasts all season
This is the method I use when I want a railing planting to look crisp in May and still look intentional by August.
- Choose planters and count plants: For each 24-inch planter, plan on 3 plants (or 2 if you want extra airflow).
- Add a liner if needed: If your planter has large drainage slots, add landscape fabric so soil doesn’t wash out while still draining.
- Fill with potting mix: Use a quality container mix. For each 24-inch planter, you’ll typically need about 8–12 quarts depending on depth.
- Mix in slow-release fertilizer: Follow label rates; a common approach is a controlled-release granular fertilizer intended for containers.
- Plant crowns at the right height: The crown should sit at soil level—burying it risks rot, planting too high dries roots.
- Water deeply until it drains: First watering should fully saturate the soil. Expect a second top-off as the mix settles.
- Mulch lightly: A 1-inch layer of straw or fine bark reduces splash, keeps fruit cleaner, and stabilizes moisture.
- Secure and test: After hanging, gently push down and outward to ensure clamps/brackets don’t shift. Re-check after the first heavy rain.
Three real-world layouts (with numbers) that work
Scenario 1: Rental balcony with strict rules (no drilling)
Space: 6-foot balcony rail, south-facing, windy afternoons. Goal: Strawberries without permanent hardware.
Layout: Two 24-inch clamp-on planters spaced 8 inches apart, centered where sun is strongest. Add one half-round planter on the side rail for a corner accent.
Planting plan: 3 ‘Tristar’ per 24-inch planter (6 plants), and 2 ‘Albion’ in the half-round (2 plants). Total: 8 plants.
Budget: Planters $25 x 2 + $30 x 1 = $80. Potting mix and fertilizer: $25–$40. Plants: $4–$7 each = $32–$56. Total estimate: $137–$176.
Maintenance reality: Watering 10 minutes, 4x/week in summer unless you add a self-watering insert. Pinch runners monthly to keep it tidy.
Scenario 2: Family deck where aesthetics matter (and kids pick daily)
Space: 16-foot deck rail, morning to late-afternoon sun. Goal: A uniform “edible border” that looks designed, not improvised.
Layout: Six matching 30-inch bracketed wood boxes along the long run, leaving a 6-inch gap between boxes. Put the most visible section (near the stairs) as the strongest fruiting zone.
Planting plan: 4 plants per 30-inch box, spaced roughly 7–8 inches apart. Choose ‘Seascape’ for heat tolerance and steady picking. Total plants: 24.
Cost range: Pre-made boxes $60 each x 6 = $360 (DIY can cut this). Soil and amendments: $90–$140. Plants: $120–$168. Total: $570–$668.
Designer tip: Keep the “stair section” slightly fuller by using the most vigorous plants there. The eye reads that as abundance, and you’ll naturally pick as you come and go.
Scenario 3: Shady deck edge (only partial sun) with a realistic yield goal
Space: 12-foot rail, 4–5 hours of sun due to trees and a neighboring building. Goal: Modest harvest, maximum greenery, minimal disappointment.
Layout: Four 24-inch planters positioned in the brightest section only (don’t waste planters in the shade). Leave the shadiest third of the rail for non-fruiting companions like trailing nasturtium or mint (in its own pot, not mixed with strawberries).
Planting plan: Use ‘Tristar’ (often more forgiving) and limit to 2 plants per planter for airflow. Total: 8 plants.
Expectation setting: You may get fewer berries, but you’ll still get blossoms, fragrance, and a neat edible edge. If you want a bigger harvest, add a $25–$60 grow light bar indoors for overwintering starts or move a couple planters to the brightest corner during bloom.
Budget-smart moves and DIY alternatives
If you want the look without the boutique price tag, focus your money on stability and soil volume. Plants can be affordable; failure is expensive.
DIY railing box (homeowner-friendly)
Build a simple 30-inch box from cedar fence pickets or exterior-grade pine. Use two L-brackets on the inside face of the railing posts (only if permitted and structurally sound). Line with heavy landscape fabric, then add drainage holes. A basic DIY build often lands around $20–$35 in materials per box depending on lumber prices—less if you already have screws and a saw.
DIY “bucket rail” option (renter-friendly, no drilling)
Use two 2-gallon buckets with railing hooks or heavy-duty zip ties (rated outdoor UV). It’s not as polished, but it’s surprisingly effective for a micro-harvest. Paint buckets matte black or the same color as your railing to visually recede.
Reality check: Buckets can look utilitarian. If the deck is a primary entertaining space, stick to uniform trough planters for a calmer edge.
Companion planting that helps strawberries on a deck
Strawberries are the headline, but a little supporting cast can solve design and pest problems. Keep companions restrained so they don’t compete in tight soil.
- Sweet alyssum (in a separate small pot tucked at intervals): attracts beneficial insects and softens the planter line.
- Chives (one clump per few planters): compact, upright texture, and flowers are pollinator-friendly.
- Trailing nasturtium (sparingly): drapes nicely, but can shade strawberries—use only at corners.
Avoid mixing strawberries with aggressive spreaders in the same planter. Strawberries need their root space, and your design needs clarity.
Maintenance expectations: what you’re signing up for
If you want railing strawberries to stay productive, plan for small, frequent care rather than occasional big fixes.
Weekly time
Expect 20–40 minutes per week total for a 4–6 planter setup: watering, quick grooming, and checking for dry pockets. In peak heat, watering can jump to 5–10 minutes daily for small-volume planters.
Seasonal tasks
- Spring (setup + first blooms): Feed lightly, watch for late frost. If nights drop below 32°F, drape a light cloth temporarily.
- Summer (fruiting): Harvest every 1–2 days when berries ripen; remove damaged fruit to reduce pests. Pinch runners weekly if you want a tidy line.
- Late summer to fall: Trim dead leaves, refresh mulch, and continue watering until cool weather slows growth.
- Winter (cold climates): If temperatures regularly fall below 20°F, planters can freeze solid. Move planters to an unheated garage or insulate with burlap and straw around the pots. Some varieties overwinter better in the ground than in exposed containers.
Troubleshooting design problems before they look messy
If plants flop over the edge: You likely have too much nitrogen or too much shade, pushing leafy growth. Switch to a fruiting-friendly fertilizer schedule and increase sun exposure if possible.
If berries are small: Usually inconsistent moisture or insufficient sun. Increase soil volume (deeper planters), add mulch, or set up a simple drip line. Even a gravity-fed watering bag can stabilize moisture.
If you see lots of runners: That’s not failure—it’s the plant’s strategy. On a railing, runners read as chaos. Snip them and root a few in small nursery pots to create free replacement plants for next season.
If planters drip and stain the deck: Add saucer trays only if they won’t trap water against wood. Better: place planters with a small gap and use a deck mat strip under the run in the heaviest drainage areas.
How it all comes together visually
The most satisfying railing strawberry planters feel like an extension of the architecture: a repeating line of green that softens hard edges and turns a pass-through deck into a place you linger. When you keep the modules consistent, match variety to your sun, and plan for water from the start, the planting looks calm—even when it’s loaded with fruit.
On your next grocery run, pause at the berry aisle and notice the price per pound. Then imagine walking outside and picking a warm strawberry off the rail, right at hand height, no kneeling, no raised bed build, no sacrificed patio space. That’s the design win here: using the deck’s brightest edge to grow something generous in a footprint you weren’t using anyway.