Backyard Garden Pond Ecosystem Design
The first time you hear it, it’s not the splash that surprises you—it’s the silence that’s missing. A small pond doesn’t just add water; it adds a steady background hum of life: birds rinsing their wings, frogs calling at dusk, dragonflies patrolling like tiny helicopters. Most homeowners come to me with the same problem: “I want a pond, but I don’t want a high-maintenance science project.” That’s exactly where an ecosystem-style pond shines. Designed well, it can run mostly on plant power, smart layout, and a little routine care—without turning your yard into a mosquito nursery.
Below, I’ll walk you through a practical design approach—how to place the pond, shape it, choose plants that do the heavy lifting, and build in the right edges and depths so the system stabilizes. I’ll also include real sizes, spacing, costs, and three different scenarios to help you fit an ecosystem pond into your actual space.
Start With the Site: How Your Yard “Behaves”
Before you sketch anything, spend one day watching your yard like a designer. Where does water sit after rain? Where do you naturally look from your kitchen window or patio chair? And—this is the big one—where does the sun land?
Sunlight: Aim for 5–6 hours, avoid all-day blast
Most pond plants (and the biological processes that keep water balanced) perform best with at least 4 hours of sun, with a sweet spot around 5–6 hours. Too little sun and you’ll struggle to grow oxygenating plants; too much sun (8+ hours) can push algae unless you compensate with more shade plants and surface coverage.
- Best placement: morning sun + afternoon shade
- Avoid: tight corners with no airflow; under deciduous trees that dump leaves (more on that later)
Keep it level and away from runoff
A pond is a bowl; everything around it wants to fall into it. Don’t place it at the bottom of a slope unless you’re also building a berm or swale to redirect runoff. Nutrient-rich runoff is algae fuel. If you can’t avoid the slope, plan a shallow gravel “filter strip” (a 12–18 inch band) on the uphill side to catch sediment.
Design Principles That Make an Ecosystem Pond Work
Think of an ecosystem pond as three zones working together: open water, planted shelves, and the surrounding buffer garden. The magic is in the ratios and transitions.
Use the 60/40 surface coverage rule
A practical target is 50–70% of the pond surface shaded by lilies, floating plants, or overhanging marginal foliage during peak summer. This reduces algae by limiting light penetration and helps stabilize temperature. The remaining open surface provides oxygen exchange and viewing.
Build depth variety: shelf, mid, and deep refuge
Even small ponds benefit from at least two depths. Here’s a workable layout that fits many backyards:
- Marginal shelf: 6–10 inches deep (for iris, rushes, pickerel)
- Mid zone: 12–18 inches deep (for baskets, wildlife access)
- Deep zone: 24–30 inches deep (temperature stability, fish refuge if used)
If you’re in a cold climate and plan to overwinter hardy lilies, a 30-inch deep pocket gives you more flexibility. For renters or small spaces, a “mini-pond” can work without deep zones—more on that in the case examples.
Edge design: make it look natural and function better
The edge is where ecosystem ponds often fail—either a harsh plastic rim shows, or stones slip in over time. Use a “capillary break” so surrounding soil doesn’t wick water out. Practically, that means:
- Set liner slightly above surrounding grade (about 1 inch)
- Then hide it with flat stones that overhang the water by 1–2 inches
- Backfill behind stones with gravel, not topsoil (topsoil slides and clouds water)
Layout Strategies for Real Yards
Now let’s translate those principles into shapes and placements you can actually build.
The “view triangle”: design from where you sit
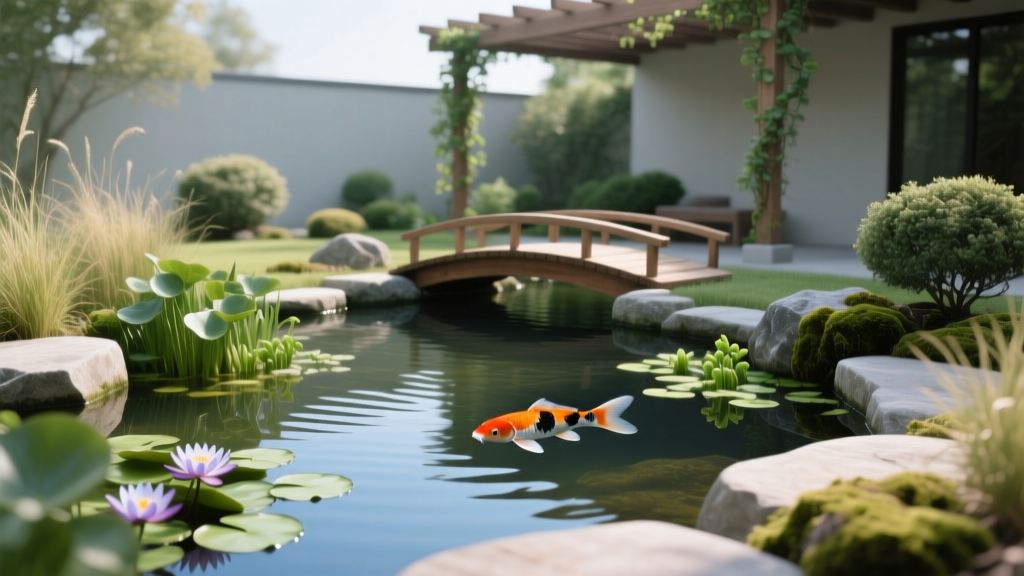
Pick your main viewing point—often a patio chair, kitchen sink, or deck. From that spot, create a triangle: the pond should fill at least one-third of your view but not dominate it. In practice, that means a pond roughly 6 ft x 8 ft reads well from 12–18 ft away.
Give wildlife a ramp and humans a path
Even if you’re not aiming for frogs, you’ll get visitors. Include at least one gently sloped “beach” area—think gravel over a shallow shelf—so small animals can exit. For people, add a stepping-stone or narrow path that brings you to one “touch point” at the pond edge. That’s where you’ll deadhead lilies, adjust plants, and skim leaves.
Plan a buffer planting ring
The most overlooked part of an ecosystem pond is the first 2–3 ft around it. This ring should be planted densely with grasses, perennials, and low shrubs to catch windblown debris and create habitat. It also makes the pond look intentional, not like a dropped-in tub.
Construction and Setup: A Step-by-Step Build You Can Pace Over a Weekend
This is a practical sequence that prevents common mistakes (like building the edge before the liner is settled).
- Mark the shape with a hose or rope. For a natural look, avoid perfect circles; aim for a soft kidney shape with one wider “bay” for lilies.
- Excavate in layers: shelf first (6–10 inches), then mid zone (12–18 inches), then deep zone (24–30 inches). Keep the shelves level.
- Remove sharp stones and lay underlayment. For DIY savings, old carpet can work under liner, but commercial underlayment protects better against punctures.
- Install liner with slack. Fill the pond with a few inches of water and adjust folds; then continue filling gradually.
- Set rocks and edge once the pond is mostly filled. Use flat capstones that overlap the liner and lock them with gravel behind.
- Add dechlorinated water if using municipal water. A simple dechlorinator is inexpensive and protects beneficial bacteria and plants.
- Plant in tiers: marginals on shelves (in aquatic baskets), lilies in deeper pockets, oxygenators anchored in mid-depth.
- Start filtration or aeration if you’re using it. For ecosystem ponds, a small pump feeding a waterfall or bog filter is optional but helpful in the first season.
- Wait before adding fish (if you add them at all). Let plants establish and water stabilize for 4–6 weeks.
Budget and DIY Alternatives (With Real Numbers)
Your budget depends on size, liner quality, stone choices, and whether you add a pump or bog filter. Here are realistic ranges for a backyard ecosystem pond around 6 ft x 8 ft with a max depth of 24 inches:
- EPDM liner (45 mil): typically $1.00–$2.00 per sq ft (size up generously for depth and edges)
- Underlayment: $0.30–$0.80 per sq ft
- Pump (optional, 1,000–2,000 GPH): roughly $90–$250
- Aquatic plant baskets + soil media: $40–$120
- Stone/gravel: $150–$600 depending on local supply and whether you choose boulders
A straightforward DIY build often lands between $500 and $1,500. If you hire it out with stonework and a formal waterfall, it can climb quickly.
DIY swaps that still look good:
- Use local river rock and gravel instead of imported boulders.
- Skip the waterfall in year one; add a small aerator stone later if needed.
- Build a simple bog filter using a plastic stock tank or a lined shallow bed filled with pea gravel.
Plant Selection: Varieties That Stabilize Water and Look Great
Plants are your filter, your shade cloth, and your design finish. A balanced pond uses a mix: marginals for nutrient uptake, floaters/lilies for shade, and oxygenators for water clarity.
Marginal plants (the workhorses on the shelves)
Place these in aquatic baskets on the 6–10 inch shelf, spaced about 12–18 inches apart so they fill in without choking the pond.
- Blue flag iris (Iris versicolor): Spring blooms, strong nutrient uptake, hardy in cold winters.
- Pickerelweed (Pontederia cordata): Purple spikes that pollinators love; excellent for naturalistic edges.
- Soft rush (Juncus effusus): Vertical structure; great for modern designs and for hiding pond hardware.
- Arrowhead (Sagittaria latifolia): Bold leaves, white flowers; spreads, so keep it in a basket to control.
- Dwarf cattail (Typha minima): Use sparingly for texture—avoid full-size cattails in small ponds; they can overwhelm.
Floating and surface-shading plants
This group helps you reach that 50–70% summer shade target. If your area restricts certain floaters, choose hardy lilies and native options.
- Hardy water lily (Nymphaea ‘Helvola’ or ‘Marliacea Chromatella’): Reliable bloom, broad pads for shade; plant one lily per 15–25 sq ft of surface area.
- American frogbit (Limnobium spongia): Great shade in warm months; easy to scoop out if it spreads.
- Water hawthorn (Aponogeton distachyos): A cool-season gem—fragrant blooms when water is still chilly, extending seasonal interest.
Oxygenators (clarity boosters)
These compete with algae for nutrients and provide micro-habitat for aquatic insects. Anchor bunches in mid-depth using a small stone or plant weight.
- Hornwort (Ceratophyllum demersum): Doesn’t need rooting; strong oxygenator and wildlife habitat.
- Anacharis/Elodea (Egeria densa): Common and effective, but check local regulations—some regions restrict it due to invasiveness.
Buffer-ring plants (2–3 ft around the pond)
This is where you blend the pond into the garden and support pollinators that also feed the pond’s food web.
- Sweetflag (Acorus gramineus ‘Ogon’): Bright chartreuse edging; tolerates damp soil near pond.
- Blue fescue (Festuca glauca): Drier side of the ring; tidy mounds that contrast with lush pond foliage.
- Cardinal flower (Lobelia cardinalis): Hummingbird magnet; likes consistent moisture.
- Joe-Pye weed (Eutrochium purpureum): Taller backdrop (place at least 3–4 ft from the edge so it doesn’t lean over the pond).
Comparing Layout Options (Choose Your Pond Personality)
| Option | Typical Footprint | Best For | Build Complexity | Estimated DIY Cost |
|---|---|---|---|---|
| Mini container pond | 2–3 ft diameter tub (18–24 in deep) | Renters, patios, balconies | Low | $60–$250 |
| Small ecosystem pond | 6 ft x 8 ft (24–30 in deep pocket) | Most suburban yards | Medium | $500–$1,500 |
| Pond + bog filter | 8 ft x 10 ft pond + 2 ft x 6 ft bog | Low-clarity issues, fish keepers | Medium-High | $900–$2,500 |
Real-World Scenarios: Three Designs That Fit Real Lives
Scenario 1: The renter-friendly patio “wildlife bowl”
If you rent or can’t dig, use a 20–30 gallon watertight container (a half whiskey barrel with liner, a stock tank, or a ceramic pot rated for water). Place it where it gets 4–5 hours of sun. Add one dwarf lily (or water hawthorn), one marginal (sweetflag works well), and a small bunch of hornwort. Top with a few stones so birds have footing.
Cost tends to stay under $250, and you can move it with help at lease end. Maintenance is mostly topping off water and scooping debris—about 10–15 minutes per week.
Scenario 2: A family yard pond that doesn’t become a chore
For a typical backyard, I like the 6 ft x 8 ft footprint because it’s large enough to buffer temperature swings and small enough to build in a weekend. Add a shallow “beach” shelf on the side kids will approach, and position stepping stones on the opposite side for adult maintenance. Plan for one hardy lily, 5–7 marginals, and 2–3 oxygenator bunches.
To keep it low-drama, design your buffer ring with plants that can handle splashes and occasional foot traffic—blue fescue and sweetflag are forgiving. Expect routine care around 20–30 minutes per week in summer.
Scenario 3: The shady yard under trees (and how to avoid the leaf trap)
If your yard is shaded by mature trees, you can still have a pond—just design it like a woodland water garden. Move the pond out from under the densest canopy if possible (even 8–10 ft makes a difference). Use water hawthorn and shade-tolerant marginals like sweetflag, and keep surface shade from plants rather than relying on sun-driven lily coverage.
Here’s the trick: plan a discreet leaf-management strategy. A simple net in fall can save you hours. Leaf litter adds nutrients and organic sludge, which can feed algae and reduce oxygen as it decomposes. The U.S. Environmental Protection Agency notes that nutrient pollution can drive excessive algae growth in water bodies (EPA, 2023). That same principle plays out in miniature when too many leaves and lawn fertilizer wash into a backyard pond.
Water Quality: Keep the Ecosystem Doing the Work
Ecosystem ponds aim for balance, not sterility. A little algae early on is normal; you’re establishing a living system.
Fish: optional, but they change the math
If you add fish, you add nutrients. That usually means you’ll need more plant mass or a bog filter. Many wildlife ponds skip fish entirely so frogs and beneficial insects can thrive.
“Aquatic plants are not decoration; they are the engine of nutrient uptake and habitat structure in small ponds.” — Royal Horticultural Society guidance on ponds and bog gardens (RHS, 2024)
For homeowners who want a few fish, keep stocking light. As a practical rule of thumb for small ornamental ponds, fewer fish is easier to keep clear and stable (and easier to overwinter safely).
Mosquito control without chemicals
Mosquitoes prefer still water with little surface movement and few predators. A small pump, an air stone, or simply encouraging dragonflies and other predators can help. If needed, Bacillus thuringiensis israelensis (Bti) dunks target mosquito larvae and are widely used in water features; use as directed and avoid overdosing.
The Centers for Disease Control and Prevention emphasizes eliminating standing water to reduce mosquito breeding (CDC, 2024). In a pond context, “standing” often means stagnant—so circulation and habitat for predators are your best preventative tools.
Maintenance Expectations: What You’ll Actually Do Week to Week
A well-designed pond isn’t maintenance-free; it’s maintenance-predictable. Plan for light, regular touch-ups rather than occasional big rescues.
Weekly (15–30 minutes in peak season)
- Skim floating leaves and spent blooms
- Check water level; top off during heat (evaporation is normal)
- Trim yellowing marginal leaves to keep nutrients from returning to the water
Monthly
- Thin floaters to maintain roughly 50–70% surface coverage
- Rinse pump pre-filter (if installed) using pond water, not chlorinated tap water
- Check stone edges for settling and adjust before the liner gets exposed
Seasonal tasks
- Spring: divide overgrown marginals, add a small dose of aquatic plant fertilizer tabs for lilies (not broadcast fertilizer)
- Summer: watch algae; increase plant shade before reaching for treatments
- Fall: net the pond if leaf drop is heavy; remove dying vegetation
- Winter: in freezing climates, keep a small opening for gas exchange (use a pond de-icer if needed); move tender plants indoors
Design Details That Make It Feel Finished
The difference between “a hole with water” and a garden feature is composition. I like to use three visual moves: a focal stone, a layered plant backdrop, and one clean access point.
Focal stone: Place a single larger boulder (even 18–24 inches across) near the widest bay. It anchors the pond visually and gives birds a perch.
Layered backdrop: Put taller plants (Joe-Pye weed, ornamental grasses) behind the pond from your main viewing angle, then step down to medium marginals, then low edging plants near the rim. This hides liner and makes the water read as integrated.
Clean access point: Choose one spot where you can kneel comfortably and reach 2–3 ft into the pond. Use flat stones there and keep surrounding plants slightly lower. Your future self will thank you.
Once your pond is in, give it a month to settle. The first season is about establishment: plants root in, beneficial organisms appear, and the water clarifies in fits and starts. Then one evening, without much fanfare, you’ll notice the soundscape shift—more birds, more movement, more garden. That’s when you know the design is doing what it’s supposed to do: making the space feel alive without making you work for every ripple.
Sources: U.S. Environmental Protection Agency (EPA), Nutrient Pollution overview (2023). Centers for Disease Control and Prevention (CDC), Mosquito control guidance on standing water (2024). Royal Horticultural Society (RHS), pond and bog garden guidance (2024).