Kitchen Spice Garden on the Counter
It usually starts the same way: you’re halfway through cooking, your hands smell like garlic, and you realize the cilantro in the fridge has liquefied into a sad green puddle. The dried jar on the shelf will “work,” but it won’t lift the dish the way fresh leaves do. Then you look over at the only sunny real estate you control every day—your kitchen counter—and wonder if it can do more than hold a cutting board and yesterday’s mail.
A counter spice garden is small-scale landscape design. You’re balancing light, moisture, circulation, access, and aesthetics in a footprint measured in inches. Done well, it’s not a row of struggling pots; it’s a working “herb station” that makes dinner taste better, reduces waste, and looks intentional. Let’s lay it out like a designer: start with the constraints, build a simple plan, then choose plants that actually thrive indoors.
Start with the site: measure, watch the light, map the traffic
Before buying anything, treat your counter like a planting bed. You need three pieces of information: available footprint, available height, and reliable light.
Counter footprint and clearance
Most kitchens can spare a strip without feeling cluttered if you stay within 24–30 inches of width and 6–10 inches of depth. If you’re working beside the sink, keep a 4-inch buffer from the faucet swing zone so you’re not constantly knocking pots.
Vertical clearance matters more than people expect. Many spice plants can stay compact, but grow lights and shelves steal headroom. If you’re under cabinets, measure from counter to cabinet underside—often 18 inches. Plan your tallest element (pot + plant + light) to stay under that.
Sunlight hours: the honest assessment
Most culinary herbs prefer bright light. Indoors, that usually means a south- or west-facing window. Aim for 6+ hours of direct sun if you want sun-loving herbs (like basil and thyme) to look like the plants you see in outdoor gardens. If you only have 2–4 hours of sun, you can still succeed—just lean on shade-tolerant herbs (like mint and chives) or plan on supplementing with a small grow light.
One reason people fail indoors is underestimating how quickly light drops as you move away from the glass. If your pots sit 24 inches from the window, the plant effectively “sees” much less light than the windowsill. That’s not a moral failure; it’s physics. Plan accordingly.
Workflow: keep herbs within arm’s reach
The most successful counter gardens live where you cook, not where they “look cute.” Put your herbs within one step of your main prep zone. If you chop on the right side of the stove, place herbs to the right. If you’re constantly reaching across a hot burner, the garden will stop getting harvested—and neglected plants get leggy fast.
Design principles that make tiny gardens feel calm (not cluttered)
Use a tray to create a “room” for the garden
A tray is the hardscape of your counter landscape. It visually contains the garden and catches drips. Choose a tray around 18 x 6 inches for a compact lineup or 24 x 8 inches if you want four to six pots. Metal baking sheets work; so do cafeteria trays or plant saucers grouped together. This one choice makes the setup look designed instead of temporary.
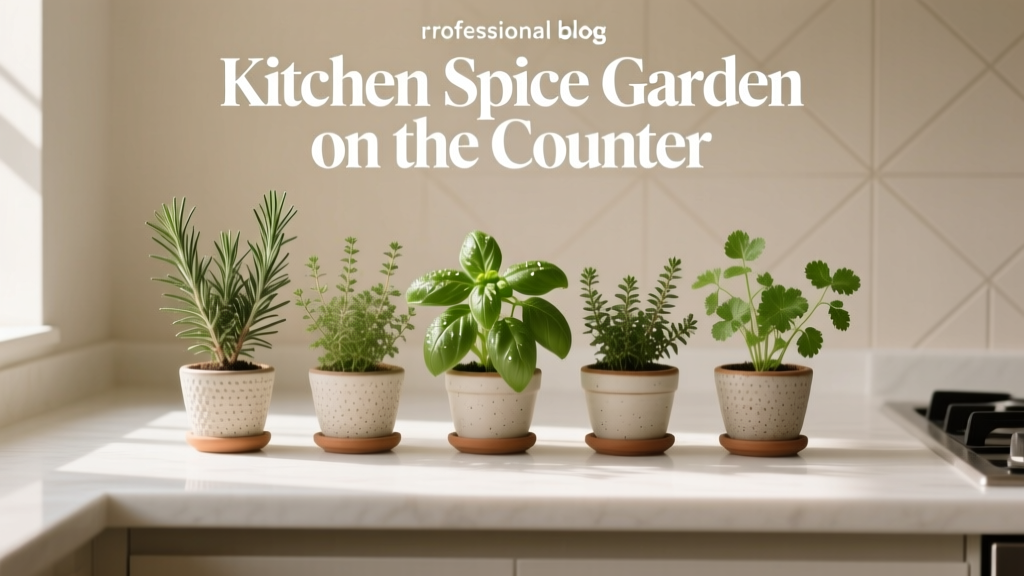
Repeat containers for instant cohesion
Pick one pot style and repeat it. The plants can vary; the containers should not. For most spice gardens, 4-inch to 6-inch diameter pots are the sweet spot. Four-inch pots fit more plants but dry faster; six-inch pots buffer moisture and are easier for basil and parsley.
Design by height: low in front, tall in back
On a counter, your “sightline” is from standing height. Arrange plants like a miniature border:
- Front row (low, tidy): thyme, oregano, chives
- Middle: parsley, cilantro (short-lived but useful)
- Back row (taller, focal): basil, rosemary (if light is strong)
If you’re under cabinets, keep the tallest plant in a spot where it won’t press against the underside—crowding up top reduces airflow and encourages mildew.
Water strategy: plan to avoid “counter swamp”
Indoor herbs hate soggy roots. Use pots with drainage holes and a saucer, or set nursery pots inside cachepots and empty water after 10 minutes. If you hate saucers, use a tray with a thin layer of pebbles to keep pots slightly elevated above runoff.
“Overwatering is the most common cause of failure with herbs grown indoors; good drainage and letting the medium dry slightly between waterings are essential.” — University of Maryland Extension, Home & Garden Information Center (2020)
This is why container choice is design, not just décor. The wrong container forces you into constant cleanup or plant loss.
Three layout strategies (pick the one that fits your kitchen)
Layout A: The “Linear Prep Line” (best for narrow counters)
This is the simplest: a straight row of matching pots on a tray. Use 4–5 pots in 4-inch containers spaced about 1 inch apart for airflow and easy lifting. Total footprint: about 22 x 6 inches.
Designer move: keep scissors in a small cup at one end so harvesting is frictionless.
Layout B: The “Two-Tier Shelf” (best for low square footage, decent height)
If your counter is crowded but you have vertical clearance, add a small countertop shelf. Look for one about 16–18 inches wide and 8 inches deep. Put low growers on the lower tier and tall basil/parsley on the top.
Important: if the shelf blocks window light, it can backfire. Use it only when your light source is strong (south/west window) or you’re adding a grow light.
Layout C: The “Sink-Side Cluster” (best for renters and high-use kitchens)
Cluster 3 medium pots (6-inch) tightly together on a waterproof tray near the sink for easy watering. Choose herbs with similar moisture needs so you’re not juggling microclimates: parsley + chives + mint, for example. Total footprint: about 18 x 10 inches.
Keep them out of the splash zone if you use harsh cleaners. If your sink gets frequent bleach sprays, put the herbs 12+ inches away or choose the linear prep line farther from the sink.
Plant selection: specific varieties that behave well on a counter
Counter gardens succeed when plants match indoor realities: lower light than outdoors, less airflow, and limited root space. Choose varieties bred for compactness and strong flavor.
Top performers for indoor spice gardens
- Sweet basil ‘Genovese Compact’: Dense growth, great for pinching; stays bushier than standard basil in pots.
- Thai basil ‘Siam Queen’: More tolerant of heat near stoves, strong flavor that holds up in cooking.
- Parsley ‘Italian Flat Leaf’: Productive in a 6-inch pot; reliable for daily snipping.
- Chives: Compact, perennial, forgiving in moderate light; excellent for eggs, potatoes, and soups.
- Thyme ‘German Winter’: Tight habit, woody structure that stays neat; needs bright light and careful watering.
- Mint ‘Spearmint’ (or ‘Mojito’): Thrives indoors, but keep it in its own pot—it spreads aggressively.
- Oregano ‘Greek’: Strong flavor, tolerates drying between waterings; compact when pinched.
Plants to treat as “advanced” indoors
- Rosemary (try ‘Arp’): Wonderful, but it needs very bright light and excellent airflow. If your window is weak, rosemary becomes a stick with a few needles.
- Cilantro ‘Slow Bolt’: Useful, but short-lived indoors. Think of it as a 4–6 week crop you re-seed regularly.
Spacing and pot sizing that actually works
For most countertop herbs:
- 4-inch pot: one plant (thyme, oregano, chives) or a small clump of chives
- 6-inch pot: one basil, one parsley, or one mint
- Spacing: keep 1–2 inches between pots to improve airflow and make watering easier
If you buy “living herb” pots from the grocery store, assume they’re overcrowded. Many are multiple seedlings crammed together, which leads to quick decline indoors. Plan to split one pot into 2–4 smaller plants within a week.
Light options: window-only vs. adding a simple grow light
If you can provide 6–8 hours of direct sun, you can keep a window-based counter garden. If not, a small LED grow light turns a frustrating project into a reliable one.
| Setup | Best for | Target light | Typical cost | Notes |
|---|---|---|---|---|
| Window-only | South/west windows with strong sun | 6+ hours direct sun | $0–$25 (tray/saucers) | Rotate pots weekly for even growth. |
| Clamp-on LED grow light | Moderate light homes, renters | 12–14 hours/day | $20–$45 | Keep light 6–12 inches above plants; raise as they grow. |
| Under-cabinet LED bar | Dedicated herb station | 12–16 hours/day | $35–$80 | Clean look; measure cabinet clearance carefully (often 18 inches). |
For indoor edible plants, many university extensions emphasize that supplemental lighting can be the difference between “survival” and “harvest.” Penn State Extension notes herbs generally need bright light indoors and benefit from supplemental grow lights when window light is insufficient (Penn State Extension, 2023).
Step-by-step: build your counter spice garden in one afternoon
- Measure your zone. Mark out an area roughly 24 x 8 inches with painter’s tape on the counter to confirm it doesn’t interfere with cooking.
- Choose a tray. Aim for something waterproof; an 18 x 6 inch tray works in most kitchens.
- Select pots with drainage. Start with 4 pots: two 6-inch (basil, parsley) and two 4-inch (thyme, chives).
- Use a quality potting mix. Avoid heavy garden soil. Fill pots leaving 1 inch headspace for watering.
- Plant or split grocery-store herbs. If splitting, gently tease roots apart and replant into separate pots. Water in thoroughly, then let excess drain.
- Place by the best light. Window-only: keep as close to the glass as practical. With a grow light: set it 6–12 inches above the leaves.
- Add a simple label system. Use waterproof plant tags or a grease-pencil mark on the pot. It’s not precious; it prevents mix-ups when seedlings are small.
- Set a watering rhythm. Check moisture with a finger test 2 times per week. Water when the top 1 inch is dry (most herbs), but keep mint and parsley slightly more evenly moist.
Budget planning (and smart DIY swaps)
You can build an attractive, functional counter spice garden at several price points. Here are realistic numbers that help you plan without guesswork:
- Basic setup ($25–$45): thrifted tray ($5–$10), four nursery pots ($0–$8), potting mix ($8–$12), grocery-store herbs ($3–$5 each).
- Midrange setup ($60–$120): matching ceramic pots ($6–$12 each), a good tray ($15–$25), potting mix ($10–$15), and a clamp grow light ($20–$45).
- Polished setup ($150–$250): designer containers, under-cabinet grow light bar ($35–$80), countertop shelf ($40–$90), plus plants and soil.
DIY alternatives that look intentional:
- Tray swap: a rimmed baking sheet you already own is nearly perfect—easy to wipe, waterproof, and slim.
- Cachepot hack: keep herbs in nursery pots (with drainage) and drop them into matching mugs or crocks. Just empty runoff water so roots don’t sit in it.
- Label swap: painter’s tape and a marker works and peels cleanly off glazed pots.
Real-world scenarios: three kitchens, three solutions
Scenario 1: The rental with one north-facing window
North light is gentle and consistent, but usually not enough for basil to thrive without help. The best design here is a two-tier shelf plus a clamp-on grow light. Put mint, chives, and parsley on the lower tier (they tolerate moderate light) and basil on the upper tier under the lamp.
Plant list: chives, spearmint, flat-leaf parsley, and Thai basil ‘Siam Queen.’ Run the light 14 hours/day using an outlet timer (a small timer often costs $8–$15). Maintenance stays simple: water checks twice weekly, pinch basil weekly.
Scenario 2: The sunny condo window—but almost no counter space
If you’ve got great sun but minimal counter, go linear and stay slim. Use a narrow tray (24 x 6 inches) and four 4-inch pots. Choose compact plants that don’t demand frequent repotting: thyme ‘German Winter,’ Greek oregano, chives, and cilantro ‘Slow Bolt’ (treated as a re-seed crop).
Design trick: push the tray tight to the window and keep your tallest plants at the ends, not the middle, so the whole lineup feels lower from the front.
Scenario 3: The family kitchen where the sink and stove are always in use
Busy kitchens kill fragile setups. Here, the goal is durability and easy cleanup. Choose three 6-inch pots on a sturdy waterproof tray near (but not directly beside) the sink—think 12–18 inches away from heavy splashing.
Plant list: parsley, chives, and mint. These handle frequent harvesting and bounce back fast. Skip cilantro (too finicky for the chaos) and skip rosemary unless you’re adding a grow light and have strong airflow.
Family-proofing detail: choose heavier containers so they don’t tip. If you have kids helping in the kitchen, keep scissors in a drawer and pinch-harvest by hand.
Maintenance expectations: what it really takes
A counter spice garden should be pleasant, not another chore. Expect 15–25 minutes per week for routine care once it’s established.
Weekly rhythm
- Water check: 2 times/week. Water thoroughly, then let drain; don’t “sip” daily.
- Pinch and harvest: 5 minutes/week. Basil especially needs pinching to stay bushy—snip above a leaf node.
- Rotate pots: weekly if you’re window-only to prevent leaning.
Monthly and seasonal tasks
- Refresh and re-seed: Cilantro often needs re-sowing every 4–6 weeks for steady supply.
- Light adjustment: In winter, many homes dip in light intensity; move plants closer to the glass or add a lamp for 12–14 hours.
- Repotting: Basil and parsley may want a step up from 4-inch to 6-inch pots after 6–8 weeks if roots fill the container.
Pest and disease reality check
Indoors, the most common issues are fungus gnats (from consistently wet soil) and powdery mildew (from low airflow). Let the surface dry between waterings, avoid crowding leaves against the window glass, and don’t mist constantly. If you see gnats, a simple sticky trap near the soil surface can reduce adults quickly.
Small design upgrades that make a big difference
If you want the garden to feel like part of the kitchen—not a science experiment—add one “finishing” element:
- A backsplash moment: set the tray against a tile or washable wall area so water and soil are easy to wipe.
- A consistent color palette: black or white pots read clean; terracotta reads warm and classic but shows mineral stains faster.
- One tool that lives there: a small pair of herb scissors or snips makes harvesting quick and keeps plants shaped.
For plant quality and food safety, it’s worth remembering that culinary herbs are at their best when grown with sufficient light and harvested regularly. USDA’s FoodData Central documents that fresh herbs contain aromatic compounds and nutrients that decline with age and poor storage, reinforcing the value of harvesting fresh as needed (USDA FoodData Central, 2019).
Once your counter spice garden is installed, the payoff is immediate: you’ll cook differently because flavor is within reach. A pinch of thyme while butter browns, a handful of basil torn over tomatoes, chives clipped onto scrambled eggs—these are small actions that make a kitchen feel alive. Keep the layout tight, the light honest, and the plant choices realistic for your window, and your counter becomes the most used garden you’ve ever had.