Indoor Biophilic Design Plant Wall
It starts with a blank wall you can’t ignore. Maybe it’s the one you see from the couch every evening—flat, echo-y, and a little too close to your screen time. You’ve tried art. You’ve tried a shelf. But the room still feels like it’s missing oxygen. If you’ve ever stood there thinking, “This space needs life,” a biophilic plant wall is one of the most satisfying fixes you can design—because it changes how the room feels, not just how it looks.
I’m going to walk you through a practical indoor plant wall layout the way a landscape designer would: start with the constraints (light, wall type, water risk), sketch the structure, then select plants like you’re choosing materials for a living mosaic. Along the way, you’ll see real dimensions, spacing rules, cost ranges, and three case-style scenarios so you can adapt the plan to your home or rental.
Design principles: what makes an indoor plant wall feel intentional
Start with the “viewing zone,” not the whole wall
Most indoor plant walls fail because people build too big, too high, or too far from where it will be enjoyed. Stand where you’ll see it most—sofa, desk, dining chair—and mark a rectangle at eye level. For most rooms, that sweet spot is roughly 36–72 inches off the floor. If you’re building a wall that’s 6 feet wide, you don’t need to fill every inch. A well-composed living panel can be 48 inches wide × 72 inches tall and still dominate the room in the best way.
Use biophilic “layers”: canopy, mid-layer, and trailing edge
Think like you’re designing a mini forest edge:
- Canopy layer: upright plants that add structure (pothos trained upward, small philodendrons, compact ferns).
- Mid-layer: medium textures that read as lush from across the room (peperomia, heartleaf philodendron, spider plant).
- Trailing edge: spillers that soften the outline (pothos, philodendron ‘Brasil’, string of hearts in bright light).
Make maintenance a design constraint
Biophilic design works best when it lasts. For most homeowners and renters, a realistic maintenance target is 20–40 minutes per week. If you know you travel often, choose a layout that lets you water from the front (no climbing) and plants that handle slight dryness. A gorgeous wall you can’t reach becomes a guilt project.
Design for safe moisture management indoors
Water is the only part of an indoor plant wall that can cause real damage. Your layout should include three safeguards:
- Water containment: trays, a waterproof backer, or self-contained pocket modules.
- Wall protection: a sealed panel (PVC sheet, FRP panel, or exterior-grade plywood sealed on all sides).
- Controlled watering: hand watering with a narrow spout, or a drip line that drains into a catch reservoir.
“Access for maintenance is one of the key determinants of long-term success for interior planted walls—without it, even well-designed systems decline quickly.” — Green wall design guidance summarized from industry practice and maintenance findings, aligned with interior living wall system recommendations (Perini & Rosasco, 2013).
Layout strategies that work in real homes (and rentals)
Strategy 1: The modular grid (best for renters and easy edits)
Modular pocket panels or individual wall planters let you build a grid that can expand or shrink. A practical starting footprint is 4 feet wide × 6 feet tall using 12-inch × 12-inch modules. That’s 24 modules in a clean rectangle, or fewer if you want negative space for art or lighting.
Spacing rule: keep 3–6 inches between modules if you’re using individual pots so foliage has room to overlap without crushing airflow. Tight grids look lush quickly, but airflow reduces fungus and gnats.
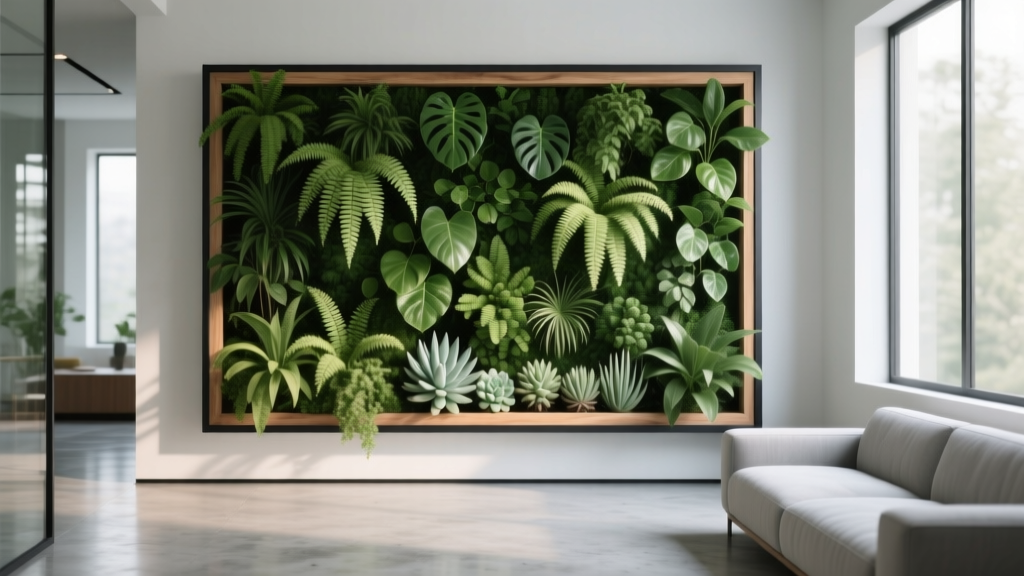
Strategy 2: The “living picture frame” (best for small apartments)
If your wall space is limited, treat the plant wall like a single framed artwork. Build a panel at 24 inches × 48 inches and mount it at eye level. You’ll get the biophilic hit without turning your living room into a maintenance zone.
For this layout, plant fewer varieties (think 5–7 total) and repeat them for a cohesive, designed look—like a patterned planting bed.
Strategy 3: The shelf-and-trellis hybrid (best for minimal wall risk)
This is my go-to when someone says, “I want a plant wall, but I’m scared of water.” Install two sturdy shelves (10–12 inches deep) plus a trellis or wire grid above. Keep plants in standard nursery pots with saucers on the shelves, then train vines upward. It reads like a living wall, but watering happens at shelf level with full control.
Use 2 shelves spaced 18–24 inches apart vertically, then run a trellis from the top shelf to 12–18 inches above it. That gives enough room for climbing and trailing plants to layer.
Light planning: your wall’s “sun budget”
Before buying plants, measure light. Most indoor plant walls thrive in 6–10 hours of bright indirect light. If you only have 2–4 hours of sun through a window (especially north-facing), plan for low-light performers and consider a grow light.
A simple, reliable setup is a 20–40 watt LED grow bar mounted 12–18 inches from the foliage, on a timer for 10–12 hours/day. This is often cheaper than constantly replacing plants that slowly decline.
Choosing a system: cost, complexity, and wall safety
| System | Typical footprint | Estimated cost (USD) | Water risk | Best for |
|---|---|---|---|---|
| Modular pocket panels | 4’ × 6’ | $250–$900 | Medium (needs waterproof backer) | Design flexibility, medium budgets |
| Living picture frame panel | 2’ × 4’ | $120–$450 | Low–Medium | Small spaces, strong visual impact |
| Shelf + trellis hybrid | 4’ wide (variable height) | $80–$300 | Low | Renters, low-risk watering |
| Professional living wall (irrigated) | 6’ × 8’+ | $1,500–$6,000+ | Low if installed correctly | Large walls, hands-off irrigation |
Budget reality: the biggest cost driver isn’t plants—it’s the wall system and waterproofing. A DIY shelf-and-trellis can look high-end for under $200 if you already own a drill and level. A fully irrigated wall costs more up front, but can reduce weekly labor.
Plant selection: specific varieties that behave well on walls
For indoor plant walls, you want plants that tolerate consistent indoor temperatures, handle pruning, and grow predictably. The goal isn’t rare plants—it’s stable performers with good leaf-to-stem ratio and forgiving water needs.
Reliable “anchor” plants (structure + bulk)
- Philodendron hederaceum (Heartleaf philodendron): Fast, cooperative growth; easy to pin and train; tolerates medium light.
- Epipremnum aureum ‘Golden Pothos’: The workhorse for coverage; ideal for trailing edges and quick fill-in.
- Nephrolepis exaltata (Boston fern): Softens hard lines with texture; best when humidity is moderate and light is bright-indirect.
Texture plants (the difference between “plants on a wall” and “designed”)
- Peperomia obtusifolia: Glossy, compact, and tidy; great in modular grids where you want controlled shape.
- Fittonia albivenis (Nerve plant): Color-veined pattern adds detail up close; prefers evenly moist conditions.
- Chlorophytum comosum (Spider plant): Arching form and toughness; works beautifully on the lower edge where it can cascade.
Accent plants (use sparingly so the wall doesn’t look busy)
- Philodendron hederaceum ‘Brasil’: Chartreuse variegation reads well from across the room.
- Scindapsus pictus ‘Argyraeus’: Silver patterning adds a “cool light” effect; slower growth makes it a stable accent.
- Hoya carnosa (Wax plant): For brighter spots; thick leaves tolerate missed waterings better than ferns.
Planting density guideline: for a lush look within 3–4 months, plan 1 plant per 0.5–1.0 sq ft, depending on species and pot size. A 24 sq ft wall (4’ × 6’) typically uses 24–36 plants in 3–4 inch pots for quick coverage, or fewer larger pots for a bolder, less intricate composition.
Plants to skip (unless your conditions are ideal)
Some popular houseplants fight the format. Succulents usually want stronger light and drier soil than most pocket systems deliver. Calatheas can be stunning but are sensitive to inconsistent watering and low humidity; they’re better as standalone pots unless your indoor environment is stable.
Three real-world scenarios (and how I’d design each one)
Scenario 1: Renter with a bright window but no drilling allowed
Use a shelf-and-trellis hybrid that relies on tension poles or a freestanding garment rack style frame. Footprint: 36 inches wide so it fits most walls without blocking pathways. Put two shelves at 16 inches and 40 inches high, then attach a lightweight wire grid.
Plant mix: golden pothos for coverage, heartleaf philodendron for dense mid-layer, and a spider plant on the lower shelf to soften the base. Estimated cost: $120–$250 (frame/shelves $60–$140, plants $40–$90, trays and ties $20).
Scenario 2: Homeowner with a dark hallway that feels lifeless
Hallways are emotionally important—they’re the transition spaces where a home can feel cold. But they’re often low light. For a dark hall, commit to a “living picture frame” plus a grow light. Panel size: 24 inches × 48 inches. Mount at 60 inches to center the view.
Lighting: add a 30 watt grow bar on a 12-hour timer. Plants: pothos, scindapsus, peperomia, and a small Boston fern if the light is consistent. Estimated cost: $180–$450 depending on panel and lighting.
Scenario 3: Open-plan living room with kids/pets and a “don’t leak on my floor” rule
In family spaces, design for resilience. I’d do a modular grid above a sideboard or console so the base catches drips and keeps plants out of reach. Keep the bottom of the wall at least 48 inches from the floor to reduce tugging risk.
Hardscape approach indoors: treat it like a retaining wall—waterproof backer, predictable drainage, and simple plant palette. Choose tougher leaves: pothos, heartleaf philodendron, hoya, peperomia. Skip delicate ferns if your HVAC runs dry. Estimated cost: $350–$900 depending on waterproofing materials and module quality.
Step-by-step setup: a practical build you can finish in a weekend
This sequence assumes a modular pocket panel or framed panel. Adjust as needed for shelves.
- Measure your target wall. Tape out your intended footprint: try 48” × 72” for a strong feature without dominating the room.
- Check light for 2–3 days. Note direct sun hours. If it’s under 6 hours of bright indirect light, plan a grow light for 10–12 hours/day.
- Locate studs and choose mounting points. A saturated plant wall is heavy. If you can hit studs, do it; if not, use heavy-duty anchors rated for your expected load.
- Add a waterproof backer. Use a sealed panel behind the system, sized at least 2 inches larger on all sides than the planted area to catch minor splash.
- Assemble the wall system. Install modules or mount the frame. Leave a small air gap (1/4–1/2 inch) behind if possible for airflow.
- Pot up plants in consistent media. A common, forgiving mix is potting soil amended with 20–30% perlite for drainage. Keep pot sizes consistent (often 3–4 inch) so watering is uniform.
- Lay out plants on the floor first. Arrange anchors evenly, then cluster accents in 2–3 repeating pockets. Repeat patterns so it looks designed, not random.
- Install plants and secure vines. Use soft plant ties or clips. Train pothos and philodendron stems horizontally at first to encourage fuller branching.
- Water slowly and test for drips. First watering is a “leak test.” Go pocket by pocket with a narrow spout. Stop if any channeling appears and adjust liners or trays.
- Set a weekly care rhythm. Put it on your calendar. Consistency is what makes the wall lush by month two.
Maintenance expectations: what it takes to keep it looking like a designer installed it
Plan on 20–40 minutes per week for a 4’ × 6’ wall once established. The first month usually takes longer because you’re dialing in water and training growth.
- Weekly: check moisture with a finger test; water as needed; remove yellowing leaves; rotate any potted sections that lean toward light.
- Every 2–4 weeks: prune and re-pin vines to maintain your intended pattern; wipe dust from leaves (dust reduces photosynthesis indoors).
- Every 6–8 weeks: light feeding with a diluted fertilizer (follow label rates); flush pockets occasionally if salts build up.
- Seasonally (2–4 times/year): expect growth spurts in spring/summer and slower pace in winter; adjust watering down when indoor light drops.
Indoor air quality and comfort matter, too. Research has documented that indoor plants can influence perceptions and certain air constituents, though results vary by setting and ventilation. NASA’s early work is widely cited for VOC interactions in controlled conditions (Wolverton et al., 1989), and later reviews emphasize that real-world indoor air improvement depends heavily on air exchange rates and system scale (Cummings & Waring, 2020). Translation for homeowners: a plant wall won’t replace ventilation, but it can absolutely improve how a room feels—and it can contribute to humidity balance and psychological restoration when maintained well.
Budget planning and DIY swaps (without sacrificing the look)
If you want the aesthetic but not the expense, spend strategically: put money into wall protection and mounting, then simplify the planting palette.
- DIY waterproofing alternative: use a sheet of FRP (fiberglass reinforced plastic) panel behind the wall. It’s commonly available and designed for wipeable, moisture-prone areas.
- Affordable plant strategy: buy fewer plants and let them grow in. Start with 12–18 strong starters for a 4’ × 6’ wall, then fill gaps with cuttings over 8–12 weeks.
- Use cuttings intentionally: pothos and heartleaf philodendron root easily in water, letting you multiply coverage with almost no cost.
- Skip complicated irrigation at first: hand watering is slower but reduces installation complexity and leak risk while you learn your wall’s behavior.
As a practical baseline, many DIY indoor plant walls land around $250–$600 all-in (system + waterproofing + plants + light if needed). If you already own shelves and can propagate cuttings, you can bring that under $200 and still achieve a lush effect—just on a longer timeline.
Small design moves that make the wall feel “architectural”
Two tricks I use constantly: lighting and edge control. Add a slim picture light or a warm LED strip above the wall and your plants read like a curated installation at night. And give the composition a clean boundary—either with a frame, a crisp rectangular footprint, or a deliberate “fade out” where trailing plants soften just one edge.
If you want the wall to look calmer (especially in small rooms), limit yourself to 3–5 primary species and repeat them. If you want it to feel like a mini conservatory, push to 8–12 species—but keep the color palette consistent so it doesn’t turn into visual noise.
The best part of an indoor biophilic plant wall is that it changes with you. You can edit it like you’d edit a garden bed—swap a struggling plant, train a vine into a new line, thin a patch for more negative space. And one day, when you walk past that wall and notice the air feels softer and the room feels finished, you’ll realize you didn’t just decorate a surface—you designed a living edge inside your home.
Citations: Perini, K., & Rosasco, P. (2013). Review of green wall systems and maintenance considerations. Wolverton, B.C., Johnson, A., & Bounds, K. (1989). NASA Clean Air Study. Cummings, B.E., & Waring, M.S. (2020). Review of indoor plants and air quality effectiveness in real buildings.