Outdoor Kitchen Garden Design
The pan is hot, the pasta water is rolling, and you realize the basil is five minutes away—across wet grass, past the hose, around the dog. You come back with half the leaves bruised and a sleeve splattered with sauce. That tiny sprint is the moment most people decide they don’t just want a vegetable garden. They want a kitchen garden: a place designed like an outdoor pantry, staged for quick harvesting, clean paths, and plants that behave when you need them.
This is a landscape designer’s approach to building one—practical, space-specific, and meant to work for both homeowners and renters. We’ll design for speed (30 seconds to harvest), comfort (no muddy shoes), and steady supply (succession planting), while keeping it beautiful enough to make you step outside even on a busy weeknight.
Design principles: build your “cook’s triangle” outdoors
Start with the 30-second rule
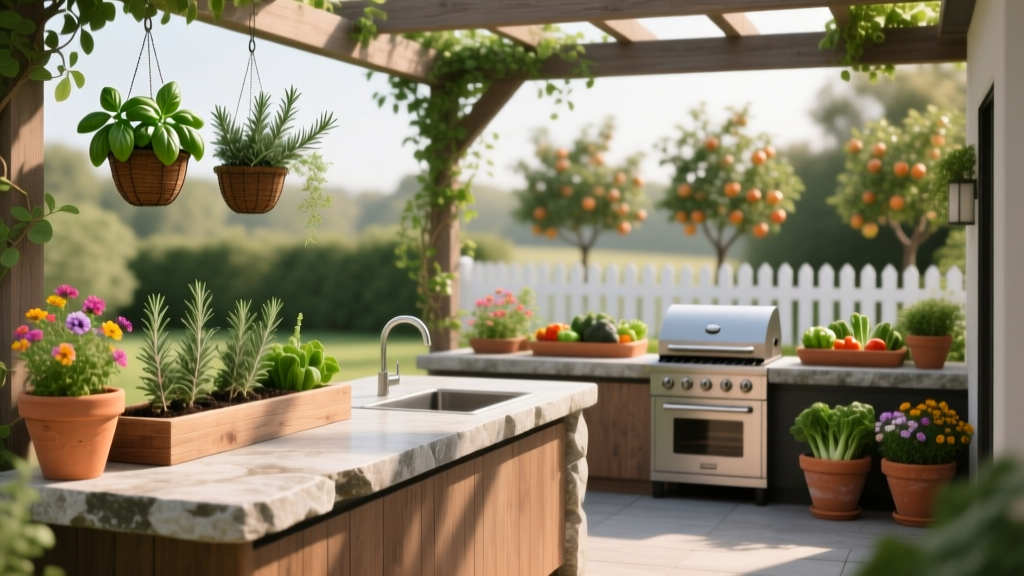
If you want to actually use your garden while cooking, keep your highest-use herbs and “snip greens” within about 25–40 feet of the kitchen door, or close enough that you can walk out and back in under a minute. In many homes, that’s a strip along the patio, a side yard run, or containers clustered near the grill.
Think of it like the classic kitchen work triangle (stove–sink–fridge). Your outdoor version is:
- Door (access and speed)
- Water (hose bib, rain barrel, or watering can station)
- Harvest zone (the beds/containers you’ll clip from daily)
Sunlight first, then aesthetics
Most fruiting crops need real sun: plan for 6–8+ hours of direct light for tomatoes, peppers, cucumbers, eggplant, and most berries. Leafy greens and many herbs will tolerate 4–6 hours (especially with afternoon shade), which is useful in courtyards and balconies.
Before you build anything, stand outside three times in one day (morning, midday, late afternoon) and note where shadows land. If you’d rather use data than guesswork, the USDA emphasizes that “full sun” generally means 6 or more hours of direct sunlight per day (USDA, 2019).
Paths you can walk with a bowl in your hand
A kitchen garden fails when the path is narrow, uneven, or muddy. Make your main access path at least 36 inches wide so you can pass with a colander or tray. Secondary paths between beds can be 18–24 inches if you’re not carrying much, but 24 inches is far more comfortable when plants spill over.
For surfaces, crushed gravel, decomposed granite, pavers, or even thick wood chips all work. If you’re renting, a simple layer of heavy-duty cardboard topped with 3–4 inches of wood chips creates a stable, removable path in an afternoon.
Bed sizing that matches human reach
Design beds around how far you can comfortably reach without stepping into soil. A classic rule is 4 feet wide if you can access both sides, or 2 feet wide if it’s against a wall or fence. Length is flexible, but 6–10 feet is a sweet spot: long enough to plant in blocks, short enough to manage and amend.
For height, raised beds at 12–18 inches improve drainage and define space; 24–30 inches is more ergonomic for frequent harvesting (and easier on knees), though it costs more soil.
Layout strategies that keep harvests constant
Strategy 1: The “Herb Halo” near the door
Put your most-used herbs in containers right outside the kitchen or on the patio edge: basil, parsley, chives, thyme, rosemary, mint (always in its own pot), and a leafy green like arugula. This reduces cooking friction. If you only build one piece of a kitchen garden, make it this.
Spacing in pots matters. A single basil plant wants a container at least 10–12 inches wide; rosemary is happier in 14–18 inches with sharp drainage. Group pots on a tray of gravel to catch drips and keep the patio cleaner.
Strategy 2: Beds arranged as “stations” (salad, sauce, grill)
Instead of planting by category (“all tomatoes here”), plant by how you cook:
- Salad bed: lettuces, arugula, radishes, scallions, dill
- Sauce bed: tomatoes, basil, oregano, garlic chives
- Grill bed: peppers, eggplant, zucchini, skewering herbs like rosemary
This makes harvesting intuitive and helps you notice gaps. If your salad station is empty in July, you’ll remember to sow heat-tolerant greens or move to shade.
Strategy 3: Succession strips for weekly harvest
One of the most overlooked design moves is leaving space to replant. Dedicate a strip that’s easy to reach—say 12–18 inches wide along the front edge of a bed—for quick crops: radishes, baby greens, cilantro, and turnips. Re-sow every 2–3 weeks during the right season and you’ll get a steady flow instead of a single glut.
Strategy 4: Vertical elements that don’t steal light
Use trellises on the north side of beds (in the Northern Hemisphere) so they don’t shade shorter plants. A cattle panel arch spanning a 4-foot path creates a dramatic entry and doubles as a cucumber/bean tunnel.
For renters, a freestanding trellis in a large container can support a patio cucumber or pole bean without touching the ground.
Three real-world design scenarios (with layouts and numbers)
Scenario A: Suburban patio + small lawn (10' x 12' footprint)
Goal: fast herbs, salad greens, and 2–3 summer crops without ripping up the yard.
Layout: two raised beds 4' x 8' set parallel, with a 36-inch gravel path between them; a pot cluster at the patio edge.
Planting plan: one bed for tomatoes/peppers with basil and marigolds; the other for salad succession and cucumbers on a trellis.
Budget: two kit beds often run about $120–$250 each depending on material; bulk soil/compost for two 4' x 8' x 12" beds is roughly 32 cubic feet total, commonly $150–$300 delivered in many areas. DIY with untreated cedar or recycled composite can shift costs up or down.
Scenario B: Rental side yard (3' x 20' strip, part shade)
Goal: maximize production without permanent changes.
Layout: a single narrow bed line using fabric grow bags and long planters: six 10–15 gallon grow bags for peppers, eggplant, and a compact tomato; a 2' x 6' trough planter for greens; a removable trellis zip-tied to two stakes for beans.
Sun strategy: place fruiting crops in the sunniest end; keep greens where the strip gets 4–5 hours of light to reduce bolting.
DIY path: cardboard + 3 inches of wood chips to keep shoes clean and signal “this is a garden.”
Scenario C: Balcony or rooftop (8' x 6', windy, full sun)
Goal: an edible setup that won’t overheat or topple.
Layout: one 2' x 4' raised planter box against the warmest wall; three to five 12–16 inch containers grouped near the door; a narrow vertical trellis anchored inside a heavy pot.
Wind strategy: choose compact varieties, use heavier pots, and add a simple screen (bamboo roll or lattice) on the windward side. Container soil dries fast: plan on watering 3–5 times per week during hot spells.
Plant selection: varieties that behave in a kitchen garden
A kitchen garden should be dependable: compact plants, repeat harvest, and flavors that show up in everyday meals. The varieties below are widely available and chosen for performance in small spaces, containers, or frequent harvest.
Go-to herbs (high use, high payoff)
- Basil ‘Genovese’: classic pesto flavor; plant after nights stay above ~50°F. Space 10–12 inches apart. Pinch weekly for bushiness.
- Parsley ‘Italian Flat Leaf’: hardy, long-lasting, better for cooking than curly; tolerates partial sun. Space 8–10 inches.
- Chives: perennial in many climates; neat clumps; flowers feed pollinators. Space 6–8 inches.
- Thyme ‘German Winter’: drought-tolerant edging herb; excellent near paths. Space 10–12 inches.
- Rosemary ‘Arp’ (cold-tolerant type): great for grilling; keep in a pot if winters are harsh. Give it 14–18 inches and sharp drainage.
- Mint (spearmint or peppermint): unbeatable for drinks, but invasive—keep it in its own container.
Salad station stars
- Lettuce ‘Salad Bowl’ (looseleaf): cut-and-come-again harvest; space 8 inches for baby leaves, 10–12 inches for full heads.
- Arugula ‘Astro’: fast and reliable; re-sow every 2–3 weeks in spring/fall.
- Radish ‘French Breakfast’: quick (often ~1 month depending on conditions); tuck into bed edges.
- Scallions ‘Evergreen Hardy White’: long harvest window; great for planters; space 2 inches for a dense clump harvest.
“Sauce bed” and summer staples (compact, productive choices)
- Tomato ‘Sungold’ (cherry): extremely productive and snackable; needs a strong trellis. Give 24 inches spacing in beds or a 15–20 gallon container.
- Tomato ‘Roma’ (paste): ideal for sauce; usually more manageable than huge slicers. Space 24 inches.
- Sweet pepper ‘California Wonder’: classic blocky pepper; does well in containers; space 18 inches.
- Hot pepper ‘Jalapeño’: steady producer; great for pickling; space 18 inches.
- Cucumber ‘Diva’: parthenocarpic (sets fruit without pollination), which can help in protected patios; train vertically to save space.
Edible flowers and companions that earn their keep
- Nasturtium: peppery leaves/flowers, attractive spillover, can distract aphids; great in pot edges.
- Calendula: long bloom season; petals are edible; draws beneficial insects.
- Marigold (French types): compact color near tomatoes and peppers; easy in borders.
“The key to a successful edible landscape is putting the plants where you will care for them—close to the kitchen, close to water, and integrated with daily life.” — Rosalind Creasy, edible landscaping designer and author (Creasy, 2010)
A practical comparison: raised beds vs. in-ground vs. containers
| Option | Best for | Typical footprint | Upfront cost (common range) | Watering needs | Notes |
|---|---|---|---|---|---|
| Raised beds | Fast setup, tidy layout, great soil control | 4' x 8' x 12" (common) | $250–$700 for bed + soil (varies by material/soil delivery) | Moderate | Ergonomic, easy to add hoops/netting |
| In-ground rows/blocks | Lowest cost if soil is decent | Flexible; path planning matters | $20–$120 (compost + edging optional) | Lower once established | Can be messy in wet weather; harder in compacted soil |
| Containers/grow bags | Renters, patios, balconies, poor native soil | 10–20 gal per fruiting plant | $15–$60 per container + potting mix | Higher (dries fast) | Most flexible; easiest to move for sun |
Step-by-step: set up your outdoor kitchen garden (designer workflow)
- Measure and sketch. Write down exact dimensions (even a rough plan). Mark door, water source, and sunniest zone.
- Choose your harvesting “hot zone.” Place herbs and salad greens within 25–40 feet of the door if possible.
- Lay out paths with a hose or string. Confirm your main path is 36 inches wide before you commit.
- Build or place beds/containers. Keep bed width to 4 feet max (two-sided access). Put trellises on the north side of beds.
- Fill with the right growing medium. Use a quality raised-bed mix or container mix; blend in compost. The EPA notes that compost improves soil structure and water-holding capacity (U.S. EPA, 2023).
- Add irrigation you’ll actually use. A simple soaker hose on a timer often costs $35–$80 and prevents the “I forgot” drought cycle.
- Plant in layers. Tall crops/trellises, then medium crops, then edge crops (greens, scallions, herbs). Leave a succession strip for re-sowing.
- Mulch and label. Apply 2–3 inches of straw or shredded leaves to reduce evaporation and splash. Label varieties so you can repeat what works.
Budget-smart design choices (and renter-friendly swaps)
If you’re trying to keep costs sensible, spend money where it prevents failure: soil quality, a stable path, and simple irrigation. Everything else can be upgraded later.
- DIY raised bed alternative: grow bags. For many renters, six grow bags plus good potting mix costs less than building a bed and can move with you.
- Free edging: reclaimed bricks or logs (as long as they’re stable). Even a clean line of pavers on grade helps keep mulch in place.
- Low-cost trellis: concrete remesh, cattle panel sections, or bamboo stakes with jute. A sturdy trellis is worth it—floppy supports lead to broken stems right when fruit sets.
- Start small with “menu plants.” If you only cook with two herbs, plant those first. A tight, loved garden beats a big, ignored one.
Maintenance expectations: what it takes to keep it productive
A well-designed kitchen garden isn’t high-maintenance, but it is high-attention. Plan on 30–60 minutes per week in spring/fall and 60–90 minutes per week in peak summer if you’re growing fruiting crops. Containers may add extra watering time.
Weekly rhythm (10-minute habits)
- Harvest often: frequent picking keeps herbs tender and encourages new growth.
- Check moisture: stick a finger 2 inches into soil; water when it’s dry at that depth (containers dry faster).
- Quick pest scan: look under leaves for aphids or caterpillars; catch problems early.
Seasonal tasks you’ll feel immediately if you skip
- Spring: top-dress beds with 1–2 inches compost; refresh mulch; plant cool-season greens.
- Early summer: install trellises before plants sprawl; prune tomatoes for airflow if needed.
- Mid-to-late summer: sow fall greens when nights begin to cool; keep herbs from flowering if you want leaf production.
- Fall: pull spent crops; add leaves as mulch; plant garlic if you use it often.
Design details that make the garden feel like part of the kitchen
Good kitchen gardens are not just productive—they’re convenient. Add one “landing spot” outdoors: a small shelf, potting bench, or even a weatherproof stool where you can set a bowl and snip herbs. If you have room, a simple wash station (a bucket with a spigot or a hose sprayer near the bed) keeps soil out of the sink.
Lighting matters too. A single solar path light at the herb pots makes evening harvesting feel natural instead of fussy. And if you cook outside, place your most-used grilling herbs (rosemary, thyme, oregano) closest to the grill zone—no wandering with raw skewers in hand.
The final touch is restraint: repeat materials (one mulch type, one pot style), keep bed edges crisp, and let the plants do the decorating. When the layout supports how you actually cook—salad on Tuesday, pasta on Friday, grilled peppers on Sunday—you’ll stop thinking of it as “the garden” and start treating it like an extension of your kitchen.
Sources: USDA (2019) guidance on sunlight definitions for garden planning; Rosalind Creasy (2010) on integrating edible gardens into daily life; U.S. Environmental Protection Agency (2023) on compost benefits for soil structure and water retention.