Indoor Terrarium Layering Techniques
The coffee table is finally clear. You’ve got a glass vessel in front of you—maybe a wide-bellied jar from a thrift shop—and a bag of potting mix that’s been sulking under the sink since last spring. You add a splash of soil, tuck in a cute fern, and within two weeks the glass fogs, the soil smells swampy, and the plant looks like it’s trying to escape. If that sounds familiar, you don’t need “hardier” plants—you need better layering. Terrarium layering is less like filling a pot and more like building a tiny landscape with drainage, airflow, and scale engineered into every inch.
Think of this as a designer’s walk-through: we’ll structure the floor plan (your layers), choose plants that behave in a confined ecosystem, and tailor the build to real homes—bright apartments, dim offices, kid-and-pet households, and renters who don’t want mess. By the end, you’ll be able to look at any glass container and immediately know what layers it needs, how thick they should be, and which plants will thrive without turning the whole thing into a science experiment.
Start with the “site survey”: container shape, light, and access
Before you buy anything, decide what your terrarium needs to do in your room. A tall cylinder reads like a vertical garden; a shallow bowl reads like a desert tableau. Each shape changes how moisture moves, how much plant mass you can support, and how easy it is to prune.
Choose a container size that matches your maintenance style
For most homes, a practical sweet spot is a container that’s 10–14 inches (25–36 cm) tall or wide. Smaller than 8 inches across and layers get so thin you lose buffering capacity; larger than 18 inches wide and you’ll need more frequent pruning and more expensive substrate volume.
If you want a low-touch build, pick a container with a lid (closed terrarium). If you prefer sculptural plants and easier airflow, go lidless (open terrarium). Your layering will change accordingly.
Map the light like a designer maps sun across a patio
Most terrarium plants want bright, indirect light for 6–10 hours per day. Direct sun through glass can overheat fast, especially on a windowsill. If you’re short on daylight, a simple LED grow light 10–20W placed 10–14 inches above the glass can replace missing sun hours with a 10–12 hour daily timer.
Closed terrariums are forgiving in moderate light because humidity stays stable; open terrariums demand a bit more consistent light and watering rhythm.
Layering as landscape architecture: function first, beauty second
A terrarium is a micro-landscape with a hidden infrastructure. The layers you can’t see are doing the heavy lifting: separating water from roots, preventing sour soil, and keeping the system breathable. In most failures, the “drainage layer” is either missing, too thin, or built with the wrong particle sizes.
“Good drainage is essential… when water is applied faster than it can drain away, roots are deprived of oxygen.” — Royal Horticultural Society (RHS), 2023
That principle applies even more inside a sealed glass container, where you can’t rely on evaporation and airflow to correct mistakes.
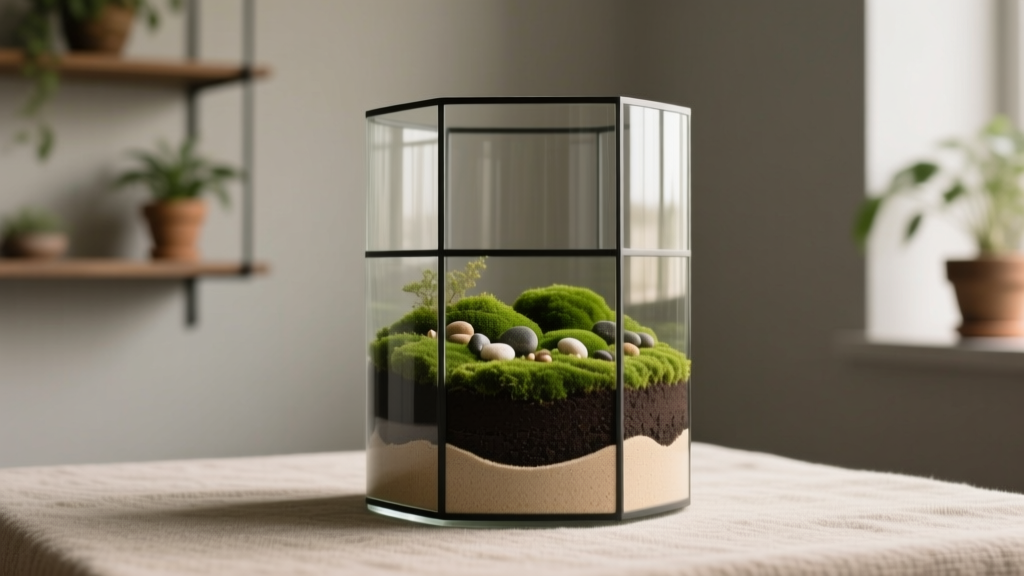
The core layers (and what each one is really doing)
Use this sequence as your baseline. Thicknesses are based on a common medium terrarium (12-inch tall vessel). Adjust slightly for very small or very large containers.
- Drainage layer (1–2 inches): Expanded clay pellets (LECA), aquarium gravel, or pumice. This creates a “sump” so roots don’t sit in stagnant water.
- Separator layer (thin sheet): Mesh screen, fiberglass window screen, or a coffee filter trimmed to fit. This prevents soil from washing down into the drainage layer.
- Charcoal layer (¼–½ inch): Horticultural charcoal (not briquettes). It helps adsorb odors and keeps the system fresher longer—especially helpful in closed terrariums.
- Substrate layer (2.5–4 inches): A mix matched to your plants—moisture-retentive for moss and ferns; gritty and fast-draining for succulents.
- Top dressing (optional, ½ inch): Sheet moss, gravel, sand, or leaf litter for a finished look and to reduce soil splash on the glass.
Design note: In a closed terrarium, I lean toward a slightly deeper drainage layer (closer to 2 inches) because condensation recycles water back into the system. In an open terrarium, you can often stay closer to 1 inch, depending on your watering habits.
Layout strategies: build depth, not clutter
Layering isn’t only vertical. A well-designed terrarium feels deeper than it is because it uses grading, negative space, and a clear focal point—exactly the same way we design a small courtyard.
Use the “high back / low front” slope
Slope the substrate so it’s higher in the back and lower in the front. In a 12-inch tall jar, aim for roughly 4 inches of substrate at the back tapering to 2.5 inches at the front. This gives roots room where taller plants sit and creates a natural perspective.
Create a drainage “valley” for reliability
If you’re the type who occasionally overwaters, design for that reality. Instead of an even gravel layer, build it slightly deeper on one side—an extra ½ inch—so excess water collects away from the main root zone. In clear glass, this also creates a pleasing, intentional look.
Limit plant count and respect mature width
Terrariums fail when they’re overplanted. For a container about 10–12 inches wide, plan on 3–5 small plants plus moss. Space plants so there’s at least 1–2 inches between their mature edges. You’re designing for month three, not day one.
Open vs. closed terrariums: pick the right layering recipe
| Feature | Closed Terrarium (Lidded) | Open Terrarium (No lid) |
|---|---|---|
| Best for | Mosses, ferns, humidity-loving tropicals | Succulents, cacti, airy displays |
| Drainage layer thickness | 1.5–2 inches | 1–1.5 inches |
| Substrate texture | Moisture-retentive, but not soggy | Gritty, fast-draining |
| Watering frequency | Every 3–8 weeks (often just a few tablespoons) | Every 1–3 weeks (depending on light and heat) |
| Typical light target | 6–10 hours bright indirect; avoid direct sun | 6–12 hours; some succulents accept a bit more sun if not overheating |
| Common failure | Too much water + not enough pruning | Soil too organic + inconsistent watering |
Plant selection: varieties that behave well in glass
The best terrarium plants share a personality trait: they grow slowly, tolerate pruning, and don’t demand extremes. Below are designer-favorite picks with specific varieties that stay attractive and manageable.
Closed terrarium plant palette (humid, lush, forgiving)
Fittonia albivenis (nerve plant) is a classic for a reason: it stays compact, loves humidity, and comes in red/white/pink veining that reads like “color” without flowers. Give it medium-bright indirect light and it will fill space without becoming woody.
Selaginella kraussiana (spikemoss) creates a soft, carpeted look that makes terrariums feel finished. It thrives in consistently moist conditions—perfect for closed builds—but hates drying out in open air.
Nephrolepis exaltata ‘Duffii’ (lemon button fern) brings delicate structure in a small footprint. It tolerates terrarium pruning well; trim fronds at the base to keep the scale right.
Pilea glauca ‘Aquamarine’ offers tiny leaves and trailing texture that can cascade over a hardscape stone. It’s a strong choice for renters because it stays tidy with minimal intervention.
Mosses (sheet moss, cushion moss) are your “lawn.” They unify the design and reduce soil splash. Use them as a top dressing rather than trying to root them deep.
Open terrarium plant palette (dry, sculptural, low humidity)
Haworthia fasciata (zebra haworthia) is one of the most reliable open-terrarium succulents: compact, slow-growing, and tolerant of indoor light better than many echeverias. Use gritty substrate and water only when fully dry.
Gasteria ‘Little Warty’ stays chunky and architectural without racing upward. It reads like a modern landscape plant in miniature.
Crassula ovata ‘Gollum’ can work in larger open bowls (14–18 inches wide) where it has room, but it’s not for tight jars—it will eventually need pruning and can shade neighbors.
Small cacti (like Mammillaria species) are best reserved for very bright rooms or supplemental lighting; indoors they often stretch if light is weak.
Important: Don’t mix true desert plants into closed terrariums. The humidity that makes moss glow will rot succulents.
Step-by-step setup: a clean build that looks intentional
Set yourself up like a designer on install day: protect your surface, pre-rinse gritty materials, and stage plants before you commit. A little prep prevents cloudy glass and messy layers.
- Clean the container: Wash with mild soap, rinse well, and dry. Any residue becomes a permanent smudge once humidity cycles.
- Rinse drainage material: Swish LECA or gravel in a colander until runoff is mostly clear. This reduces dusty haze.
- Add drainage layer: Pour 1–2 inches of LECA/gravel. Tap the container to level or shape your “valley.”
- Add separator: Cut mesh/coffee filter to fit. Keep it flat so soil doesn’t migrate downward.
- Add charcoal: Sprinkle ¼–½ inch evenly. Keep it away from the glass if you want a cleaner visual band.
- Mix and add substrate: For closed terrariums, use a blend like 2 parts coco coir, 1 part fine orchid bark, 1 part perlite. For open terrariums, use a cactus/succulent mix amended with pumice at about 30–50% by volume. Add 2.5–4 inches and build your slope.
- Place hardscape: Add stones or wood first, pressing them down to stable points. This prevents later shifts that crush roots.
- Plant with spacing: Remove excess nursery soil, tuck plants in, and firm gently. Keep leaves off the glass to reduce rot spots.
- Top dress: Add moss, gravel, or leaf litter. Leave a little exposed soil around plant crowns for airflow.
- Water sparingly: Start with 2–4 tablespoons in a closed terrarium, ¼ cup in an open one (adjust for size). You can always add more; removing water is the hard part.
Budget planning: what it really costs (and where DIY swaps make sense)
A polished terrarium doesn’t have to be pricey, but it helps to spend money where performance matters: substrate structure and appropriate plants.
Typical costs for a medium build (10–12 inches wide):
- Glass container: $12–$35 (thrifted jars can be $4–$10)
- LECA or gravel: $8–$15
- Horticultural charcoal: $6–$12
- Substrate components: $10–$20
- Plants (3–5 small pots): $18–$45
DIY alternatives: Use a cleaned pickle jar or cookie jar; swap LECA for rinsed aquarium gravel; use a coffee filter as the separator. If you’re on a tight budget, buy one larger plant and divide it (Fittonia and Pilea often split nicely) rather than purchasing multiple pots.
Three real-world scenarios (and how I’d layer them)
Scenario 1: The low-light apartment shelf (closed terrarium that stays fresh)
You’ve got a shelf 8 feet from a north-facing window—pretty, but not bright. This is where closed terrariums shine. Use a 12-inch tall lidded jar and prioritize moisture control: 2 inches drainage, separator, ½ inch charcoal, then a substrate mix with bark/perlite for air pockets. Plant a Fittonia, a lemon button fern, and a patch of Selaginella with sheet moss as the “lawn.”
Light target: about 6–8 hours of bright indirect; if it’s dim, add a small 10W grow light on a timer. Water expectation: often just once every 4–6 weeks, and only when condensation disappears for several days.
Scenario 2: The sunny windowsill that keeps cooking plants (open terrarium with heat tolerance)
South or west windows are tempting, but glass magnifies heat. If you want a terrarium right in that light, go open and gritty. Use a wide bowl (at least 10 inches across) rather than a tall jar to avoid heat buildup. Build 1–1.5 inches drainage, separator, a light dusting of charcoal, and a cactus mix cut with 40% pumice.
Plant with Haworthia and Gasteria—both handle indoor conditions better than many rosette succulents. Leave 2 inches of breathing room between plants so air can move. Water every 2–3 weeks in summer, possibly 3–5 weeks in winter, always after the mix dries fully.
Scenario 3: The renter’s “no-mess” desktop terrarium (small, stable, minimal tools)
You want something that won’t spill soil during a lease inspection and won’t demand daily attention. Choose a container around 8–9 inches tall with a wide mouth for easy trimming. Keep the layer bands clean: rinse gravel, use a tidy mesh separator, and add a thin moss top dressing to keep soil from splattering the glass.
Plant selection: Fittonia (color), Pilea glauca (soft cascade), and a small fern or a compact peperomia. This combination stays attractive under office-like light if it’s near a window with 6 hours of indirect brightness. Maintenance stays easy: 10–15 minutes per week to wipe glass and remove any yellow leaves, plus a deeper trim about once every 6–8 weeks.
Micro-climates inside the glass: manage moisture like a pro
The biggest skill in terrariums is reading moisture without guesswork. Condensation is a tool, not a decoration. In a healthy closed terrarium, you may see light fog in the morning that clears by afternoon. If glass stays wet all day, you’ve got too much water or too little airflow.
The U.S. Environmental Protection Agency notes that controlling moisture is key to preventing mold growth indoors (EPA, 2023). In terrariums, that translates to small water inputs and quick corrections—cracking the lid for a few hours, trimming overcrowded growth, and avoiding soaking the substrate.
Quick corrections that save a terrarium
- Constant fogging: Remove lid for 12–24 hours, blot pooled water in the drainage zone with a paper towel rolled into a wick.
- Soil smells sour: Increase airing, remove decaying leaves, and consider adding a small amount of fresh charcoal as a top dressing.
- Mold on wood or leaf litter: Reduce watering and remove affected material. Mold often appears in the first 2–3 weeks as the system stabilizes.
Maintenance expectations: what you’re signing up for
A terrarium should feel like a pleasure, not a chore. Plan on 10–20 minutes per week for quick checks: wipe glass, rotate the container a quarter turn for even growth, and remove dying leaves before they become a humidity problem.
Seasonally, your tasks shift:
- Winter: Water less—indoor evaporation slows. Watch for cold-window chill; keep terrariums a few inches off glass if nighttime temps drop.
- Spring: Expect growth spurts; prune to maintain scale. This is when terrariums look “too full” if spacing was ignored.
- Summer: Watch overheating. If the container feels warm to the touch in sun, move it back 2–3 feet from the window.
- Fall: Refresh top dressing, remove accumulated leaf litter, and check that hardscape hasn’t shifted.
Closed terrariums may only need watering every 3–8 weeks. Open terrariums typically need water every 1–3 weeks, depending on heat and light. Your best indicator is the substrate: if it’s damp an inch down, wait.
Designer finishing moves: make it look intentional from across the room
Once your layers are functional, make them visually calm. Keep layer lines crisp by pouring materials through a paper funnel and brushing stray soil off the glass with a soft paintbrush. Use one “feature stone” or a single piece of wood as a focal point, then let plants support it. Too many decorations make a terrarium feel like a craft project rather than a miniature landscape.
Finally, label your build date on a small piece of tape underneath the container. It’s a quiet professional habit—and three months later, when you’re deciding whether it’s time to water, you’ll be glad you did.
Sources: Royal Horticultural Society (RHS), “Watering and drainage” guidance, 2023. U.S. Environmental Protection Agency (EPA), “A Brief Guide to Mold, Moisture, and Your Home,” 2023.