Inductive Indoor Seed Starting Rack
The night before your last frost date, your kitchen table is buried under seed packets, yogurt cups, and a leaning desk lamp that’s doing its best to imitate the sun. Every time you water, you have to shuffle trays, wipe drips, and apologize to whoever lives with you for turning dinner space into a greenhouse. If you’ve ever started seeds indoors, you know the two big problems: light that’s never quite right, and a setup that never stays tidy.
An inductive indoor seed starting rack solves both in a way that feels almost like cheating. “Inductive” here is about a system that cues you—through layout, labeling, and repeatable spacing—to do the right thing automatically: water efficiently, keep light at the correct height, and rotate trays without thinking. It’s part furniture, part micro-nursery, designed to be attractive enough for a living space and organized enough to prevent seedling chaos.
I’m going to walk you through a rack design that works for homeowners with a basement corner and renters with a studio apartment window—plus a few real-life scenarios where tweaks make all the difference.
Design principles: a rack that trains you to succeed
Principle 1: Build around light geometry, not shelf geometry
Seeds don’t care how pretty your shelving looks; they care about photon density and distance. Most seedlings thrive when the light source stays close—typically 2–4 inches above the canopy for many LED shop lights—so the rack has to make adjustment simple. The “inductive” move is to design for easy light-height changes (chains, pulleys, or slotted rails) so you actually do it weekly instead of telling yourself you will.
Plan for 14–16 hours/day of light for common indoor-started vegetables and flowers. University of Minnesota Extension notes that seedlings generally need long, bright days under lights to avoid weak growth (University of Minnesota Extension, 2020).
Principle 2: Standardize the footprint so everything stacks cleanly
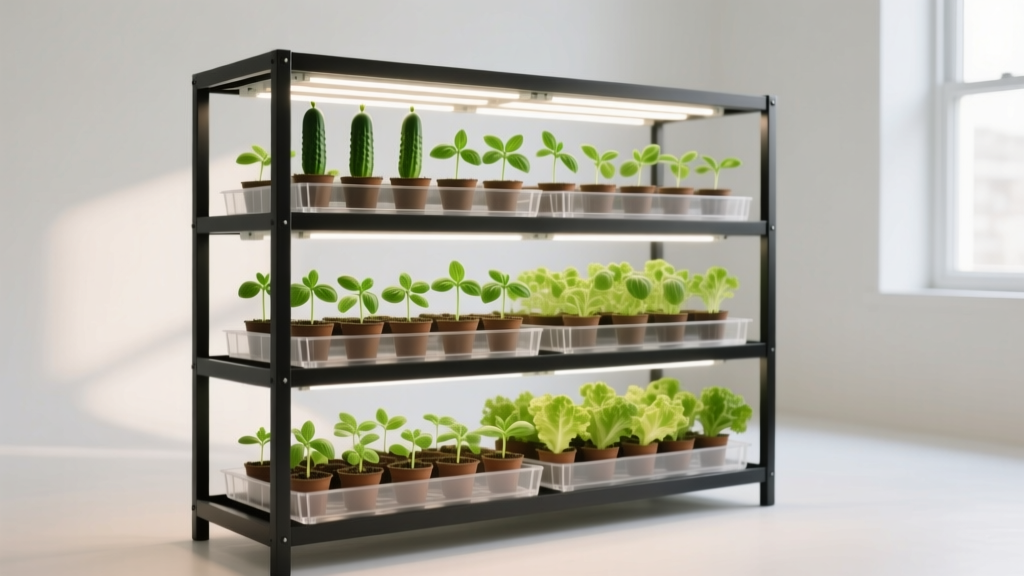
Use nursery standards as your “grid.” A 10x20 inch tray (often called a 1020 tray) is the workhorse of seed starting. If every shelf is sized to hold two 1020 trays side-by-side, your brain stops negotiating with mismatched containers. No mystery puddles. No balancing acts.
A practical shelf interior size is 44 inches wide x 20 inches deep, which comfortably holds 2 trays (each about 10" x 20") with a little finger clearance and room for labels.
Principle 3: Water should be contained, visible, and boring
The best watering system is the one that doesn’t wreck your floors and doesn’t require heroics. Bottom-watering in trays reduces fungus gnat issues and keeps stems drier. Put every tray inside a watertight 1020 bottom tray and plan a “drip zone”: a washable boot tray or vinyl mat under the rack sized to at least 48 x 24 inches.
“Good design is about making the right action the easiest action.” — Don Norman, The Design of Everyday Things (revised edition, 2013)
That quote is your north star. The rack should make it easier to slide out a tray and add water than to overwater from above because the watering can is already in your hand.
Principle 4: Airflow and spacing prevent problems before they start
Air movement reduces damping-off risk and strengthens stems. A small clip fan on each rack level is ideal, but even one oscillating fan nearby helps. The goal is gentle movement, not a windstorm.
Also, design for plant spacing from the beginning. If you start in dense 128-cell trays, you’ll need a planned “pot-up shelf” for 3.5-inch pots. If you only build for the first stage, your seedlings will outgrow the rack right when they need the most consistent care.
Layout strategies: designing the rack like a mini greenhouse
A reliable baseline rack (fits most homes and rentals)
Here’s a practical configuration that hits a sweet spot: big enough to matter, small enough to live with.
- Overall footprint: 48" wide x 24" deep
- Height: 72" (fits under most ceilings, including many apartments)
- Shelves: 4 growing levels, each with adjustable lights
- Tray capacity: 8 standard 1020 trays (2 per shelf)
If you prefer tighter, a 36" wide x 18" deep rack can still hold one 1020 tray per shelf and tuck into a closet or laundry nook.
Light placement: treat every shelf like a separate “sun”
For each growing shelf, use either:
- 2-foot LED bars (2 per shelf), or
- 4-foot LED shop light (1 per shelf) if shelf width supports it
Aim to keep lights 2–4 inches above seedlings, raising them as plants grow. If your rack shelves are 16–18 inches apart, you’ll have enough vertical range for germination domes and early growth.
For perspective on indoor gardening light intensity, Utah State University Extension emphasizes that insufficient light is a primary cause of weak, leggy seedlings (Utah State University Extension, 2019).
Traffic flow: a rack should be “one-step serviceable”
Place the rack where you can water without carrying dripping trays across the house. Ideal locations:
- A utility room near a sink
- A basement corner with a dehumidifier nearby
- A kitchen-adjacent nook with a waterproof mat
- A bright spare room where the rack becomes functional furniture
Plan at least 24 inches of clearance in front so trays slide out easily. If you’re squeezing into a hallway, you’ll skip the maintenance that keeps seedlings healthy.
Comparison: three rack approaches and who they fit
| Rack Style | Typical Capacity | Best For | Approx. Cost (USD) | DIY Difficulty |
|---|---|---|---|---|
| Wire shelving + LED shop lights | 6–10 (1020) trays | Most homeowners; flexible layouts | $140–$320 | Easy |
| Wood frame rack (custom shelves) | 4–12 trays (custom) | Design-conscious spaces; odd dimensions | $120–$280 | Moderate |
| Mini rack (closet/cart) + seedling heat mat | 2–4 trays | Renters; small batches; herbs/flowers | $70–$180 | Easy |
The inductive trick isn’t which type you choose—it’s standardizing tray sizes, keeping tools stored on the rack, and making light/water adjustments frictionless.
Step-by-step setup: build a rack that “runs itself”
1) Choose the footprint and lock in your tray math
- Measure your space and commit to a rack width: 36" (compact) or 48" (full).
- Decide how many 1020 trays you want active at peak. A practical starter peak is 6–8 trays.
- Confirm clearance: leave 24" in front for slide-out access.
2) Assemble shelves and add waterproofing
- Build/assemble the rack to 72" tall if possible (stable and vertical).
- Place a waterproof mat or boot tray underneath (at least 48" x 24" for a 48" rack).
- Set each shelf height to allow 16–18" between growing surfaces.
3) Install lights with easy height adjustment
- Hang LED shop lights on chains or adjustable rope ratchets.
- Set initial height at 3 inches above the tray surface for germination under domes (adjust once seedlings emerge).
- Put lights on a timer set to 16 hours on / 8 hours off.
4) Add “inductive” organization: zones, labels, and tools
- Assign each shelf a role: Germination (top), Growth (middle), Pot-up (lower), Hardening prep (lowest).
- Mount a small bin on the side for labels, a pencil, snips, and sticky notes.
- Keep a dedicated measuring cup or squeeze bottle on the rack for bottom-watering.
5) Optional upgrades that pay off quickly
- Add a 20" box fan on low nearby for airflow.
- Use a seedling heat mat for warm-germinating crops (peppers, eggplant). Keep it only under the germination shelf.
- Clip a simple thermometer/hygrometer to the rack; aim for about 65–75°F for most seedlings.
Plant selection: varieties that thrive in rack life
Indoors, your goal is compact growth, transplant resilience, and predictable timing. Choose varieties that don’t punish you for slightly imperfect light or watering.
Reliable vegetables (with specific varieties)
Tomato: ‘Sungold’ (cherry) and ‘Celebrity’ (slicer). Both are vigorous and forgiving at transplant time. Cherry types often rebound fast after a slightly leggy start, and ‘Celebrity’ is known for dependable performance in many home gardens.
Pepper: ‘King of the North’ (sweet) and ‘Jalapeño M’. These handle indoor pot-up well and benefit from heat mat germination. Start peppers earlier because they grow slowly at first.
Lettuce: ‘Salad Bowl’ (looseleaf) and ‘Little Gem’ (romaine mini). These are ideal for quick success: short indoor time, minimal pot-up needs, and strong performance under lights. They also let renters harvest baby leaves even if outdoor space is limited.
Brassicas: ‘Dinosaur’ kale and ‘Green Magic’ broccoli. These tolerate cooler indoor temps and stay compact if lights are close.
Flowers that earn their shelf space
Zinnia: ‘Profusion’ series. Compact, fast, and less fussy than tall cut-flower zinnias when started indoors.
Marigold: ‘Gem’ series (signet). These stay tidy in small cells and transplant without sulking.
Snapdragon: ‘Rocket’ series if you have patience and good airflow. Worth it for early-season color and structure in containers.
Spacing and tray planning (so you don’t overgrow the rack)
Use this spacing as a working rule:
- 128-cell tray: ideal for lettuce, brassicas, herbs; pot-up optional depending on timing.
- 72-cell tray: good for tomatoes and flowers; usually pot-up at 2–3 true leaves.
- 3.5-inch pots: allocate 18 pots per 1020 tray (a common fit) for tomatoes/peppers before transplanting outdoors.
If you plan to raise 24 tomato plants, you’ll need at least 2 trays dedicated to 3.5" pots during the pot-up stage—this is where most racks fail without a planned “second phase” shelf.
Three real-world scenarios (and how the rack adapts)
Scenario 1: The renter with one bright window and no tolerance for mess
You’ve got a 36" rack beside a window, but the window light is inconsistent. Use the window as ambiance, not the main engine. Put a 2-tray-per-level system on a compact rack only if you can keep clearance; otherwise, use 1 tray per shelf and keep a clean look.
Design moves that matter here:
- Use a 36" x 18" rack with 3 shelves for growing and one for tools.
- Choose compact crops: lettuces, herbs, marigolds, dwarf tomatoes like ‘Tiny Tim’ if you want edible plants without a garden plot.
- Use a single waterproof mat and a small covered bin for supplies so nothing migrates to your counters.
Scenario 2: The homeowner with a basement corner and big spring ambitions
You want dozens of plants: tomatoes, peppers, basil, flowers—maybe the whole neighborhood. Basements are great because they’re stable, but humidity can creep up. Plan airflow from day one.
Design moves that matter here:
- Go full size: 48" x 24" x 72" rack, 4 growing shelves.
- Add a fan and keep shelves spaced at 18" to allow air to circulate.
- Dedicate one shelf as the pot-up zone with 3.5" pots and stronger light coverage.
This setup is where a “rack routine” becomes powerful: every Sunday, you raise lights, rotate trays, and bottom-water. The rack’s layout turns that routine into a loop you can repeat without thinking.
Scenario 3: The busy household where seedlings must coexist with kids, pets, and laundry
If your seed rack lives near a mudroom or laundry area, durability and containment are everything. You’re designing for bump-resistance and spill-resistance.
Design moves that matter here:
- Use a rack with a stable base and avoid top-heavy stacking. Keep the heaviest items (water jugs, soil) on the lowest shelf.
- Add a simple hook rail for a spray bottle, scissors, and a scoop—tools off surfaces means fewer accidents.
- Choose sturdy transplants: kale, broccoli, marigolds, and bush tomatoes like ‘Celebrity’ that can recover from minor mishaps.
Scenario 4: The micro-space grower timing transplants for a balcony garden
You’re not raising 60 tomatoes—you’re raising 6 perfect plants for containers. The rack becomes a precision instrument, not a factory.
Design moves that matter here:
- Use a mini rack (or rolling cart) holding 2–3 trays total.
- Prioritize premium varieties: ‘Little Gem’ lettuce, ‘Sungold’ tomato, compact basil like ‘Greek Columnar’.
- Pot-up early into larger containers so plants transition smoothly to balcony pots.
Budget planning and DIY alternatives
A realistic budget depends on how many shelves you light and how polished you want it to look. Here are practical ranges you can plan around:
- Basic starter (2 shelves lit): $70–$150 (compact rack, 2 lights, timer, 2–4 trays)
- Mid-range (4 shelves lit): $160–$320 (full rack, 4 lights, trays, fans, mat)
- Design-forward wood rack: $120–$280 in lumber/hardware, plus lights
DIY swaps that work:
- Instead of pricey trays: reuse bakery trays or cafeteria trays for secondary containment, but keep at least one true watertight tray for bottom-watering.
- Instead of pulleys: use chain and S-hooks—simple, strong, and adjustable.
- Instead of a new rack: retrofit a sturdy bookshelf by lining shelves with waterproof panels and hanging lights from the shelf above.
One place not to cut corners: the timer. A $10–$20 timer protects your consistency, and consistency is what produces stocky seedlings.
Maintenance expectations: what it really takes
Seed starting isn’t hard, but it is repetitive. The rack’s job is to make the repetition easy enough that you keep doing it.
Weekly time commitment
Plan for 30–60 minutes per week for a moderate rack (6–8 trays). That includes bottom-watering, checking germination, raising lights, and a quick tray rotation. If you’re potting up a lot of tomatoes and peppers, add another 30–45 minutes on pot-up weeks.
Daily check (short, but important)
Give yourself a 2-minute daily glance: are lights on, is anything dry, any seedlings flopping over, any fungus gnat activity? This is how you catch problems early.
Seasonal tasks that keep the rack pleasant
- Late winter: wipe down shelves, sanitize trays, test lights and timers before sowing day.
- Spring: as outdoor temps allow, begin hardening off seedlings—plan a staging area by a door so the transition is smooth.
- After transplanting: clean and dry everything; store trays nested; keep the rack for microgreens or houseplant propagation if you want it to earn its footprint year-round.
If damping-off has ever wiped out a flat of seedlings for you, sanitation is not optional. The University of Minnesota Extension recommends using clean containers and a sterile starting medium to reduce disease pressure (University of Minnesota Extension, 2020).
Small design details that make the rack feel effortless
Label like a professional. Put the variety and sowing date on every tray. Use a single label format so you never wonder what “Tom2” meant three weeks later.
Build a pot-up rhythm. Keep a dedicated empty tray on the pot-up shelf. When seedlings are ready, you don’t hunt for supplies—you slide the tray out and start.
Use a “quarantine corner.” Keep one small area (even half a tray) for anything suspicious: a yellowing seedling, a tray that stayed too wet, a new houseplant cutting. Separation is prevention.
Make it nice to look at. If the rack is in living space, choose a consistent color temperature of LED lights and keep cords tidy. A rack that feels intentional is one you won’t resent for two months.
Once your inductive indoor seed starting rack is in place, the whole early season changes tone. Instead of improvising with lamps and balancing trays on chairs, you get a little plant studio—organized, bright, and calm. You’ll notice your seedlings become sturdier, your timing tighter, and your spring less frantic. And when the first tray of ‘Little Gem’ lettuce is ready to move outside, you’ll already know exactly where the empty tray goes, how high the lights should be, and what you’re starting next.