Vertical Garden Wall for Small Balconies
You step onto your balcony with a mug of coffee and immediately do the side-step: chair, tiny table, air conditioner unit, then the railing you can’t move. The sun hits one corner for a few hours, the wind whips down the building face, and there’s barely enough floor left for a single pot—yet you want greenery, fragrance, maybe even dinner herbs. The way out of that squeeze isn’t more floor space. It’s the wall.
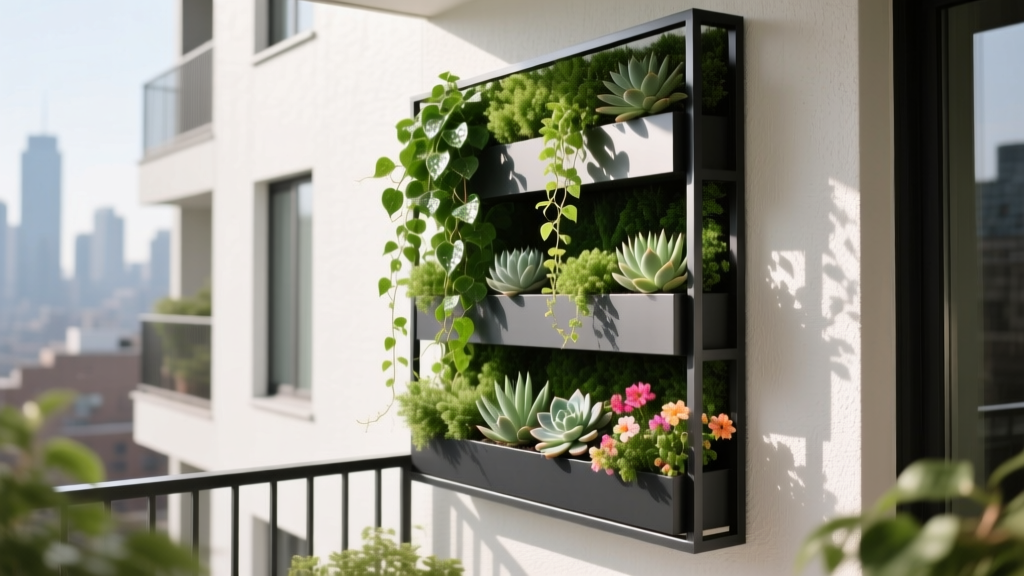
A vertical garden wall turns a blank, hot surface into planting real estate—without blocking your walking path or breaking lease rules. Think of it like designing a living mural: plants arranged by light, weight, and watering needs, so it looks intentional and stays healthy with realistic maintenance.
Start With the Balcony You Actually Have (Not the One on Pinterest)
Measure first: the “usable wall rectangle”
Before you buy anything, measure the wall area you can truly use. Most small balconies can spare a rectangle about 60–120 cm wide and 120–200 cm tall without interfering with doors, outlets, or furniture. A highly workable starter size is 80 cm (W) × 160 cm (H): large enough for impact, small enough to manage.
Also note the distance from wall to railing. If your balcony depth is 90 cm, you’ll want the vertical system to project no more than 15–20 cm from the wall so you don’t clip it every time you pass.
Sunlight mapping in 5 minutes
Track direct sun for a typical day. Most balconies fall into one of these patterns:
- Bright shade: 0–2 hours of direct sun, lots of reflected light
- Part sun: 3–5 hours of direct sun (often morning or late afternoon)
- Full sun window: 6+ hours (rare on deep balconies, common on exposed corners)
Plant selection hinges on this. The Royal Horticultural Society notes that “full sun” generally means 6+ hours of direct sun per day (RHS, 2023). Use that as your baseline when deciding whether herbs and fruiting plants will truly perform.
Weight, water, and the renter reality check
Vertical gardens become heavy quickly. Water weighs about 1 kg per liter, and wet potting mix is far heavier than dry. If your building has rules about wall penetrations, plan for a freestanding frame or a system that mounts to the railing with padded clamps. If you can anchor into masonry, use proper plugs and hardware; if not, use compression poles or a ladder-style plant shelf that leans safely.
“Designing vertical planting is less about cramming in plants and more about managing irrigation, root volume, and maintenance access—those are the constraints that decide success.” — Nigel Dunnett, planting designer and author (Dunnett, 2015)
Layout Strategies That Make a Vertical Wall Feel Intentional
1) Build a visual “spine” and “fill”
On a small wall, too many plant types can look messy. I like a simple composition:
- Spine plants: 2–3 repeat varieties that create structure (upright or mounding)
- Fill plants: trailing or textural plants that soften edges
- Seasonal pockets: 1–2 spots reserved for rotating color or edibles
Repeating the same plant every 25–30 cm (for small pockets) or every 35–45 cm (for bigger planters) keeps it cohesive.
2) Put thirsty plants low, drought-tolerant plants high
Gravity matters. The top dries out faster—sun and wind hit it first, and water moves downward. Place drought-tolerant herbs and succulents near the top; moisture-lovers and ferns lower down. This reduces uneven stress and makes watering more forgiving.
3) Design for reach: maintenance zones
If you can’t reach it easily, you won’t prune or harvest it. Treat the wall as three horizontal bands:
- Top band: eye-level and above (best for low-maintenance plants)
- Middle band: prime zone (best for herbs, frequent harvest)
- Bottom band: splash zone (best for trailing plants or anything tolerant of extra moisture)
For most adults, the comfortable “working zone” is roughly 80–160 cm off the floor. Put your favorite herbs there, not at the top where they become a ladder project.
4) Choose a system that matches your watering style
You have three realistic options on a small balcony wall: pocket planters, modular pots on a grid, or a trellis with climbing plants in troughs. Here’s a comparison that reflects what I see on real balconies.
| System | Depth off wall | Best for | Watering | Typical cost (USD) |
|---|---|---|---|---|
| Fabric pocket wall (e.g., 12–18 pockets) | 10–15 cm | Herbs, small foliage plants | Frequent; dries faster at top | $25–$80 |
| Modular grid + pots (rail/wall mounted) | 15–25 cm | Mixed planting, easy swapping | Moderate; individual pots simplify care | $60–$200 |
| Trellis + 1–2 long trough planters | 20–35 cm | Climbers, screening, flowers | Less frequent; larger soil volume | $50–$180 |
If you travel or forget to water, lean toward fewer, larger soil volumes (trough planters or bigger pots). If you like rearranging and experimenting, modular grids are your friend.
Step-by-Step Setup: A Vertical Wall You Can Maintain
Option A: Renter-friendly modular pot grid (my go-to)
This approach uses a freestanding frame or a grid that clamps to a railing, minimizing wall holes and making it easy to move.
- Measure your target area: aim for 80 cm × 160 cm to start, or scale down to 60 cm × 120 cm if your balcony is tight.
- Choose a frame: a powder-coated steel grid or ladder shelf rated for at least 25 kg. If it leans, use anti-tip straps.
- Select pots: use 12–15 cm diameter pots for herbs and compact plants; use 18–22 cm pots for larger focal plants.
- Add drip trays or a backer: protect the wall with a waterproof back panel (corrugated plastic or sealed plywood). Keep a 2–3 cm air gap for drying.
- Use a lightweight potting mix: avoid heavy garden soil. For herbs, a blend with perlite helps drainage and reduces weight.
- Arrange by light: sun-lovers higher and outer edges; shade-tolerant plants lower and inner areas.
- Install simple irrigation help (optional): a gravity-fed dripper bag or a micro-drip kit can cut weekly watering time. Budget $20–$60 for basic kits.
- Plant and label: especially if mixing similar herbs (thyme varieties can look identical when young).
- Test watering: water slowly until you see a little runoff, then stop. Check the wall after 30 minutes to ensure no leaking onto neighbors below.
Option B: DIY pocket wall on a waterproof panel
If you love the “living wallpaper” look, pockets work—just commit to more attentive watering. Expect 10–20 minutes watering sessions, 2–4 times per week in warm weather depending on sun and wind.
- Buy a pocket planter: a 12-pocket fabric panel is a manageable start.
- Mount to a sealed backboard: use an exterior-grade panel sized about 60 cm × 120 cm so water doesn’t hit your wall.
- Create a drip catch: place a narrow trough or window box at the bottom to catch drips.
- Plant shallow-rooted varieties: compact herbs, small ferns, and trailing plants do best.
- Water top-down slowly: pause between pockets so lower ones don’t get flooded.
Plant Selection: Varieties That Behave on a Balcony Wall
The best vertical wall plants are not just “pretty.” They’re plants that tolerate smaller root zones, bounce back after missed watering, and don’t turn into a wind-shredded mess. Below are reliable picks organized by light.
Part sun (3–5 hours): the sweet spot for most balconies
Herbs (edible + fragrant):
- Thyme ‘Doone Valley’ (Thymus vulgaris): compact, drought-tolerant, trails gently—great for upper pockets.
- Basil ‘Prospera’: downy mildew resistant, productive in containers; place mid-wall where you’ll harvest often.
- Chives (Allium schoenoprasum): upright “spine” plant; tolerates container life and gives edible flowers.
- Mint ‘Swiss Ricola’ (in its own pot): mint is vigorous—contain it to one pot so it doesn’t take over.
Ornamental + pollinator plants:
- Pelargonium (scented geranium) ‘Attar of Roses’: tough in pots, fragrant foliage, handles balcony heat well.
- Calibrachoa ‘Superbells’ series: excellent trailing color for edges; flowers heavily with regular feeding.
Full sun (6+ hours): choose plants that won’t collapse in heat
- Rosemary ‘Arp’: one of the more cold-tolerant rosemaries; woody structure adds year-round form. Give it a larger pot (20–22 cm).
- Strawberry ‘Tristan’ (everbearing): compact, flowers and fruits over a long season; best in mid-to-lower band where watering is steadier.
- Nasturtium ‘Jewel Mix’: fast, edible flowers, trails nicely; great “seasonal pocket” plant.
- Sedum ‘Angelina’: for uppermost, hottest spots; minimal watering once established.
Bright shade (0–2 hours): lush without needing sun
- Pothos (Epipremnum aureum) ‘Marble Queen’: reliable trailer, tolerant of missed water, great for softening edges.
- Bird’s nest fern (Asplenium nidus): architectural leaves; place lower where humidity is slightly higher.
- Heuchera ‘Caramel’: color in shade, handles containers well; good mid-wall texture.
Spacing rules that keep plants healthy
Vertical walls tempt you to overplant. Don’t. Use these practical spacing targets:
- Small herbs (thyme, chives): 1 plant per 12–15 cm pot/pocket
- Basil, parsley, compact ornamentals: 1 plant per 15–18 cm pot/pocket
- Rosemary, larger focal plants: 1 plant per 20–25 cm pot
That spacing reduces mildew risk and makes pruning possible—two things that matter more on a tight balcony than in an open garden.
Three Real-World Balcony Scenarios (and What I’d Build)
Scenario 1: The windy high-rise ledge (10th floor and up)
The challenge: wind desiccates leaves, knocks over pots, and makes watering inconsistent.
The layout: a 60 cm × 120 cm modular grid mounted on a freestanding frame, with heavier pots at the bottom to lower the center of gravity. Add a simple reed screen or perforated windbreak panel, leaving airflow.
Plant choices: rosemary ‘Arp’, thyme ‘Doone Valley’, sedum ‘Angelina’, chives, and pelargoniums. Avoid tall, broad-leaf plants that shred (many basils struggle unless sheltered).
Maintenance expectation: 30–45 minutes/week in summer (mostly watering checks and pruning wind damage). In peak heat, plan on watering 3 times/week.
Scenario 2: The shady rental balcony with one bright corner
The challenge: not enough direct sun for tomatoes or peppers; you still want a green wall that looks lush.
The layout: a pocket wall on a waterproof backboard sized 80 cm × 160 cm, but plant it like a shade garden: ferns and trailing foliage dominate, with herbs only in the bright corner.
Plant choices: pothos ‘Marble Queen’, bird’s nest fern, heuchera ‘Caramel’, plus a single basil ‘Prospera’ and chives placed where the corner gets 2–3 hours of sun.
Maintenance expectation: 20–30 minutes/week; watering 1–2 times/week depending on indoor/outdoor heat. Rotate plants quarterly so one side doesn’t lean toward light.
Scenario 3: The cooking balcony (you want herbs within arm’s reach)
The challenge: you’ll use the herbs if they’re easy; if they’re above your head, you won’t.
The layout: a grid with the “harvest band” centered at 100–150 cm height. Keep the top row for drought-tolerant plants you can ignore for a week.
Plant choices: basil ‘Prospera’, parsley ‘Italian Flat Leaf’, chives, thyme, oregano ‘Kent Beauty’ (ornamental trailing form), and one pot of mint ‘Swiss Ricola’ contained.
Maintenance expectation: 30 minutes/week (more harvesting than chores). In summer: water 2–4 times/week depending on sun hours.
Budget, Costs, and DIY Alternatives
You can build a vertical balcony wall for the cost of a nice dinner out—or you can invest in a modular system that lasts for years. Here are realistic numbers:
- DIY ladder shelf + pots: $40–$120 for a basic shelf, plus $3–$8 per pot
- Fabric pocket planter: $25–$80, plus a backboard $15–$40
- Modular grid system: $60–$200 depending on size and finish
- Potting mix: $10–$25 for a 25–50 L bag (often 1–2 bags for a small wall)
- Optional drip kit: $20–$60
If you’re watching costs, prioritize the structure first (safe, stable, water-safe). Plants can be added over time. A strong starter palette is 6–10 plants, then fill gaps as you learn how your balcony behaves.
Smart DIY swaps (that still look designed)
- Instead of a pricey grid: use a galvanized wire panel (often sold as shelving or fencing) mounted to a simple timber frame.
- Instead of designer pots: use uniform nursery pots and slip them into inexpensive cover pots for the front-facing row only.
- Instead of an irrigation kit: add saucers and water-retentive crystals sparingly, or use self-watering planters for the thirstiest herbs.
Maintenance You Can Actually Keep Up With
Vertical gardens fail from two things: uneven watering and delayed pruning. Set a routine you can stick to.
Weekly rhythm (most seasons)
- Watering: 10–30 minutes/week in spring/fall; 20–60 minutes/week in summer depending on sun and wind
- Quick grooming: 5–10 minutes/week to pinch basil, remove yellow leaves, and keep airflow
- Check fast-dry zones: top row and outer edges dry first—touch the soil, don’t guess
Seasonal tasks (put these on your calendar)
- Early spring: refresh top 2–3 cm of potting mix, start slow-release fertilizer, re-tighten fittings
- Mid-summer: feed flowering plants every 2 weeks, prune trailing plants to keep pathways clear
- Autumn: cut back annuals, bring tender plants inside if nights drop below 10°C (50°F)
- Winter (cold climates): group pots for insulation, reduce watering, and protect evergreens from drying wind
One more practical note: small containers leach nutrients faster. The University of Maryland Extension emphasizes that container plants generally need more frequent watering and fertilizing than in-ground plantings (University of Maryland Extension, 2020). That’s not a drawback—it’s just the maintenance trade for gardening in the air.
Small Details That Make the Wall Feel Like a Designed Space
Light the wall: A warm LED strip or two clamp lights aimed across foliage turns the wall into an evening feature. Keep fixtures rated for damp conditions.
Repeat materials: If your balcony furniture is black metal, echo it with a black grid and dark pots. If it’s warm wood, use a timber frame and terracotta tones. Cohesion makes a small space feel calmer.
Leave negative space: Aim for about 10–20% open space on the wall at installation. Plants grow. That breathing room is what keeps it from looking cluttered two months later.
Once the first row of plants settles in, the balcony stops feeling like an outdoor closet. The wall becomes the view—green at eye level, fragrant when you brush past, and productive if you’ve tucked in herbs. Start with a modest rectangle, design around your light and reach, and let the wall thicken in over a season. That’s how small balconies become gardens you actually use.
Sources: Royal Horticultural Society (RHS), 2023; Dunnett, N., 2015; University of Maryland Extension, 2020.