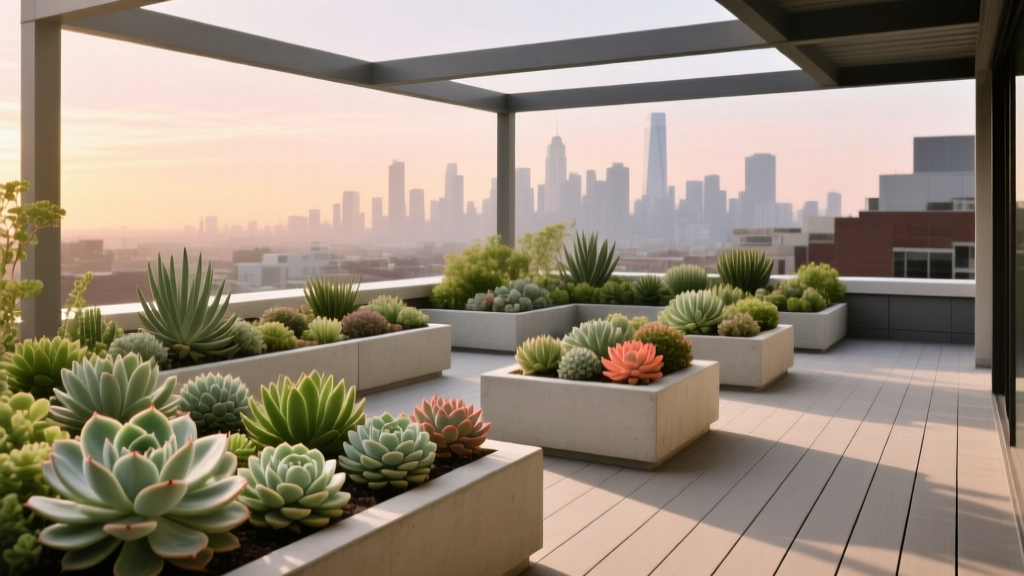
Rooftop Succulent Garden Design
The elevator doors open, you step onto the roof, and the wind immediately grabs at your shirt. The view is incredible—so is the heat radiating off the membrane roof. You brought a few succulents up last summer, but by August the pots were bone-dry by noon, two planters toppled in a storm, and the rest looked scorched. Rooftops are dramatic spaces, but they’re also unforgiving: sun bounces off pale walls, wind accelerates around corners, and weight limits quietly dictate what’s possible.
This is the kind of site where succulent design shines—if you lay it out like a landscape architect, not like a windowsill collection. Below is a practical, buildable plan that balances microclimates, weight, irrigation reality, and style—so your roof becomes a garden you actually use.
Start With the Roof: Constraints That Shape the Layout
Before you sketch a single planter, do a quick site audit. Succulents are drought-tough, but rooftops introduce two stressors they can’t “tough out” forever: extreme heat and wind desiccation.
Weight and load: design with a safety buffer
If you’re renting or you don’t have construction documents, assume you need a conservative approach and confirm allowable load with building management or a structural engineer. A surprisingly small change in soil depth can double weight. As a reference point: a 12-inch (30 cm) deep planter bed can weigh hundreds of pounds when saturated. The green roof industry often cites saturated system weights in the range of ~15–35 lb/ft² for lightweight extensive systems, depending on depth and materials (FLL, 2018). Use that as a mental warning light: keep containers lighter, distribute weight, and avoid clustering heavy planters in one corner.
Sun hours and heat reflection: map the microclimates
Most rooftops deliver 6–10 hours of direct sun in summer, but not evenly. Spend one day noting sun/shade at 9 a.m., 12 p.m., and 3 p.m. The south and west edges often run hottest; a wall can reflect enough heat to scorch tender varieties. If your roof is pale or metallic, reflected light can increase leaf burn.
Wind and exposure: design your “calm zones”
Wind is the silent killer on roofs. It doesn’t just snap stems—it wicks moisture from soil and leaves. The goal is not to block all wind (which can create dangerous uplift and turbulence), but to diffuse it with permeable screens and strategic massing.
“On exposed sites, the difference between success and failure is often not plant hardiness, but how well wind is moderated at plant level.” — Royal Horticultural Society guidance on windy gardens (RHS, 2023)
Design Principles for Rooftop Succulent Layouts
Think of your rooftop in three layers: a circulation path, a planted edge (wind and glare management), and a focal area where you sit and enjoy the plants up close.
1) Create a simple circulation loop (even if it’s tiny)
A roof garden feels larger when you can move through it comfortably. Aim for a primary walkway of 30–36 inches wide so two people can pass without bumping pots. If space is tight, 24 inches works for one-person circulation.
Use lightweight deck tiles or a narrow gravel strip in trays. Avoid loose gravel directly on membranes unless your building allows it; it can abrade surfaces over time.
2) Use planters as “site furniture”
Instead of scattering pots, group planters into purposeful “walls” and “rooms.” On a roof, planters are your windbreak, your visual boundary, and your design structure.
- Windward edge: taller, heavier planters with tough, upright succulents and grasses (or non-succulent companions) to slow gusts.
- Leeward interior: low bowls and shallow troughs for rosettes, trailing sedums, and small xeric accents.
- Focal corner: one sculptural specimen (Agave or Aloe) in a statement pot.
3) Design with repeatable modules
Rooftop projects succeed when they can be assembled in parts. I like a modular grid that you can scale up or down:
- Base module: a 2 ft x 4 ft (24" x 48") planter box, or two 18-inch round pots.
- Spacing between modules: 12–18 inches so you can water, prune, and rotate pots.
Modularity also helps renters—if you move, the garden moves.
4) Keep soil depth intentional (not “as deep as possible”)
Succulents don’t need deep soil; they need fast drainage and oxygen. For most rooftop container succulent mixes:
- 6–8 inches of soil depth for Sedum, Sempervivum, Delosperma, and small rosettes
- 10–14 inches for larger Echeveria, Aloe, and shrubby succulents
- 16–20 inches only for large Agave or deep-rooting statement plants (and only where weight is acceptable)
Three Layout Strategies You Can Steal
Layout A: The “Windbreak Border + Lounge Pocket” (best for exposed roofs)
Scenario: A 10 ft x 12 ft roof section with strong prevailing wind and full sun.
Plan: Line the windward edge with three 24" x 24" square planters spaced 6 inches apart. Place a permeable slat screen behind them (leave 2–4 inches gap from the floor for airflow). Inside that protected zone, set a bistro chair and a low succulent bowl garden.
Why it works: The tall planters and screen reduce wind at leaf level, which is where succulents lose moisture fastest.
Layout B: The “Perimeter Gallery” (best for renters with small footprints)
Scenario: A 6 ft x 10 ft roof terrace where you need open floor space for daily use.
Plan: Keep the center open. Use a perimeter run of lightweight troughs—36" long x 8" wide x 8" deep—with repeating plant palettes. Add two vertical plant stands only in the corners (vertical in the middle becomes a sail in wind).
Why it works: The garden reads as intentional and “designed,” but you still have functional space.
Layout C: The “Collector’s Grid” (best for plant lovers who rotate pots)
Scenario: A 12 ft x 16 ft roof with partial shade from a penthouse wall (4–6 hours of sun).
Plan: Create a grid of twelve 14–16 inch pots on deck tiles, grouped in four clusters of three. Each cluster gets a theme: silver-leaved, rosette-heavy, trailing, or winter-hardy. Keep a 30-inch aisle down the middle for access.
Why it works: You can swap plants seasonally and quarantine anything struggling, without disrupting the whole look.
Plant Selection: Varieties That Actually Behave on Rooftops
On roofs, your best succulents share three traits: heat tolerance, fast recovery after dryness, and wind resilience (compact rosettes, flexible stems, or ground-hugging forms). Below are proven performers and exactly where I use them in a rooftop layout.
Wind-tough backbone plants (structure and resilience)
Use these as the “bones” in larger pots. They handle sun and occasional neglect better than fussier rosettes.
- Agave parryi (Parry’s agave): architectural, cold-tolerant compared to many agaves; ideal as a single specimen in a 18–24 inch pot. Give it space—spines are real.
- Aloe striata (coral aloe): smooth-edged (friendlier near seating), handles heat and bright light; great in a 14–18 inch pot.
- Crassula ovata (jade plant): surprisingly wind-tolerant if gradually acclimated; better for roofs with 4–6 hours sun to prevent scorch in very hot climates.
Rosettes for color and pattern (the “jewelry” layer)
These are your Instagram plants—but pick durable cultivars and plant them where wind is moderated.
- Echeveria ‘Perle von Nürnberg’: purple tones in bright light; plant 8–10 inches apart so rosettes don’t trap moisture against each other.
- Graptopetalum paraguayense (ghost plant): forgiving and easy to propagate; great in bowls and troughs; handles some wind due to flexible stems.
- Sempervivum tectorum (hens and chicks): excellent for cold-winter roofs; tight rosettes tolerate wind; ideal spacing 6–8 inches.
Trailers and groundcovers (soften edges, cool the soil)
Trailing succulents reduce evaporation by shading soil and visually “stitch” containers together.
- Sedum spurium ‘Dragon’s Blood’: tough, color deepens in sun; great for trough edges; spacing 8–12 inches.
- Delosperma cooperi (ice plant): vivid flowers in sun; performs best with 6+ hours sunlight; use where drainage is sharp.
- Senecio serpens (blue chalksticks): a color anchor; use in protected areas—stems can snap in severe gusts.
Microclimate match: sun and wind placement
If your roof is brutally hot (south/west exposure with reflected heat), prioritize Sedum, Sempervivum, Delosperma, and Agave. If you have partial shade, lean into jade, aloes, and ghost plant, and reserve Echeveria for the brightest pocket you can protect from wind.
Container and Medium Choices (and What They Cost)
You don’t need luxury planters, but you do need stable, well-draining, roof-safe choices.
| Option | Weight (Empty) | Durability on Roof | Best Use | Typical Cost |
|---|---|---|---|---|
| Fiberglass planter (18–24") | Light | Excellent (UV, freeze-thaw varies by brand) | Statement specimens, windward anchors | $80–$200 |
| HDPE/resin pot (14–20") | Very light | Good (can degrade in intense sun over years) | Modular grid, renter-friendly | $25–$90 |
| Terracotta (12–18") | Medium | Fair (cracks in freeze; dries fast) | Hot/dry roofs where you water regularly | $20–$60 |
| Wood planter box (2' x 4') | Medium | Good (needs liner; check rot resistance) | Windbreak border, mixed planting | $120–$350 |
Soil mix: Aim for a gritty, fast-draining blend. A practical rooftop recipe is 50% high-quality potting mix + 50% pumice/perlite/crushed lava rock. In very rainy climates, push to 60–70% mineral component. Many succulent societies recommend sharply drained media to prevent root rot; the Cactus and Succulent Society of America emphasizes fast drainage and avoiding waterlogged soil (CSSA, 2020).
Step-by-Step Setup (A Buildable Weekend Plan)
This sequence avoids the most common rooftop mistake: placing everything first and realizing you can’t reach to water or the wind knocks it over.
- Confirm rules and drainage. Verify waterproofing protection requirements, weight limits, and where water can drain. Add pot feet or risers so containers don’t trap moisture against the roof surface.
- Measure and tape the layout. Use painter’s tape to mark a 30–36 inch walkway and planter zones. Live with it for a day.
- Install wind moderation first. If using a screen, anchor it per building rules. Place heavier planters on the windward edge before lighter pots.
- Stage empty containers. Position planters, leaving 12–18 inches between groupings for access. Check door clearance and any roof drains.
- Add drainage layers thoughtfully. Skip the myth of “rocks at the bottom” (it can create perched water). Instead, ensure drainage holes are clear and use a mesh screen to keep mix from washing out.
- Fill with mix and plant by size. Install the largest structural plants first, then rosettes, then trailers to cascade over edges.
- Top-dress for stability. Add 1/2–1 inch of gravel (pumice, lava rock) to reduce soil splash, slow evaporation, and add weight against wind.
- Water deeply once. Let it drain completely. Then wait until the mix is mostly dry before watering again.
- Label and photograph. Rooftop stress can mimic pests; labels help you learn what thrives in each microclimate.
Budget Planning and Smart DIY Alternatives
A rooftop succulent garden can be done on a tight budget or as a polished design install. Here’s a realistic range for a starter layout on a 10 ft x 12 ft roof section:
- Lean DIY ($250–$500): resin pots, DIY soil blend, starter succulents in 2–4" nursery pots, DIY slat screen from sealed furring strips, manual watering.
- Mid-range ($700–$1,500): fiberglass planters for anchors, a few large specimens (Agave/Aloe), deck tiles, high-mineral soil components, drip kit on a timer.
- Design-forward ($2,000–$4,000+): custom planters, mature specimens, integrated seating, architectural screen panels, professional installation.
DIY swaps that don’t look cheap:
- Use stock tanks or galvanized troughs as long planters (drill drainage, add risers). They read modern-industrial and hold up in sun.
- Create a “statement pot” by cladding a basic nursery container with exterior wood slats (leave the bottom open for drainage and airflow).
- Propagate from cuttings: ghost plant, sedums, and many crassulas root easily, letting you fill troughs for the cost of a few mother plants.
Maintenance Expectations (Real Time, Real Tasks)
A well-designed rooftop succulent garden is low-maintenance, not no-maintenance. Plan for 20–40 minutes per week during the growing season, and a short seasonal checklist.
Weekly (spring through early fall)
- Water check: stick a finger 2 inches into the mix; water only if mostly dry. In peak summer wind, you may water containers every 4–7 days; in mild weather, every 10–14 days.
- Wind patrol: re-center pots, check risers, and rotate plants to keep growth even.
- Pest glance: look for mealybugs in rosette centers; treat early with isopropyl alcohol swabs or insecticidal soap as needed.
Monthly
- Light feeding: one diluted cactus fertilizer application during active growth (especially in containers, where nutrients wash out).
- Re-topdress: add gravel where soil has settled; it also keeps crowns cleaner during rain.
Seasonal tasks
- Late spring: acclimate plants to stronger sun over 7–10 days to prevent sunburn.
- Mid-summer: add temporary shade cloth (30–40%) if temperatures and reflected heat are extreme.
- Fall: reduce watering; remove fallen leaves that can trap moisture and encourage rot.
- Winter (cold climates): move tender Echeveria and many aloes indoors; keep Sempervivum and hardy sedums outside if containers won’t waterlog.
Three Real-World Scenarios (and How I’d Handle Each)
Scenario 1: The renter’s roof with strict rules (no drilling, no permanent screens)
You can still build a coherent design by using planters as your wind buffer. Place two or three heavier planters (fiberglass or wood) on the windward side and “lock” lighter pots behind them. Use a freestanding lattice panel attached to weighted bases (like large planters) rather than roof penetrations. Choose compact plants—Sempervivum, Sedum spurium, and Graptopetalum—so breakage is minimal when gusts hit.
Pro tip: Keep everything movable. A modular perimeter gallery layout lets you clear the roof fast if building management needs access.
Scenario 2: The blazing hot roof with reflected heat (plants keep scorching)
This is where plant choice and placement matter more than watering. Shift the most sensitive rosettes away from reflective walls by 18–24 inches. Add a narrow trellis or slatted screen to create dappled shade in the hottest band of the roof, and reserve that zone for sedums, ice plants, and agaves.
If you’re watering daily and still seeing collapse, the issue is often root zone overheating. Light-colored pots, top-dressing gravel, and slightly larger containers (more soil mass) stabilize temperatures better than small black nursery pots.
Scenario 3: The partial-shade roof (great for comfort, tricky for color)
With 4–6 hours of sun, you’ll get a calmer garden and fewer scorched leaves, but some succulents will stretch. Fight legginess by selecting plants that tolerate bright shade: jade plant, ghost plant, Gasteria, and some aloes. Use a few sun-loving sedums in the brightest strip to keep the design from feeling flat. Visually, lean into texture—chalky blues, speckled leaves, and tight rosette repetition.
Layout move: Place your seating in the shade zone and treat the brighter edge like a “succulent frame” that glows around it.
Small Details That Make the Design Feel Finished
Rooftop gardens can look cluttered fast. These finishing touches keep it intentional:
- Limit the palette: choose 6–9 core species and repeat them. Repetition reads designed; randomness reads like storage.
- Use three heights: one tall (Agave/Aloe), one medium (Echeveria/Gasteria), one low/trailing (Sedum/Delosperma).
- Unify with top-dressing: the same gravel across containers ties the garden together and looks crisp against decking.
- Night lighting: one or two solar uplights aimed at an agave or aloe can transform evening use without wiring.
Once everything is placed, give it two weeks before you judge it. Succulents settle in, colors shift with sun, and you’ll learn where the wind really snakes through. Adjust one module at a time, and your rooftop will stop feeling like a harsh, empty surface—and start acting like a living terrace that holds up through heat, gusts, and busy weeks.
Sources: Forschungsgesellschaft Landschaftsentwicklung Landschaftsbau (FLL). Green Roof Guidelines, 2018. Royal Horticultural Society (RHS). “Windy gardens” guidance, 2023. Cactus and Succulent Society of America (CSSA). Cultivation guidance resources, 2020.