How to Build a Garden Tool Cleaning Station
The fastest way to ruin good garden tools isn’t heavy use—it’s putting them away dirty and damp. A thin film of sap, soil, and moisture can quietly trigger rust, spread plant diseases, and turn pruning into a hand-cramping workout. The fix is surprisingly simple: set up one small “pit stop” where every tool gets cleaned the same way, every time, in under 2 minutes.
If you’ve ever left pruners on the potting bench “just for a night” and found them stiff the next day, you already know why this matters. A proper cleaning station makes the right thing the easy thing—no scavenger hunt for a brush, no half-rinsed shovel leaning against the hose, no mystery bucket of brown water you avoid touching.
Pick the right spot (so you’ll actually use it)
Place it where tools naturally land
Tip: Build the station within 10 steps of your tool drop zone. If your tools usually end up by the shed door, the garage side door, or the back steps, that’s where the station goes. Convenience beats good intentions—if you have to walk across the yard to “do it properly,” you won’t. A simple rule: if you can’t reach the station in 30 seconds after finishing a task, you’ll skip it.
Example: After moving her hooks and brushes to the outside wall of the shed (instead of inside), one gardener I worked with stopped stacking muddy trowels on the potting table because the cleaning tools were literally at elbow height.
Choose drainage and shade on purpose
Tip: Put it on gravel, pavers, or a sloped area—never bare soil. You’ll be rinsing off grit and maybe dumping dirty water; bare soil turns into a mud pit and splashes back onto clean tools. If possible, place it in partial shade so buckets don’t turn into warm “tea” that smells by day two. A 2 ft x 3 ft paver pad is plenty for a compact station.
Case: A community garden moved their station from turf to a 24 in x 36 in paver base and cut muddy puddles to near zero—even during weekly volunteer days.
Build the base: simple, sturdy, hose-friendly
Start with a no-wobble work surface at the right height
Tip: Aim for a work height of 34–36 inches. That’s counter height, and it keeps you from hunching while you scrub pruners or wipe blades. A cheap outdoor potting bench works, but a DIY top is easy: a 2 ft x 4 ft piece of exterior plywood sealed with spar urethane (2 coats) on two sawhorses will hold up surprisingly well. Expect $25–$60 depending on what you already have.
Example: One balcony gardener used a 36-inch-tall plastic shelving unit; the top shelf became the cleaning deck and the lower shelves held spray bottles and rags.
Add a “wet zone” and a “dry zone” so tools don’t get re-contaminated
Tip: Split the station into two sides—left for dirty/wet, right for clean/dry. This one habit prevents the classic mistake of rinsing a trowel and laying it back into wet soil crumbs. Use a cheap rubber boot tray ($8–$15) as the wet zone to contain runoff, and a scrap towel or drying mat on the dry side.
Real-world scenario: If you’re cleaning after dealing with powdery mildew, you don’t want sanitized pruners resting in the same splash zone as dirty leaves and stems.
Set up your cleaning “kit” (the stuff that makes the station work)
Keep three brushes—each with a job
Tip: Use a stiff brush for shovels, a narrow brush for pruners, and a gentle brush for wood handles. A $3 stiff nylon scrub brush knocks off clay on spades. An old toothbrush (free) gets into the pivot of pruners and around bolt heads. A soft dish brush keeps wooden handles from getting chewed up and splintery.
Example: After switching from one “do-it-all” brush to a toothbrush + scrub brush combo, a market gardener reported cleaning hand pruners in about 45 seconds instead of fighting stuck grit at the hinge.
Use a two-bucket system: rinse bucket + disinfect bucket
Tip: Label two 2–5 gallon buckets and don’t mix their roles. The rinse bucket is for knocking off soil first; the disinfect bucket stays cleaner longer and actually disinfects. If you only use one bucket, it quickly becomes mud soup and your “disinfectant” stops touching the tool surface effectively.
Numbers that help: A 2-gallon bucket is plenty for home gardens; a 5-gallon bucket makes sense if you’re cleaning loppers, spades, and digging forks daily.
Choose disinfectants that are proven (and use the right ratios)
Tip: Keep at least one fast disinfectant and one “gentle” option. For quick sanitation, many extension services recommend 70% alcohol (isopropyl or ethanol) because it works quickly and doesn’t corrode metal like bleach can. For bleach, a commonly recommended mix is 1 part household bleach to 9 parts water (a 10% solution), made fresh because it degrades over time.
North Carolina State Extension specifically notes alcohol (70%) as an effective, convenient disinfectant for pruning tools, and that bleach solutions should be freshly mixed for best results (NCSU Extension, 2020). The University of Minnesota Extension also advises using disinfectants between plants to reduce disease spread, especially during pruning (University of Minnesota Extension, 2019).
“Sanitizing pruning tools between plants is one of the simplest ways to reduce the spread of plant pathogens—especially during dormant pruning and when working with known disease problems.” — University of Minnesota Extension (2019)
Don’t skip lubrication—it’s the “secret sauce” for smooth pruners
Tip: Store a small oil bottle and apply 2–3 drops at the pivot after cleaning. Pruners fail at the hinge first: grit + moisture turns into grinding paste. Any light machine oil works; even a silicone spray can help, but avoid coating cutting edges with thick grease that attracts dirt. A $6 bottle of oil can last a full season for most home gardeners.
Example: If your pruners squeak or feel gritty, clean with a toothbrush, dry thoroughly, then add a couple drops at the bolt—open/close 10 times to distribute.
Build the station around the jobs you actually do
For muddy digging tools: add a “scrape rail” before you even touch water
Tip: Screw a 16–24 inch metal edge or old hoe head onto the bench leg as a scraping bar. Scraping first saves water and time; it also keeps your rinse bucket from becoming sludge instantly. If you garden in clay, this is the difference between a 30-second cleanup and a 5-minute mess.
Case: A gardener with heavy clay soil added a scrap angle iron (about $10) to the station and cut hose rinsing by more than half because most soil came off dry.
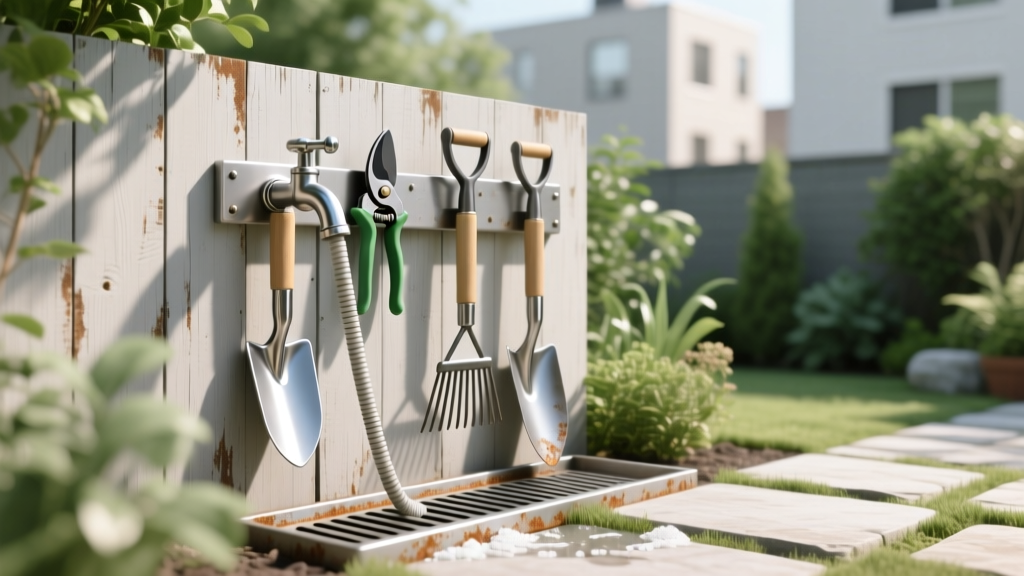
For pruners and snips: mount a magnet strip and a tiny parts tray
Tip: Install a 12-inch magnetic tool strip to hold pruners while they drip-dry. This keeps blades off wet surfaces and prevents the “I set it down and now it’s buried under leaves” problem. Add a small tray (even a yogurt container) for extra springs, nuts, or the little bolt you always lose when you disassemble pruners for deep cleaning.
Example: If you clean pruners after each rose bush (smart during black spot season), a magnet strip keeps you moving without juggling tools.
For hand tools: keep a sand bucket for fast polishing and rust prevention
Tip: Fill a bucket with sand and oil for a quick dip-and-wipe. The classic mix is clean, dry sand with enough oil to lightly coat—think “damp beach sand,” not soup. Plunge a trowel or hori-hori in, twist a few times, then wipe; it removes grime and leaves a thin protective film.
Numbers: Start with 1 gallon of sand and add about 1/4 cup of mineral oil, mixing until evenly distributed. Total cost is often under $15 if you already have a spare bucket.
Cleaning methods: pick what matches your tools and your tolerance for fuss
Quick daily routine (90 seconds) for most tools
Tip: Scrape → rinse → disinfect → dry → oil (if it has moving parts). Scrape the bulk off first, then a quick rinse or dunk, followed by a disinfectant wipe or spray. Dry with a rag—don’t air-dry wet steel if you can help it. Oil pivots on pruners and loppers; wipe off excess so it doesn’t attract dirt.
Example: After deadheading and light pruning, a hand pruner can be cleaned and ready to store in about 1–2 minutes with this sequence.
Weekly deep clean for pruners and loppers (10–15 minutes)
Tip: Once a week during heavy season, do a hinge-and-blade detail. Open the tool, scrub the pivot with a toothbrush and soapy water, rinse, dry, then disinfect. If sap is the issue, a small amount of rubbing alcohol on a rag cuts it quickly; finish with 2–3 drops of oil in the pivot. This prevents the slow “stiffening” that makes pruning feel harder than it should.
Case: A small fruit grower deep-cleans every Sunday evening during summer pruning; their pruners last longer and cuts stay cleaner (less tearing) because the blades aren’t gummed up.
Safe disinfecting times (so you’re not just making tools smell like bleach)
Tip: Give disinfectants enough contact time to work. Alcohol (70%) works quickly—wet the surface and let it sit briefly before wiping dry. Bleach solutions typically need longer wet contact; use them when you can rinse afterward and avoid prolonged soaking to reduce corrosion.
Practical hack: If you’re moving from a diseased plant to a healthy one, keep a 70% alcohol spray bottle at the station and another small one in your apron so you can sanitize on the go.
Comparison table: choose your disinfectant like a pro
| Option | Typical use | Pros | Cons | Cost ballpark |
|---|---|---|---|---|
| 70% isopropyl/ethanol alcohol | Wipe/spray pruners between plants | Fast, easy, less corrosive than bleach, no mixing | Flammable; can dry skin; needs ventilation | $3–$8 per bottle |
| Bleach solution (1:9 bleach:water) | Disinfect after disease work; buckets/tools | Strong disinfectant; inexpensive | Corrosive to metal; should be made fresh; can damage clothes | $2–$6 for bleach (many batches) |
| Soapy water (dish soap + water) | Initial cleaning to remove dirt/sap | Great for grime; gentle; cheap | Not a disinfectant by itself | Pennies per use |
Three real-life station setups (steal one)
The “small patio” station (fits in 2 feet)
Tip: Use a vertical rack and a single tub instead of buckets. If space is tight, use a 12–18 inch-wide wall-mounted rail with hooks, plus one plastic tub that can be carried to the sink. Store a spray bottle of 70% alcohol, a rag, and a toothbrush in a small caddy. Total footprint: roughly 24 in wide x 18 in deep.
Example: A container gardener cleans hand tools at the patio station, then dumps rinse water into a gravel strip (not into pots, where soil can clog drainage).
The “mud season” station for clay gardens
Tip: Add a hose, a scraping bar, and a dedicated boot brush. In sticky soil, the winning combo is dry scrape first, then a short hose rinse. Mount a boot brush ($10–$20) at ground level so you’re not tracking clay into the shed while you put tools away. This setup saves time every single day in spring.
Case: One gardener timed their cleanup: with scrape bar + boot brush, tool-and-boot cleanup after digging dropped from ~8 minutes to ~3 minutes.
The “disease-control” station for roses, tomatoes, and fruit trees
Tip: Create a red-flag zone for disinfecting after sick plants. Keep a clearly labeled disinfectant spray bottle and a disposable wipe roll (or dedicated rags) only for disease work. If you’ve been pruning black spot roses or cutting out tomato blight, sanitize tools before they touch anything else—especially if you’re moving down the row. This habit is strongly supported by extension recommendations for limiting pathogen spread (University of Minnesota Extension, 2019; NCSU Extension, 2020).
Example: A tomato grower clips suckers from 30 plants; they spray pruner blades every 3–5 plants and do a full wipe-down at the station when finished.
Money-saving upgrades (the stuff you’ll wish you did sooner)
Use thrifted kitchen gear as tool-cleaning gear
Tip: A $2 metal loaf pan makes a perfect “drip tray.” Old baking sheets, loaf pans, and utensil holders are great at containing mess and keeping small parts from rolling away. Save your nice garden budget for quality pruners, not fancy station accessories.
Example: A shallow roasting pan catches oily drips when you lubricate tools—no more stains on the bench.
Make a DIY rag system you’ll actually keep clean
Tip: Store clean rags in a lidded container and toss used ones into a separate bin. This prevents the classic “one gross rag for everything” problem. A small $5 plastic bin with a snap lid works; label it CLEAN and USED with a permanent marker. Wash used rags weekly on hot, and don’t mix oily rags with delicate laundry.
Real-world scenario: If you’re disinfecting after pruning disease, you don’t want yesterday’s dirty rag spreading yesterday’s problem back onto today’s tools.
Skip pricey rust removers—use what you already have
Tip: For light rust, scrub with a scouring pad and oil; for heavier rust, soak smart. A green scouring pad plus a few drops of oil removes surface rust fast. If you need a soak, white vinegar can help—check progress every few hours and scrub, then rinse and dry thoroughly. The station makes this easier because you have a dedicated “mess zone” and drying space.
Cost note: A gallon of white vinegar is often under $4 and can rescue multiple tools—way cheaper than replacing a $35 pair of loppers because the hinge seized.
Habits that keep the station from turning into another neglected corner
Use a timer rule: “If it takes under 2 minutes, do it now”
Tip: Treat tool cleaning like washing your hands—automatic and immediate. Most daily cleaning is a 90-second job if the station is stocked. The moment you tell yourself “I’ll do it later,” you’ve basically scheduled rust and sticky sap for tomorrow.
Example: After weeding, a hand hoe gets one scrape, a quick rinse, and a wipe—done before you even take your gloves off.
Refresh solutions on a schedule, not when they look scary
Tip: Dump rinse water daily in summer and remake bleach mix each use. Warm weather turns buckets funky fast, and dirty water doesn’t clean well. If you’re using bleach solution, mix what you’ll use that day and discard afterward; extension guidance commonly emphasizes fresh mixes for effectiveness (NCSU Extension, 2020). Alcohol bottles just get capped and stored.
Numbers: Mixing 1 quart of 10% bleach solution (about 3.2 oz bleach + water to 32 oz) is plenty for a home garden session—no need to fill a 5-gallon bucket.
Make storage foolproof: hang tools blade-down and handles up
Tip: Install 3–5 hooks and give every tool a “home.” When tools have a specific hook, they don’t pile up wet on the bench. Hanging blade-down also keeps sharp edges from catching sleeves and helps any remaining water drip away from wooden handles.
Example: A simple row of hooks ($10–$20 total) stops the shed-floor shuffle and keeps clean tools from getting stepped on.
A cleaning station doesn’t have to be fancy—it just has to be ready. When your scrub brush is hanging where you can grab it, your disinfectant is mixed correctly, and your drying rag isn’t a mystery rag, you’ll start putting tools away clean without thinking. And once that becomes routine, you’ll notice the quiet wins: smoother pruning, fewer rust spots, less disease spread, and tools that feel “new” for years longer than they should.
Sources: North Carolina State University Extension (2020); University of Minnesota Extension (2019).