Patio Outdoor Shower Privacy Garden
You step out of the back door with sandy feet, a towel slung over your shoulder, and that small hope of rinsing off before you track half the beach into the house. Then you notice it again: the neighbor’s second-story window, the side gate that clicks open when someone walks by, and the patio that suddenly feels like a stage. An outdoor shower is supposed to be a luxury—refreshing, clean, and a little bit freeing. Without privacy, it becomes something you avoid.
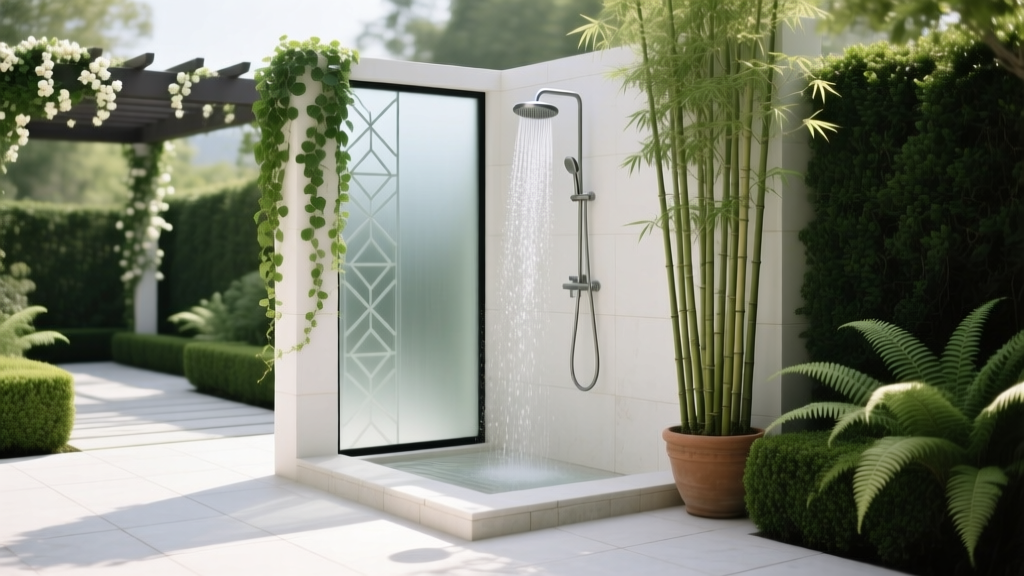
Let’s design a patio outdoor shower privacy garden that feels calm and intentional, not like you wedged a shower head between two fence panels. I’ll walk you through layout strategies, plant choices, and practical details like spacing, sunlight, and maintenance—plus a few real-world scenarios so you can picture how this comes together in your exact kind of space.
Start With the Sightlines: Privacy Is a Geometry Problem
Before we talk plants, we handle the “who can see what” question. Stand where the shower will be (or mark it with a bucket). Now identify every viewing angle: neighboring windows, gaps in the fence, the patio seating area, and any path where people naturally walk.
Rule of thumb: block the diagonal, not just the side
A 6 ft fence might block a straight-on view, but a diagonal view from a deck or window can still expose the shower area. Think in triangles: if a viewer is elevated, your privacy screen needs either more height or to be closer to the shower so it fills more of their view.
- Target privacy height: 6–8 ft for ground-level neighbors; 8–10 ft if you’re dealing with second-story views (often achieved with trellis + vine).
- Comfortable shower footprint: 36 in x 36 in minimum; 48 in x 48 in feels generous for adults and for hanging towels.
- Clear access path: at least 36 in wide so you can walk in with a towel and not brush wet foliage.
Layout Strategies That Make a Shower Feel Built-In (Not Plopped Down)
A patio shower privacy garden works best when you build “layers”: hardscape closest to the shower, then screens, then plants. That layering keeps the shower area tidy and makes the garden feel intentional.
Strategy 1: The L-Screen (best for corner patios)
Create an L-shape around two sides of the shower using a slatted screen, fence extension, or trellis panels. The third side stays open toward your house for easy access.
Designer dimensions: Set the shower base 18–24 inches away from the screen. That gap gives you room for drip line irrigation, airflow to dry surfaces, and a narrow planting strip for softening.
Strategy 2: The “Green Hallway” (best for narrow side yards)
If your shower sits along a side wall, build a corridor: one side is the house/fence; the other side is a planted screen. The secret is to keep the walkway clear and let foliage do the privacy work above waist height.
Working measurements: Aim for 60–72 inches total width: 36 inches of walkway + 24–36 inches of planting bed. If you have only 48 inches total, use a trellis with climbers to keep the bed slim (12–18 inches).
Strategy 3: The “Outdoor Bathing Nook” (best for open patios)
In an open patio, treat the shower like a garden room: a three-sided enclosure with an entry gap. Include a small bench or hook wall so it feels like a place, not a utility corner.
Privacy trick: Offset the entrance so there’s no direct view line into the shower. Even a 24-inch offset makes a big difference.
“Outdoor spaces feel more comfortable when boundaries are defined and edges are softened—people relax when they understand where a space begins and ends.” — Clare Cooper Marcus, landscape architect and co-author of People Places (1998)
Hardscape Choices: Drainage, Slip Resistance, and Cost Reality
A shower garden lives at the intersection of water and foot traffic. Plan for safe footing and responsible drainage from day one.
Shower base options
| Base Material | Typical Installed Cost | DIY Difficulty | Slip Resistance | Best Use |
|---|---|---|---|---|
| Gravel + pavers grid | $200–$600 | Easy | Good (choose textured pavers) | Renters, quick builds, flexible drainage |
| Concrete pad (broom finish) | $600–$1,500 | Moderate | Very good | Permanent patios, clean modern look |
| Wood slat platform (cedar/redwood) | $350–$1,200 | Moderate | Good if maintained; can get slick with algae | Warm look; pair with gravel underneath |
| Stone/porcelain pavers | $800–$2,500 | Hard | Varies (choose outdoor-rated textured) | High-end patio integration |
Drainage note: Many municipalities restrict graywater discharge. Before you drain soap-and-shampoo water into a planting bed, check local rules. The U.S. Environmental Protection Agency notes that graywater can contain microorganisms and chemicals, and reuse requires careful management (EPA, 2023). In California, the state plumbing code provides frameworks for residential graywater systems with specific design requirements (California Department of Housing and Community Development, 2022).
Practical drainage plan (simple and effective)
- Fast DIY approach: A 4-inch-deep gravel sump under the shower area, lined with landscape fabric, with water percolating into soil (only if allowed and soil drains well).
- More controlled: A drain pan piped to a dry well. A small dry well is often 3 ft x 3 ft x 3 ft filled with drain rock, wrapped in geotextile.
Planting Design Principles for Shower Privacy (So It Looks Great Year-Round)
Your plants are doing two jobs: screening and mood-setting. The best outdoor shower gardens feel lush, but they’re also tidy where you need movement and dry footing.
Principle 1: Layer heights for believable privacy
Use three layers:
- Upper layer (6–10 ft): narrow shrubs, clumping bamboo alternatives, or trellised vines for the “wall.”
- Middle layer (3–5 ft): leafy shrubs and grasses that block torso-level views.
- Lower layer (0–2 ft): tough groundcovers that tolerate splashing and foot-adjacent conditions.
Principle 2: Keep the “wet zone” simple
The area within 18 inches of the shower gets the most splash. Choose plants that tolerate occasional wetness and don’t drop messy fruit, petals, or spines where bare feet land.
Principle 3: Build a maintenance “edge”
Add a hard edging line (steel edging, brick, or a paver soldier course) between the shower base and planting bed. It prevents soil washout and makes trimming quick. A clean line is the difference between “spa” and “mud corner.”
Plant Selection: Specific Varieties That Earn Their Space
Below are designer favorites that look good near patios, handle pruning, and create privacy without swallowing the yard. Always cross-check with your USDA Hardiness Zone and local invasive plant guidance.
Evergreen screens (structure and year-round coverage)
1) Podocarpus macrophyllus (Japanese yew pine)
Why it works: narrow, upright, and takes clipping well—great for tight patios. Plant 3–4 ft apart for a hedge; expect 6–10 ft tall with pruning. Best with 4–6 hours of sun; tolerates part shade.
2) Ilex crenata ‘Sky Pencil’ (Japanese holly)
Why it works: a living privacy column for small footprints. Space 24–30 in apart for a slim screen. Likes consistent moisture, which pairs nicely with a shower garden as long as drainage is good.
3) Pittosporum tobira ‘Wheeler’s Dwarf’
Why it works: dense evergreen mounds for the mid-layer without taking over. Space 3 ft apart. Great in coastal areas and tolerates pruning into clean shapes.
Clumping grasses (soft screens that move with the breeze)
4) Calamagrostis x acutiflora ‘Karl Foerster’ (feather reed grass)
Why it works: upright, architectural, and stays narrow. Space 18–24 in apart; height 4–5 ft. Looks modern against wood screens. Cut back in late winter.
5) Muhlenbergia capillaris (pink muhly grass)
Why it works: airy, romantic fall color; thrives in sun with low fuss once established. Space 30–36 in apart. Use as a soft middle layer rather than a full screen.
Trellis vines (maximum privacy with minimum ground space)
6) Trachelospermum jasminoides (star jasmine)
Why it works: evergreen in warm climates, fragrant, and dense on a trellis. Give it a trellis panel 6–8 ft tall; plant 18–24 in from the base for airflow and irrigation access. Sun to part shade.
7) Clematis armandii
Why it works: evergreen clematis with big spring impact and good screening. Best in mild climates; provide strong support and keep roots cool with mulch.
Groundcovers and “wet-edge” plants (tidy near bare feet)
8) Lomandra longifolia ‘Breeze’
Why it works: strappy foliage, clean clumps, handles heat and periodic water. Space 24–30 in apart.
9) Dymondia margaretae (silver carpet)
Why it works: tough, low, and tolerates light foot-adjacent conditions. Likes sun and good drainage. Use between stepping stones or at the bed edge.
10) Asarum splendens (Chinese wild ginger)
Why it works: a calm, lush groundcover for shade-side shower gardens. Not for heavy foot traffic, but excellent as a soft green “carpet” beyond the splash zone.
Three Real-World Layout Scenarios (and How I’d Solve Them)
Scenario A: Renter-friendly patio shower screen on a balcony-style patio
The problem: You can’t dig, you can’t attach to fencing, and you need privacy fast.
The solution: Use two freestanding trellis panels in weighted planters to create an L-screen. Choose large containers (at least 18–24 in diameter) so they don’t tip and so roots have room.
- Plants: star jasmine on trellis + Lomandra at the base for fullness.
- Costs: Two trough planters ($80–$200 each), trellis panels ($40–$120 each), potting mix ($20–$50), plants ($25–$60 each). A solid renter setup often lands around $300–$800.
- Bonus: When you move, the whole privacy garden moves with you.
Scenario B: Small suburban patio with neighbor window overlooking the shower
The problem: The fence is fine at ground level, but a second-story window sees down into the space.
The solution: Place a screen closer to the shower and go vertical with a trellis topper. A 6 ft fence plus a 2 ft trellis extension often creates an 8 ft visual block without rebuilding the whole fence.
- Plants: Podocarpus (tight evergreen wall) + ‘Karl Foerster’ grass in front to soften.
- Spacing: Podocarpus 3 ft apart; grasses 24 in apart.
- Sunlight: If the area gets only 3–4 hours of sun, prioritize evergreen shrubs that tolerate part shade over sun-hungry flowering plants.
Scenario C: Coastal beach house rinse-off station with sand and wind
The problem: Salt spray, wind, and constant sand make delicate plants struggle and make maintenance annoying.
The solution: Use a gravel base with a simple hose-style shower, then plant hardy, wind-tolerant evergreens and tough grasses. Keep leaf litter low and branches off the walkway.
- Plants: Pittosporum tobira ‘Wheeler’s Dwarf’ + Lomandra + pink muhly for seasonal softness.
- Hardscape: A 4 in compacted gravel base with 24 in x 24 in concrete pavers set flush for stable footing.
- Cost target: A practical coastal build can stay near $500–$1,500 if you DIY the base and planting.
Step-by-Step Setup: Build the Privacy Garden Like a Pro
This is the sequence I use to avoid rework and keep the project feeling manageable.
- Mark the shower footprint. Tape out a 48 in x 48 in square if space allows. Stand in it and test sightlines.
- Decide your screen type. Freestanding panels for renters; attached trellis/screen for homeowners. Aim for 6–8 ft total height.
- Plan the access path. Keep 36 in clear from door to shower. If you need a hook or towel bar, place it outside the splash zone.
- Build the base and drainage. Install your pad/platform first; it determines finished grade and where water goes.
- Install irrigation (optional but smart). A simple drip line in the planting bed saves time. Keep emitters 6–12 in away from the shower base so the hardscape dries faster.
- Plant the backbone evergreens. Place tall screens first (podocarpus, sky pencil holly), then mid-layer grasses/shrubs.
- Add the soft edge. Groundcovers and low plants go last to stitch everything together and cover irrigation lines.
- Light it gently. One low-voltage uplight (around 3–5 watts) on a feature plant and one path light can make the area feel safe without turning it into a spotlight.
Budget and DIY Alternatives (So You Can Get Privacy Without a Full Remodel)
Privacy can be built in layers, and you don’t have to do everything at once.
- DIY screen idea: Use corrugated polycarbonate roofing panels in a wood frame for a modern, light-filtering screen. Materials often run $150–$400 depending on size.
- Low-cost plant screen: Three to five large containers with upright plants can create a surprisingly effective barrier. Expect $40–$120 per container setup if you shop sales.
- Phased approach: Build the base and one screen first, then add plants over a season as budget allows.
If you’re hiring out parts of the work, labor costs vary wildly by region. As a planning anchor, many homeowners find that a plumber-installed outdoor shower hookup can range from $500 to $2,000+ depending on distance to supply lines and whether hot water is included (get local quotes early so your garden layout doesn’t conflict with trenching).
Maintenance Expectations: What It Takes to Keep It Spa-Calm
A shower garden should not become a weekly headache. With the right plant palette and a clean edge, maintenance is steady and predictable.
Weekly (growing season): plan on 15–30 minutes per week to check irrigation, pull a few weeds, and do a quick trim along the path edge.
Monthly:
- Rinse the shower base and scrub any slick spots (especially wood slats).
- Check drains/gravel areas for hair and leaf buildup.
- Lightly prune fast growers (star jasmine, pittosporum tips) to keep the entry clear.
Seasonal:
- Late winter: Cut back feather reed grass; refresh mulch (aim for 2–3 in depth, kept a few inches away from stems).
- Spring: Fertilize container plants lightly; check trellis ties and anchors.
- Summer: Deep water shrubs if rainfall is low; keep foliage off the shower hardware to reduce mildew.
- Fall: Clear leaf litter from drains; do a structural prune so winter storms don’t break top-heavy plants.
Small Design Touches That Make It Feel Like a Destination
Privacy is the baseline. Comfort is what makes you use the space daily.
- Add a hook rail at 60–66 inches high (easy reach for towels without dragging them through plants).
- Include a small bench (even a 12–14 inch deep wall-mounted teak slat) for toiletries and a place to sit while drying off.
- Use fragrance carefully: star jasmine near the entry is wonderful; avoid heavily fragrant plants directly in the splash zone where scent can intensify uncomfortably on hot days.
Once the screens are placed with intention, the plants are layered for year-round coverage, and the footing is clean and safe, the patio outdoor shower stops feeling exposed. It becomes a small garden room—one you’ll actually step into without hesitating, even when the towels are still warm from the sun and the rest of the yard is watching from the edges.
Sources: U.S. Environmental Protection Agency (EPA), “Graywater Reuse and Recycling” (2023). California Department of Housing and Community Development, California Plumbing Code (2022). Clare Cooper Marcus & Carolyn Francis, People Places: Design Guidelines for Urban Open Space (1998).