Backyard Perennial Border Design
You step outside with coffee and a vague hope that “this year” the backyard will feel finished. But the view is the same: a strip of exposed fence, a lumpy lawn edge, and a few tired shrubs that never quite connect into a garden. The space isn’t terrible—it’s just undecided. A perennial border is how you give that indecision a plan: a long, layered planting that looks intentional from spring through frost, returns every year, and can be built in weekends instead of months.
Let’s walk this like a real project. You’ll measure, choose a layout that matches your sun and time, pick plants that behave, and set spacing so you’re not re-digging everything next summer.
Start with the “view line,” not the plant list
Perennial borders fail most often because they’re planted like a collection—pretty things placed wherever there’s a gap. A border works when you design it from where you’ll see it most: the patio chair, the kitchen sink, the back door steps. Stand there and mark your primary viewing line. This determines height order, focal points, and where you can “hide” utilitarian elements (hose, AC unit, trash bins) behind taller plants.
Recommended border dimensions that read well from a house
For a typical suburban yard, a border that’s too narrow looks like a hedge with flowers. Too wide and it becomes a maintenance project you avoid. A dependable range:
- Depth: 4–8 ft is the sweet spot for layering (front, mid, back). If you can only spare 3 ft, choose a “thin border” strategy (more on that below).
- Length: Aim for at least 12–20 ft so repetition feels rhythmic rather than random. Longer is better; you can repeat the same plant group every 6–8 ft for cohesion.
- Height: Keep the tallest plants within the mature height that won’t block windows or sightlines—often 36–60 in along a fence line.
Sun matters more than almost anything else. Most showy perennials want 6+ hours of direct sun. Part sun means 3–6 hours and shifts your plant palette toward tougher, shade-tolerant bloomers and foliage stars. (The Royal Horticultural Society defines “full sun” as 6+ hours in its gardening guidance; see RHS, 2023.)
Design principles that make a border look “designed”
1) Layering: front–middle–back (and why the middle matters most)
Think in three bands across the depth of the border:
- Front edge (6–18 in tall): Low mounding plants that soften the lawn/patio edge and hide bare stems.
- Middle (18–36 in): The workhorses—these carry color and texture through the longest season.
- Back (36–72 in): Vertical anchors and airy “see-through” plants that add height without heaviness.
The middle band is where you repeat plants for unity. If you only do singles, the border reads like a plant sale haul. If you repeat in groups of 3s and 5s, it reads like a plan.
2) Repetition and “drifts” (the easiest professional trick)
Choose 5–7 core perennials and repeat them. Plant in drifts: groupings that are wider than they are deep (for example, a 3 ft wide drift that’s 18 in deep). This creates a bold read from a distance and reduces the “busy” look.
3) Structure: perennials need a backbone
A perennial border still needs structure—especially in winter. Include at least one of these:
- Evergreen: Dwarf boxwood alternatives like Ilex crenata (Japanese holly) where boxwood blight is a concern.
- Ornamental grass: Winter form, movement, and seed heads. (Just confirm it’s not invasive in your region.)
- Woody flowering shrub: A hydrangea or potentilla can anchor the scene without taking over.
As the landscape architect Thomas Rainer puts it:
“It’s not about individual plants—it’s about plant communities that behave like nature, with layers, repetition, and resilience.”(Rainer is known for ecological planting design; quote paraphrases his widely shared design message in his public talks and writing, including 2015.)
4) Edges: decide if your border is crisp or relaxed
A crisp edge (steel edging or a spade-cut line) looks modern and keeps mulch tidy. A relaxed edge (plants allowed to spill slightly) looks cottagey and forgiving. Either is fine—but decide early. If you want crisp, install edging before planting.
Three layout strategies (pick one that matches your yard)
Strategy A: The classic fence-line border (most common, most satisfying)
Best for: Fences, blank garage walls, property lines, or anywhere you want to soften a hard boundary.
Layout example: A border 24 ft long × 6 ft deep along a fence. Place 3 anchor plants spaced about 6–8 ft apart to set the rhythm, then fill between with repeating mid-layer drifts and a continuous low front edge.
Strategy B: The “thin border” for renters or tight patios (3 ft deep, still layered)
Best for: Townhomes, narrow side yards, rental homes where you want impact without excavation.
Keep tall plants to “see-through” forms (like verbena bonariensis) so the border doesn’t feel like a wall. Choose compact cultivars and plants with long bloom time.
Layout example: 16 ft long × 3 ft deep along a walkway. Use wall-mounted trellis or a narrow obelisk to add height without wide root zones.
Strategy C: The corner wrap (solves the awkward back corner problem)
Best for: That back corner where everything dies: poor drainage, weird shade angles, or the spot you see from every window.
Layout example: An L-shape border: 10 ft on one side and 12 ft on the other, both 5 ft deep. Put the tallest anchor at the corner joint, then step down in height as you move away.
Step-by-step setup (a weekend plan that actually works)
- Measure and mark. Use a hose to sketch the front edge. A gentle curve looks more natural than a ruler-straight line. Confirm depth: aim for 4–6 ft minimum if possible.
- Check sun hours. Spend one day noting sun at 9am, noon, and 3pm. If you get 6+ hours, plan for sun perennials; if 3–6, choose part-sun plants.
- Kill the grass. Sheet mulch is renter-friendly: overlap cardboard by 6 in, wet it, and top with 3–4 in compost + mulch. Plant through it. (This reduces digging and weeds.)
- Improve soil selectively. You don’t need to amend the entire yard—just the border. Add 2 in compost and mix into the top 6–8 in where you’ll plant.
- Place plants in pots first. Set anchors, then mid-layer drifts, then front edge. Step back to your main viewing line and adjust spacing before you dig.
- Plant at correct spacing. Most perennials do best when planted to their mature width (not “to fill instantly”). Typical spacing is 12–24 in depending on cultivar.
- Mulch and water in. Apply 2–3 in mulch, keeping it a few inches away from crowns. Water deeply right after planting and weekly during establishment.
Plant selection: reliable varieties and why they earn their space
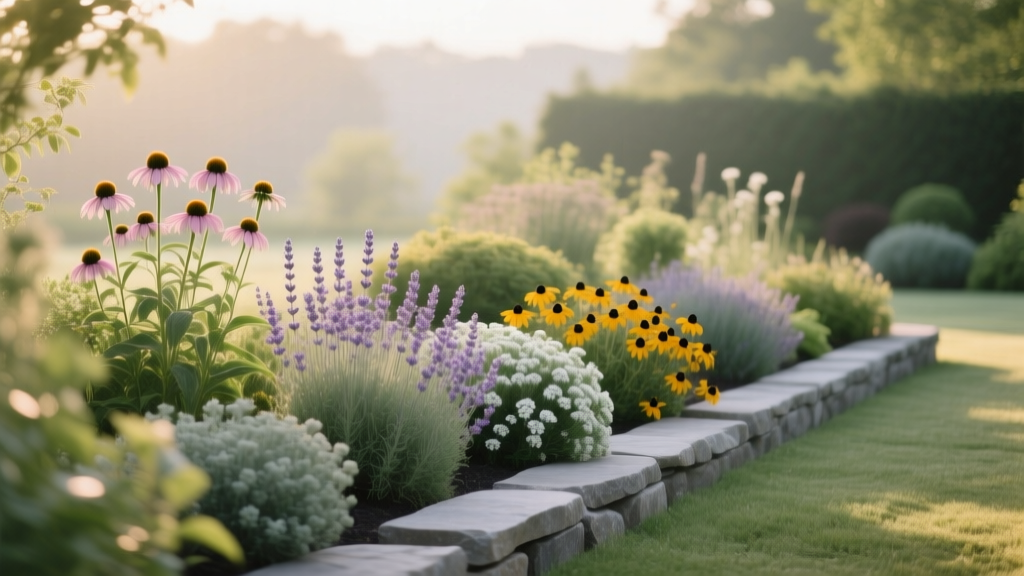
The goal is a border that looks good in layers, has repeatable performers, and doesn’t collapse into flopping stems by July. I’ll give you a practical sun-border palette first, then options for part shade.
Sun border (6+ hours): a designer’s core palette
Back layer / anchors (structure and height):
- Hydrangea paniculata ‘Little Lime’ (3–5 ft): big summer bloom, sturdy, tolerates sun with moisture. Great as a repeating anchor at 6–8 ft intervals.
- Calamagrostis x acutiflora ‘Karl Foerster’ (4–5 ft): upright grass that won’t splay. Looks good even in winter; plant 24–30 in apart.
- Echinacea purpurea ‘Magnus’ (30–36 in): strong stems, pollinator magnet, repeats well in drifts.
Middle layer (long season and repeatable color):
- Nepeta ‘Walker’s Low’ (18–24 in): a border “stitch” plant—soft mound, long bloom, hides bare legs of taller plants. Plant 18–24 in apart.
- Salvia nemorosa ‘Caradonna’ (18–24 in): vertical purple spires, great contrast with mounding forms; repeat every 4–6 ft.
- Achillea ‘Moonshine’ (18–24 in): silvery foliage, drought tolerant, strong color in summer; good for hot edges.
- Rudbeckia ‘Goldsturm’ (24–30 in): late-season gold that carries into fall; dependable mass effect.
Front edge (clean line and weed suppression):
- Geranium ‘Rozanne’ (12–18 in): long bloom, spills gracefully; excellent for softening the edge.
- Heuchera ‘Caramel’ (12–18 in): warm foliage contrast; especially good when flowers are between flushes.
- Allium ‘Millenium’ (12–18 in): late summer purple pom-poms, tidy clumps, minimal fuss.
For pollinator value and resilience, it helps to prioritize plants with proven ecological benefit. The Xerces Society emphasizes that native and well-adapted flowering plants support pollinators best when bloom spans the season (Xerces Society, 2019). Even if you use some non-natives, aim for continuous bloom windows.
Part shade (3–6 hours): lush and tidy, not gloomy
- Hydrangea arborescens ‘Incrediball’ (4–5 ft): handles part shade and still flowers heavily.
- Hakonechloa macra ‘Aureola’ (12–18 in): flowing gold grass for the front; brightens shade.
- Astrantia major ‘Roma’ (18–24 in): intricate blooms, long season, feels refined.
- Brunnera ‘Jack Frost’ (12–18 in): silver foliage lights up shade; spring flowers are a bonus.
- Helleborus x hybridus (12–18 in): late winter/early spring backbone; evergreen-ish leaves in mild climates.
- Japanese anemone ‘Honorine Jobert’ (3–4 ft): late-season white flowers; give it room and avoid tiny beds.
Comparison table: three border “recipes” at a glance
| Border Recipe | Best For | Suggested Size | Plant Spacing | Estimated Plant Cost | Maintenance Level |
|---|---|---|---|---|---|
| Sun Classic (Hydrangea + grasses + salvias) | Fence lines, full sun, modern-to-cottage | 24 ft × 6 ft | 12–30 in depending on plant | $350–$900 (mix of 1-gal and 2-gal plants) | Moderate (deadhead + spring cutback) |
| Thin Border (vertical “see-through” + compact mounds) | Renters, tight patios, narrow walkways | 16 ft × 3 ft | 12–18 in mostly | $200–$550 | Low–Moderate (more watering first year) |
| Part Shade Lush (hydrangea + foliage + astrantia) | Morning sun/afternoon shade, under tree edges | 20 ft × 5 ft | 15–24 in | $300–$850 | Moderate (slugs + cleanup) |
Three real-world scenarios (and how the design changes)
Scenario 1: New homeowner with a sunny fence and clay soil
Site: 30 ft of fence, full sun (7–8 hours), heavy clay that stays wet in spring.
Design move: Build a slightly raised planting strip with compost and pine fines to open the soil. Choose plants that tolerate periodic wetness but don’t require bog conditions.
Planting plan highlights:
- Anchors: 3× ‘Little Lime’ hydrangeas spaced 8 ft apart
- Vertical repetition: 7× Salvia ‘Caradonna’ in groups of 3-2-2
- Soil helpers: Nepeta ‘Walker’s Low’ to knit the middle layer and reduce weed pressure
Cost range: If you buy 1-gallon perennials and 2-gallon shrubs, expect about $600 for a 30 ft border planted at sensible spacing. If you jump to 3-gallon shrubs and instant impact, you can hit $1,200+ quickly.
Scenario 2: Renter with a narrow side yard and strict digging rules
Site: 18 ft long × 3 ft deep strip along a wall, part sun (4–5 hours), landlord doesn’t want major excavation.
Design move: Use large containers and a “hybrid border.” Place 3–4 big pots (at least 18 in diameter) for anchor plants, then fill the in-ground strip with shallow-rooted perennials through sheet mulch.
Planting plan highlights:
- Containers: dwarf hydrangea or a compact grass like ‘Karl Foerster’ (in a pot, it stays narrower)
- In-ground: Brunnera ‘Jack Frost’ + Heuchera for foliage, Astrantia for bloom
DIY alternative: Skip steel edging and cut a clean spade edge every month during the growing season. It costs $0, just 10 minutes of effort.
Scenario 3: Busy family patio view that needs “clean” year-round
Site: Border seen from the kitchen and patio, sun until early afternoon (5–6 hours), kids and a dog cut across the edge.
Design move: Keep the front edge tough and walk-by friendly: low mounds that don’t snap easily, plus a defined hard edge. Add stepping stones (18–24 in apart) at the dog’s preferred path so the border doesn’t get trampled.
Planting plan highlights:
- Front: Geranium ‘Rozanne’ + Allium ‘Millenium’ (durable clumps)
- Middle: Salvia ‘Caradonna’ for vertical structure that reads clean
- Back: grasses for movement without messy petals
Budget note: A simple steel edge can cost $2–$4 per linear foot. For a 24 ft run, plan roughly $48–$96 plus stakes—worth it if you want a crisp line with minimal weekly fuss.
Spacing, quantities, and a practical planting math shortcut
Here’s a quick way to estimate plant counts without overbuying: perennials spaced 18 in apart typically need about 4 plants per 10 sq ft. A 24 ft × 6 ft border is 144 sq ft, which often lands around 55–70 perennials depending on how many shrubs/grasses you include and whether you leave room for growth.
If you’re tempted to pack plants closer for instant fullness, remember you’re paying twice: once now, and again later when you divide, move, or replace plants that suffocated. A little mulch is cheaper than extra plants.
Budget planning: where to spend and where to save
Spend on anchors. Buy your shrubs and grasses a size up (2–3 gallon) because they set the structure. Saving $20 per shrub isn’t a win if the border looks empty for three years.
Save on repeaters. Your drift plants (nepeta, salvia, rudbeckia) are perfect as smaller pots. You can also divide them in year 2–3 to expand the border.
DIY alternatives that look professional:
- Edging: spade-cut edge instead of steel (free)
- Mulch: local municipal compost or leaf mold instead of bagged mulch (often $20–$40 per cubic yard locally, versus many bags)
- Plant supports: use discreet twiggy branches pushed into clumps in spring instead of buying peony rings
Maintenance expectations (so the border stays a pleasure)
Perennial borders aren’t no-maintenance, but they can be predictable. Plan for:
- First growing season: 30–45 minutes per week for watering checks, weeding, and deadheading. Water deeply once weekly if rain is under 1 inch.
- After establishment (year 2+): 15–30 minutes per week in peak season, mostly for deadheading, edging, and pulling the occasional weed.
Seasonal rhythm:
- Early spring: Cut back grasses and perennial stems before new growth reaches 4–6 in. Top-dress with 1 in compost.
- Late spring: Stake flop-prone plants early (or use the “Chelsea chop” on tall asters/sedums where appropriate).
- Summer: Deadhead salvias and nepeta for rebloom; irrigate during heat waves.
- Fall: Leave some seed heads for winter interest; cut back only what turns to mush.
- Every 3–4 years: Divide crowded perennials (especially geranium, nepeta, daylily-type clumps) to refresh vigor.
If you want a border that looks good through winter, keep upright grasses and sturdy stems until late winter. The University of Vermont Extension notes that leaving some perennial stalks and seed heads can add winter interest and habitat value (UVM Extension, 2020).
Small design details that make it feel finished
Add one “pause.” A bench, birdbath, or obelisk placed about 1/3 of the way down the border gives the eye a resting point. This is especially useful in long, straight fence-line borders.
Repeat one foliage color. Silver (achillea), burgundy (heuchera), or chartreuse (hakonechloa) repeated three times reads as intentional even when flowers come and go.
Plan for succession. Aim for at least three bloom peaks: late spring (salvia), midsummer (echinacea), late summer/fall (rudbeckia, asters, anemone). Continuous bloom is less about having 30 species and more about selecting a few that overlap.
The best perennial border doesn’t feel like it was “installed.” It feels like it belongs: layered for your sightlines, repeated for calm, and tough enough to handle real life—kids, renters, clay, shade, and the weeks you forget to deadhead. Measure your strip, pick a layout strategy that matches your constraints, and start with anchors and repeaters. By the end of the season, you won’t be looking at an undecided yard anymore—you’ll be looking at a border that’s clearly going somewhere, and already coming back.
Sources: Royal Horticultural Society (RHS), 2023; Xerces Society, 2019; University of Vermont Extension, 2020.