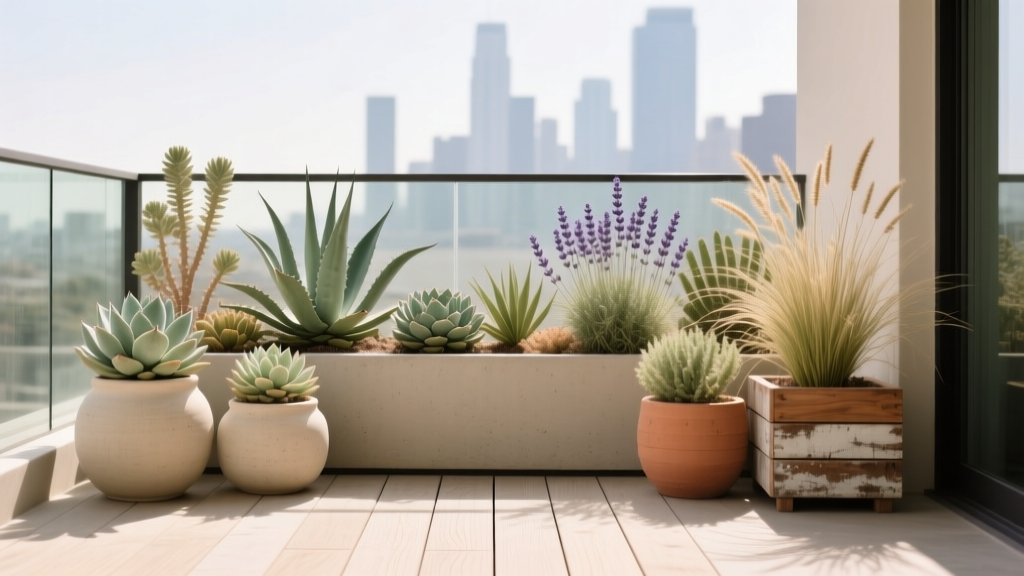
Balcony Drought-Tolerant Container Garden
The forecast says “no rain for 10 days,” and your balcony planters are already looking thirsty by day three. You’re carrying a watering can through a sliding door, dripping across the floor, and wondering why the sunniest corner of your home feels like the hardest place to keep alive. If your balcony is windy, bright, and exposed, the problem isn’t your effort—it’s that typical container setups behave like tiny ovens. The good news: with a drought-tolerant design, your balcony can stay lush-looking while asking for far less water, fewer emergencies, and a maintenance routine that fits real life.
I’m going to walk you through a balcony layout the way I’d sketch it for a client: we’ll use the microclimates you already have (hot wall, windy rail, shaded door corner), choose containers that slow evaporation, and build a plant palette that looks intentional even when you miss a watering day.
Start with the Balcony’s “Weather Map” (Microclimates First)
A drought-tolerant container garden succeeds when you place the right plant in the right stress level. Before buying anything, stand outside for a minute at three times of day—morning, mid-afternoon, and evening—and notice where the sun hits, where wind funnels, and where reflected heat builds up.
Measure and mark three zones
Most balconies—no matter how small—have these distinct zones:
- Heat wall zone: the area within about 12–18 inches of a sun-baked wall. It’s warmer and dries faster.
- Edge/wind zone: along the railing, especially on upper floors. Wind increases transpiration and can desiccate foliage.
- Door/shade zone: near the door or an overhang where sunlight is shorter and temperature swings are smaller.
Concrete data point: If you’re getting 6–8 hours of direct sun, plan for true sun-lovers (lavender, thyme, sedum). If you have 3–5 hours, choose drought-tolerant plants that accept part sun (some salvias, pelargoniums, smaller grasses). Under 3 hours, drought tolerance is still possible, but focus more on “low-water” than “desert”—think hardy evergreens and tough foliage plants rather than cacti.
“The right plant, right place principle is the foundation of sustainable landscapes—matching species to site conditions reduces inputs like irrigation and fertilizer.” — Royal Horticultural Society (RHS), 2021
The RHS statement is written for landscapes, but the same principle is even more important in containers, where roots have less buffering capacity.
Design Principles That Make a Balcony Feel Designed (Not Just “Pots on a Slab”)
When space is tight, design choices have to do double duty: make it look good and make it easier to care for. Here are the principles I lean on for drought-tolerant balconies.
1) Think in vertical layers: rail, mid, floor
Instead of lining pots along the edge, build a layered view:
- Rail layer: slim troughs or rail planters for low, trailing, or compact herbs.
- Mid layer: one or two statement containers with sculptural plants.
- Floor layer: larger pots that hold moisture longer and anchor the composition.
Concrete data point: A practical minimum walkway is 24 inches. On a narrow balcony (say 3 feet wide), keep deep pots on one side only and use shallow rail planters on the other to avoid a cluttered squeeze.
2) Use fewer, larger containers to slow drying
Small pots dry fast. Larger containers act like thermal mass—more soil volume means more stable moisture. A single 18-inch diameter pot can be easier than three 10-inch pots, and it reads cleaner visually.
3) Repeat shapes and limit the palette
Drought-tolerant plants often have strong textures (spikes, rosettes, silvery leaves). Repeating two or three container finishes (matte black, terracotta, galvanized) and repeating plant forms keeps it cohesive. I typically aim for 60% repeat plants (same variety used multiple times) and 40% accents.
4) Protect soil from sun and wind
On balconies, soil is exposed from above and the sides. Two fixes make a big difference:
- Top-dress mulch: 1 inch of gravel mulch or small lava rock reduces evaporation and looks sharp with drought plants.
- Use pot “shades”: cluster pots so their sides shade each other, or place a low groundcover around the base.
Evaporation and plant water use are also influenced by temperature, humidity, solar radiation, and wind—factors described in the FAO’s classic reference on evapotranspiration (Allen et al., 1998).
Three Layout Strategies (Pick the One That Fits How You Live)
Below are three layouts I use all the time for renters and homeowners. Each is meant to feel intentional, leave space to move, and keep water needs predictable.
Scenario 1: The “Narrow Corridor” Balcony (3 ft x 10 ft)
This is the classic apartment balcony: you can stand, maybe place a chair, but anything too deep blocks the path. The goal is to keep the floor mostly open.
Layout: Put two 10–12 inch deep rail planters along the railing, then use two large floor pots at opposite ends (each 16–18 inches wide). The ends become visual anchors, and the rail planters provide continuity without eating walkway space.
Planting approach: Rail planters get compact drought-tolerant herbs and trailers; end pots get one sculptural “thriller” plus two supporting plants.
Scenario 2: The “Windy High-Rise” Balcony (5 ft x 8 ft, exposed)
Wind is the hidden water thief. It can strip moisture from leaves and whip soil surfaces dry. Here, durability matters as much as drought tolerance.
Layout: Create a windbreak using a tall, narrow planter (around 12 inches wide x 36 inches long) placed perpendicular to the railing. Pair it with a low bench or storage box that also blocks airflow at soil level.
Planting approach: Choose flexible, non-brittle plants—ornamental grasses and tough salvias—rather than plants with brittle stems.
Scenario 3: The “Hot South-Facing Wall” Balcony (4 ft x 12 ft, intense sun)
This is the balcony that roasts. Reflected heat from walls and windows can push stress up a notch.
Layout: Pull your biggest containers 12 inches away from the wall to reduce heat blast and allow air movement. Use light-colored or double-walled containers to keep root zones cooler. Place a small side table or a narrow shelf in the door/shade zone for a soft transition.
Planting approach: Embrace Mediterranean plants (lavender, rosemary, thyme) and heat-loving succulents.
Container Choices: Materials, Costs, and DIY Swaps
The container is part of the irrigation system. Material affects how quickly the root zone heats and how fast water evaporates.
| Container Type | Water Retention | Heat on Roots | Typical Cost (USD) | Best Use on Balcony |
|---|---|---|---|---|
| Unglazed terracotta (14–18") | Low (dries faster) | Moderate | $25–$60 | Herbs; plants that hate wet feet (thyme, lavender) if you can water a bit more |
| Glazed ceramic (16–20") | High | Moderate | $45–$120 | Statement pots; reduces evaporation compared to terracotta |
| Resin/plastic composite (16–20") | High | Low–Moderate | $30–$90 | Windy balconies (lighter than ceramic), easy to move |
| Fabric grow bags (10–20 gal) | Moderate | Low | $8–$20 | Budget builds; great drainage, but can dry faster in wind |
| Wood planter box (lined) | High | Low | $40–$150 | Windbreak planters; long troughs for layered planting |
DIY alternatives that still look designed: Use fabric grow bags inside decorative baskets (lined with a cut-open contractor bag with drainage holes). Or build a simple cedar planter box: a 36-inch long trough is manageable on most balconies and gives you enough soil volume to keep roots happier.
Concrete data point: Plan for $120–$350 to set up a small but polished drought-tolerant balcony (containers, soil, plants, mulch). A higher-end version with large glazed pots can reach $500+, but you can phase it in.
Plant Selection: Specific Varieties That Earn Their Keep
Drought-tolerant balcony plants need more than low-water genetics—they must handle container life: heat, wind, restricted roots, and occasional missed watering. Below are reliable picks with specific varieties and the reason each works.
Structural “Thrillers” (1 per large container)
- Lavandula angustifolia ‘Hidcote’ — Compact, fragrant, and naturally adapted to dry summers. Its silvery foliage reflects light and reads clean from indoors.
- Salvia rosmarinus (Rosemary) ‘Arp’ — More cold-tolerant than many rosemaries; upright form makes it a balcony “mini-shrub.” Great for cooking, and it tolerates drying between waterings once established.
- Yucca filamentosa ‘Color Guard’ — Architectural, tough, and heat-hardy. Use only if your balcony has room; it’s a long-term plant with presence.
Mid-layer “Fillers” (2–3 per large container)
- Salvia nemorosa ‘Caradonna’ — Deep purple stems, long bloom season, and strong drought tolerance once rooted in. Excellent for pollinators.
- Gaura lindheimeri ‘Whirling Butterflies’ — Airy flowers that move beautifully in wind; looks light even when the container is full.
- Helichrysum italicum (Curry plant) — Silvery foliage, heat tolerance, and a dry-garden look. (Not culinary curry, but wonderfully aromatic.)
Edge and trailing plants (soften pot rims, cover soil)
- Thymus serpyllum ‘Elfin’ — A tight, low mat that acts like living mulch, shading soil and reducing evaporation.
- Sedum rupestre ‘Angelina’ — Bright chartreuse needles, drought tolerant, and forgiving. Ideal for rail planters and edges.
- Delosperma cooperi (Hardy ice plant) — Loves sun, flowers heavily, and thrives on lean, well-drained mixes. Best where it won’t be overwatered by neighboring pots.
Optional “Seasonal Color” that won’t guilt-trip you
- Pelargonium (Scented geranium) ‘Citronella’ — Handles sun and drying better than many annuals; scented foliage is a bonus.
- Verbena ‘Homestead Purple’ — Heat tolerance and long bloom window; works well spilling over edges.
Spacing guidance (concrete data point): In a 18-inch pot, start with 1 thriller + 2 fillers + 2 trailers. Give upright plants about 8–12 inches between centers inside the container so airflow stays good and roots aren’t instantly cramped.
Soil and Irrigation: The Low-Water Setup That Still Looks Lush
Drought-tolerant doesn’t mean “no water,” especially in containers. It means you’re designing a system that holds moisture longer and uses it more efficiently.
A practical soil recipe (balcony-friendly)
Skip garden soil—it compacts in pots. Use a high-quality potting mix, then modify for drainage and stability.
- Base: potting mix (enough to fill your containers)
- Add: 20–30% pumice or perlite for oxygen and drainage (especially for lavender, rosemary, sedum)
- Top-dress: 1 inch gravel mulch (keeps the surface cooler and reduces splash)
Concrete data point: For a medium build with three large pots and two rail planters, expect to use about 6–10 cubic feet of potting mix total, depending on container depth.
Watering tools that cut effort
- Watering can with a long spout for precise soaking without splashing walls.
- Drip kit to a faucet if you have an outdoor spigot; if not, a gravity-fed reservoir can still help.
- Moisture meter is optional, but for beginners it prevents accidental overwatering—one of the fastest ways to kill “drought plants.”
Remember that plant water use is driven by evaporative demand (sun, heat, wind). The FAO’s reference lays out how these factors combine to influence evapotranspiration (Allen et al., 1998), which is why balconies—often hot and windy—can behave harsher than a backyard bed.
Step-by-Step: Build the Balcony Layout in One Weekend
- Measure the usable footprint. Mark a 24-inch walkway with painter’s tape so you don’t crowd the space as you add pots.
- Place empty containers first. Put the largest pots at ends or corners. Keep them 12 inches away from the hottest wall if heat is intense.
- Group by water needs. Put the thirstiest “low-water” plants (like flowering annuals) together, separate from true dry-lovers (lavender, sedum).
- Prep drainage. Ensure every container has a hole. Skip rocks in the bottom; instead, use a mesh screen over the hole so soil doesn’t escape.
- Fill with soil mix. Leave 1–1.5 inches headspace at the top for watering and mulch.
- Plant in layers. Set your thriller first, then fillers, then trailers around edges. Rotate pots and look from indoors before finalizing positions.
- Water deeply once. Saturate until water drains from the bottom, then let it settle. Top off soil if it sinks.
- Mulch the surface. Add 1 inch gravel mulch, keeping it slightly away from plant crowns.
- Add small comforts. A slim stool, foldable chair, or a narrow side table turns it into a place you’ll actually use—which means you’ll notice issues early.
Case Examples: Real-World Planting Plans You Can Copy
Here are three complete “recipes” based on common balcony conditions. Adjust quantities up or down depending on your container count.
Case A: Renter with a strict budget, part sun (4 hours)
Goal: Green and fragrant, minimal spend, easy to move.
Containers: Two 10-gallon fabric grow bags placed in inexpensive baskets + two rail planters.
Planting:
- Grow Bag 1: Rosemary ‘Arp’ (thriller) + Salvia nemorosa ‘Caradonna’ (filler) + Thyme ‘Elfin’ (edge)
- Grow Bag 2: Lavender ‘Hidcote’ + Gaura ‘Whirling Butterflies’ + Sedum ‘Angelina’
- Rail planters: Mixed thyme + trailing sedum
Estimated cost (concrete numbers): Grow bags and baskets $40, potting mix $45, plants $60–$90, gravel mulch $15. Total: roughly $160–$190.
Case B: Busy homeowner, full sun (7+ hours), wants “set-and-forget” structure
Goal: Clean, modern look with strong forms that stay attractive between waterings.
Containers: Three resin composite pots, each 18 inches diameter, plus one 36-inch trough.
Planting:
- Pot 1: Yucca filamentosa ‘Color Guard’ + Sedum ‘Angelina’ around the rim
- Pot 2: Lavender ‘Hidcote’ + curry plant + thyme edge
- Pot 3: Salvia ‘Caradonna’ + gaura + trailing verbena ‘Homestead Purple’
- Trough: A repeating ribbon of thyme and sedum for continuity
Why it works: Repetition creates order; resin holds moisture better than terracotta; plants are sun-proof and wind-tolerant when placed in clusters.
Case C: Windy high-rise, full sun, rail exposure
Goal: Prevent wind scorch and constant drying, keep plants from toppling.
Containers: One lined wood trough (12 x 36 inches) as a windbreak + two heavy low pots (16 inches) instead of tall skinny ones.
Planting:
- Trough: Ornamental grass (compact variety) + salvia + creeping thyme as living mulch
- Low pots: Lavender + sedum mixes with gravel mulch
Extra tactics: Use saucers only if you can empty them (standing water invites root issues). Place pots in clusters so they shelter each other.
Maintenance Expectations (So It Stays Easy)
With a drought-tolerant container garden, you’re not eliminating care—you’re making it predictable.
Weekly time: plan on 20–40 minutes per week total once established. In peak summer heat, you may check moisture more often, but you won’t necessarily water more—just smarter.
Your simple weekly rhythm
- Watering: Deep soak when the top 1–2 inches are dry. In hot spells, that might be every 3–5 days for some pots; in milder weather, weekly may be enough.
- Grooming: Snip spent salvia spikes; pinch herbs lightly to keep compact.
- Pest check: Look under leaves for aphids or spider mites—windy, dry balconies can invite mites. A firm rinse can often solve early issues.
Seasonal tasks that protect your investment
- Spring: Refresh the top 1–2 inches of potting mix, reapply gravel mulch, and prune lavender lightly after bloom (avoid cutting into old wood).
- Summer: Move the most heat-sensitive pot (often the darkest container) a few inches into shade during extreme heat waves.
- Fall: Reduce watering frequency. Remove weak annuals and keep the structural plants.
- Winter (cold climates): Cluster pots together for insulation, and avoid waterlogging—roots rot faster in cold, wet soil.
Small Details That Make It Feel Like an Outdoor Room
Once the bones are in place, add one or two finishing touches that don’t increase water demand:
- A narrow outdoor rug to visually define the walkway (choose quick-dry materials).
- One warm light source (solar or plug-in) so the balcony feels inviting at dusk.
- A single accent color in pots or cushions to unify the scene—let foliage textures do the heavy lifting.
The final look you’re aiming for is calm and resilient: a few well-chosen containers, repeated plants, and a soil surface protected with mulch. When the next dry spell hits, you’ll still enjoy your morning coffee outside—without dragging a watering can out twice a day and hoping for the best.
Sources: Royal Horticultural Society (RHS), 2021. Allen, R.G., Pereira, L.S., Raes, D., Smith, M. FAO Irrigation and Drainage Paper 56: Crop Evapotranspiration, 1998.