Driveway Strip Garden Ideas for Easy Curb Appeal
You pull into the driveway at dusk and the headlights sweep across that thin, stubborn band of soil between pavement and fence (or sidewalk). It’s either bare dust, a patchwork of weeds, or a few struggling shrubs that look singed by summer heat and splashed with winter road grit. The strip is narrow, hot, and often forgotten—yet it’s the first thing your guests see, and the last thing you want to weed on a weekend.
The good news: driveway strips are small enough to redesign in a day, but visible enough to change the whole feel of your front yard. The trick is treating it like a designed “edge” with the right proportions, plants, and a layout that acknowledges real life—car doors opening, snow shovels scraping, dogs cutting corners, and the occasional delivery driver stepping off the pavement.
Design principles that make a skinny strip look intentional
1) Measure like a designer: width, setbacks, and door-swing reality
Before you buy a single plant, grab a tape measure and note three numbers:
- Strip width (common ranges are 18–48 inches)
- Driveway length you want to treat (often 15–40 feet)
- Clearance zone for car doors and foot traffic—plan a minimum of 24 inches of “step-out space” where people regularly exit vehicles.
If your strip is under 24 inches wide, think “groundcovers + repeating accents,” not bulky shrubs. If it’s 36 inches or wider, you can layer low mounds with a few upright punctuation plants—just keep mature widths in mind so nothing flops into the driveway.
2) Build a tough planting zone (because this soil has been through it)
Driveway edges tend to be compacted, dry, and reflective-hot. A simple soil upgrade pays off more than fancy plants. For most strips, aim for a refreshed planting depth of 8–10 inches:
- Cut and remove weeds/sod, then loosen soil to 8 inches deep (a digging fork works in tight spaces).
- Blend in 2–3 inches of compost across the strip.
- Top with 1.5–2 inches of mulch (keep mulch 2 inches away from plant crowns).
Budget note: compost and mulch are usually your biggest material line item. A typical 3 ft × 25 ft strip is 75 sq ft. At 2 inches deep, mulch volume is about 12.5 cu ft—roughly one standard bagged-mulch “trunk load.” Depending on region, expect $35–$80 for compost + mulch for this size.
3) Use repetition to make a narrow space feel calmer
Long skinny spaces look busy fast. Repetition is your best friend: pick 1–2 “base” plants and repeat them every 18–30 inches like tiles. Then add a smaller number of accent plants at consistent intervals (every 6–10 feet) to create rhythm without clutter.
4) Keep heights low where sightlines matter
If your strip runs near the street, keep plantings under 24–30 inches tall at driveway entrances to protect driver visibility. Taller plants can go farther back from the sight triangle or toward the house side where they won’t block views.
5) Design for heat and drought first; “pretty” comes second
Most driveway strips receive 6–10 hours of sun in summer and extra radiant heat from pavement. Choose plants that are comfortable in those conditions so you’re not hand-watering daily. The U.S. Environmental Protection Agency notes that impervious surfaces like pavements contribute to urban heat island effects (EPA, 2023), which is exactly what your driveway strip experiences on a micro scale.
“Put the right plant in the right place. It’s the fundamental rule of gardening and landscaping.” — Royal Horticultural Society (RHS), 2025
Layout strategies (with simple templates you can steal)
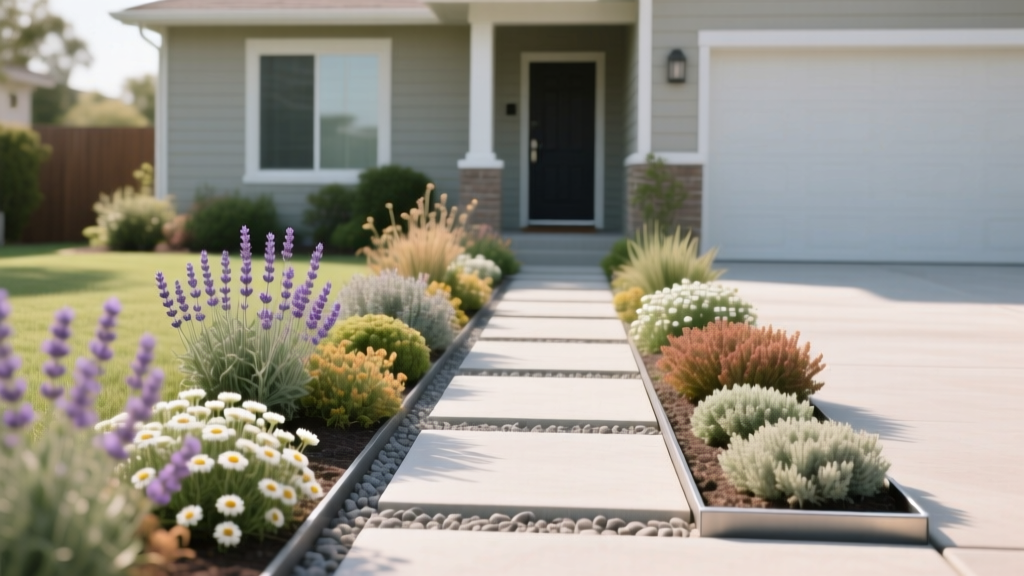
Template A: The “Ribbon + Anchors” layout (best for 18–30 inch strips)
This is my go-to for narrow strips: one tough, low plant repeated continuously (the ribbon), plus small anchor plants that repeat every few feet.
- Ribbon plant: spaced 12–18 inches apart (depending on mature spread)
- Anchors: one plant every 6–8 feet (upright grass, compact evergreen, or flowering shrub)
Why it works: the ribbon reads as a single design gesture, and the anchors stop it from looking like a runway.
Template B: The “Two-Lane Planting” layout (best for 30–48 inch strips)
Split the strip visually into two bands: a low front band near the driveway edge and a slightly taller back band near the fence/house.
- Front band (0–12 inches from pavement): low, tidy plants under 12 inches tall
- Back band (remaining width): mounding perennials and occasional accents up to 24–36 inches tall
This layout feels lush without spilling into the driveway.
Template C: The “Gravel + Pockets” layout (best for renters or no-dig needs)
If you can’t dig much (rental, utility lines, or severe compaction), use a mineral mulch like gravel and plant into pockets:
- Lay cardboard over weeds (overlap seams by 6 inches).
- Add 2 inches of gravel.
- Cut holes and plant drought-tough perennials into compost pockets.
It’s clean, modern, and dramatically reduces weeding.
Plant selection that actually behaves along a driveway
Choose plants with three traits: heat tolerance, compact growth, and resilience to occasional splash/salt. The National Association of Landscape Professionals notes that road salt can damage plants directly through foliar contact and indirectly through soil salinity (NALP, 2022). If your area gets icy winters, favor salt-tolerant options or set sensitive plants back from the edge.
Sun-baked, low-water stars (6–10 hours sun)
These are reliable performers for hot strips and reflected heat:
- Catmint (Nepeta × faassenii ‘Walker’s Low’) — Soft purple bloom, pollinator-friendly, handles heat; space 18–24 inches. It also rebounds well if lightly sheared after the first bloom.
- Lavender (Lavandula angustifolia ‘Hidcote’ or ‘Munstead’) — Compact, fragrant, loves drainage; space 18 inches. Keep it away from soggy spots.
- Feather reed grass (Calamagrostis × acutiflora ‘Karl Foerster’) — Strong vertical accent, stays narrow; place every 6–8 feet as anchors; allow 18–24 inches width.
- Stonecrop sedum (Hylotelephium ‘Autumn Joy’) — Thick leaves handle drought, late-season color; space 18–24 inches.
- Creeping thyme (Thymus serpyllum) — Great “ribbon” plant for edges, fragrant when brushed; space 8–12 inches.
Part-sun picks that still look crisp (3–6 hours sun)
- Coral bells (Heuchera ‘Caramel’ or ‘Palace Purple’) — Colorful foliage that reads from the curb; space 12–18 inches.
- Liriope (Liriope muscari ‘Big Blue’) — Tidy evergreen-ish clumps in many climates; space 12 inches.
- Japanese forest grass (Hakonechloa macra ‘Aureola’) — For a softer look in part shade; space 18 inches.
Evergreen structure without the “shrub blob”
- Dwarf boxwood (Buxus ‘Green Velvet’) — Use sparingly as anchors; allow 24–30 inches mature width and keep it clipped slightly off the driveway edge.
- Juniper (Juniperus horizontalis ‘Blue Rug’) — Tough, low, drought tolerant; space 3–4 feet (it spreads). Best for wider strips.
Salt-tolerant or salt-resilient options (for snowy regions)
- Rugosa rose (Rosa rugosa) — Extremely tough and salt tolerant, but use only where you can accommodate thorns and width; space 3–5 feet.
- Switchgrass (Panicum virgatum ‘Northwind’) — Upright native grass, strong winter presence; allow 18–24 inches.
- Daylily (Hemerocallis varieties) — Durable, tolerant of neglect; space 18–24 inches (note: can spread).
A quick comparison table: choose your “strip style”
| Strip Style | Best Width | Look | Weed Control | Typical Install Cost (DIY) | Maintenance Time |
|---|---|---|---|---|---|
| Ribbon + Anchors | 18–30 in | Clean, rhythmic | Good with mulch | $150–$450 for 25 ft | 20–40 min/week |
| Two-Lane Planting | 30–48 in | Lush, layered | Very good once filled in | $250–$700 for 25 ft | 30–60 min/week |
| Gravel + Pockets (No-dig) | 18–48 in | Modern, minimal | Excellent | $200–$600 for 25 ft | 10–25 min/week |
Step-by-step: a practical setup plan you can do in a weekend
This sequence works for most driveway strips and keeps the project moving.
- Mark the edge. Use a hose or string line to decide if your bed edge is straight (modern) or gently curved (soft). In narrow strips, keep curves subtle—aim for a curve depth of only 4–6 inches so you don’t lose planting width.
- Remove weeds and loosen soil. Dig down 6–8 inches and pull roots. If soil is rock-hard, water the night before to make digging realistic.
- Install edging (optional but helpful). Metal edging or a simple spade-cut edge keeps mulch from spilling onto pavement. Budget $30–$120 depending on length and material.
- Amend and grade. Mix in 2–3 inches compost. Grade soil slightly away from the driveway so water doesn’t pool against pavement seams.
- Lay out plants while still in pots. Start with anchors every 6–8 feet, then fill ribbon plants between. Stand back from the street to check spacing.
- Plant. Keep the plant crown level with finished soil. Water each plant in deeply.
- Mulch (or gravel). Apply 1.5–2 inches mulch. Keep it thin in tight strips so it doesn’t migrate onto the driveway.
- Watering plan for establishment. For the first 3–4 weeks, water 2–3 times per week (deep soak), then taper to weekly if rainfall is lacking.
Three real-world driveway strip scenarios (and what I’d plant)
Scenario 1: The baking-hot, 24-inch-wide strip beside a concrete driveway
Conditions: Full sun (8+ hours), heat reflection, narrow width, likely foot traffic at car doors.
Layout: Ribbon + Anchors.
Plant plan (25 ft run):
- Ribbon: Creeping thyme at 10-inch spacing = about 30 plants (or fewer if using plug trays).
- Anchors: 3 feather reed grasses (‘Karl Foerster’) spaced roughly 8 feet apart.
- Optional pop: 5–7 lavender ‘Munstead’ tucked between anchors, spaced 18 inches.
Why it works: Thyme stays low and tidy at the edge, grasses add height without width, and lavender holds its shape in heat. This combination also looks good from the car window—important, because you’ll see it often.
Scenario 2: The renter-friendly strip where digging is limited
Conditions: You can’t excavate deeply, and you want a reversible upgrade that still looks polished.
Layout: Gravel + Pockets (No-dig).
Plant plan (15 ft run, 30 inches wide):
- Cardboard sheet mulch overlapped by 6 inches.
- 2 inches of gravel (pea gravel or crushed stone).
- Plant pockets: 7 liriope clumps at 12–15 inches spacing + 5 heuchera for foliage contrast.
DIY alternative: If gravel isn’t allowed, use shredded bark mulch and skip cardboard—just be prepared to hand-weed more often.
Cost note: For a 15 ft × 2.5 ft area (about 37.5 sq ft), gravel at 2 inches is roughly 6.25 cu ft. Expect materials + plants around $120–$350 depending on plant sizes.
Scenario 3: The snowy-climate driveway edge with salt spray
Conditions: Winter plowing, salt splash, early spring mess. Plants must be forgiving.
Layout: Two-Lane Planting, with a “sacrificial” hardy front band.
Plant plan (30 ft run, 42 inches wide):
- Front band (tough zone): Daylilies at 20-inch spacing (about 18 plants) or switchgrass if you prefer grasses.
- Back band: Nepeta ‘Walker’s Low’ at 20-inch spacing (about 18 plants).
- Anchors: 4 switchgrass ‘Northwind’ or feather reed grass for winter structure.
Why it works: The front band takes the brunt of salt and foot traffic. The back band stays cleaner and carries the “designed” look through summer. If anything gets scorched in winter, it’s the front band—easy to cut back and refresh.
Budget choices that still look designed
A driveway strip doesn’t need expensive specimens to look sharp. It needs consistency and coverage.
Smart ways to spend
- Spend on edging and soil prep. A crisp edge and healthy soil make inexpensive plants look upscale.
- Buy smaller plants. Perennials in 4-inch pots cost less and catch up within a season or two with proper watering.
- Use plugs for ribbons. Thyme, sedum, and groundcovers are often available as plug trays—ideal for close spacing.
DIY alternatives to cut costs
- Propagate from divisions. Daylilies, liriope, and many perennials divide easily—ask neighbors or local plant swaps.
- Mulch with shredded leaves. In fall, chopped leaves are free mulch; apply about 2 inches (avoid matting by mixing with bark mulch).
- Skip landscape fabric. Use cardboard under mulch/gravel instead. It suppresses weeds and breaks down over time.
Maintenance expectations (so it doesn’t slide back into “weedy strip”)
Most driveway strips can stay neat with 20–45 minutes per week during the growing season once established. New plantings need more attention in the first month.
Weekly rhythm (spring through early fall)
- Weeding: 10 minutes. Pull small weeds before they root deeply.
- Watering: 10–30 minutes depending on rainfall and whether you’re hand-watering or using drip.
- Quick grooming: 5 minutes to snip broken stems and keep the edge clear of the driveway.
Seasonal tasks that make a big difference
- Spring: Cut back grasses and perennials before new growth. Refresh mulch to maintain roughly 1.5–2 inches.
- Early summer: Shear nepeta by about 1/3 after the first bloom to encourage rebloom and keep it from flopping.
- Fall: Remove leaf buildup that can smother groundcovers. If you use salts in winter, rinse the strip during thaws to reduce salt accumulation.
- Winter: Avoid piling shoveled snow directly onto tender shrubs; designate a snow stack zone if possible.
Small details that raise curb appeal fast
If you want that “finished” look, focus on these details:
- Keep the edge clean. A monthly quick edging (even just a spade-cut line) makes everything look intentional.
- Limit your palette. In a strip, 2–4 plant types reads more upscale than 12 different novelties.
- Add one repeating hard element. For example, place a boulder or a simple solar path light every 6–10 feet—rhythm matters in long skinny spaces.
When your driveway strip is designed around real conditions—heat, narrow width, and traffic—it stops being a problem zone and becomes a welcome mat. Start with measurements, choose a layout template that fits your width, and commit to a few tough plants repeated with intention. The next time your headlights sweep across that edge, you’ll see structure, texture, and a clean line that makes the whole property feel cared for.
Sources: U.S. Environmental Protection Agency (EPA), “Heat Island Effect” (2023); National Association of Landscape Professionals (NALP), guidance on salt damage to landscapes (2022); Royal Horticultural Society (RHS), planting principle “right plant, right place” (2025).