Sunroom Air Plant Display Wall
The sun is already strong when you walk into the sunroom—so bright it turns the tile warm under your feet by mid-morning. But the wall you stare at while sipping coffee is blank, or worse, cluttered with random hooks and a forgotten framed print. You want green without dragging in heavy pots, worrying about watering drips on the floor, or sacrificing your limited walking space. This is where a dedicated air plant display wall shines: it’s light, sculptural, renter-friendly if you plan it right, and it turns “that empty wall” into a living focal point that thrives on bright, indirect light.
I’ll walk you through a layout that feels intentional—like a small botanical installation—using practical mounting methods, reliable Tillandsia varieties, and spacing that keeps airflow high (the difference between thriving plants and soggy, struggling ones). We’ll also work through three real-world scenarios: a compact rental sunroom, a family sunroom with pets and kids, and a larger sunroom that gets direct afternoon sun and needs heat-smart placement.
Start with the wall as a “light map,” not a blank canvas
Before you buy a single plant, stand in the sunroom at three times of day (morning, midday, late afternoon) and watch what the wall actually receives. Most sunrooms deliver 6–10 hours of bright light, but the intensity changes dramatically with window orientation and glazing. Air plants generally prefer bright, filtered light rather than harsh midday sun that can scorch leaves—especially behind glass.
Quick light targets for air plants (usable design numbers)
As a practical design target, plan for:
- 4–8 hours/day of bright, indirect light for most Tillandsia.
- Keep plants 12–24 inches back from glass if the wall gets strong direct sun (especially west-facing), or add a sheer shade.
- Maintain 2–4 inches of open air around each plant for fast dry-down after watering.
If you want a science-backed reality check on what “bright” can mean, horticultural references often describe plant growth thresholds in terms of light intensity and duration rather than just “sunny.” For indoor plant lighting context, the Royal Horticultural Society notes that light levels indoors can be much lower than outdoors and that window proximity strongly affects plant performance (RHS, 2023).
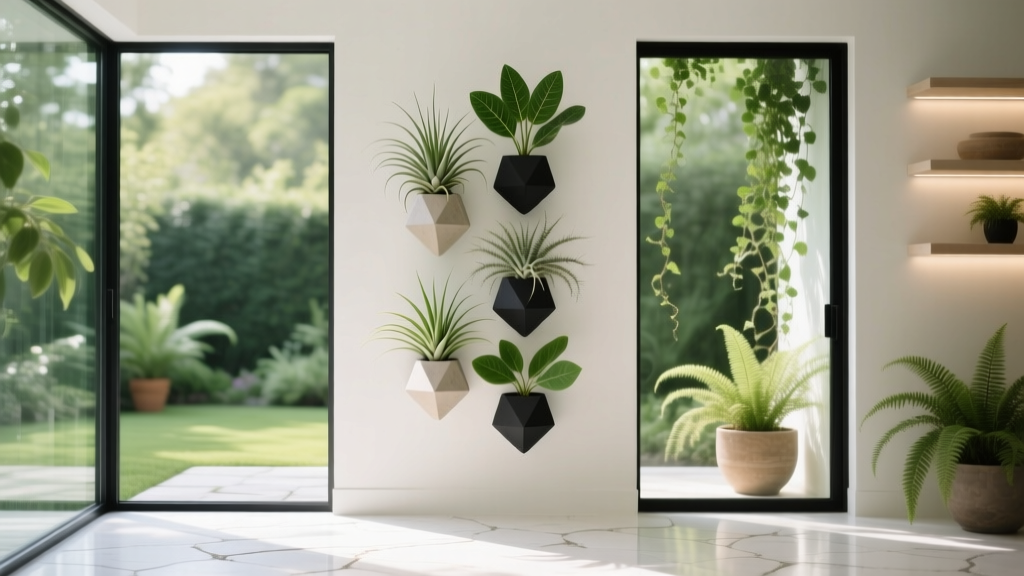
Design principles that make the wall feel built-in (not stuck-on)
1) Use a repeating grid—then break it on purpose
The easiest way to make an air plant wall look professional is to start with a simple underlying grid. For a common sunroom wall section—say 60 inches wide × 84 inches tall—a clean approach is a 5-column layout with mount points every 10–12 inches horizontally and 12–14 inches vertically. That gives you about 15–20 plant positions without crowding.
Then, break the grid intentionally: swap a few mount points for a driftwood piece, a vertical cork panel, or a trio of small geometric holders. Your eye reads the repetition as orderly, and the “breaks” as artistry.
2) Design for airflow first, decoration second
Air plants rot when water sits in their base too long. Your layout should prevent “tight pockets” where plants stay damp. The best display walls have:
- Stand-off mounts (plants sit 1–2 inches off the wall)
- No enclosed cups unless they’re wire or slatted
- Clear dry-down path: after watering, plants should dry within 4 hours in a typical home environment (faster is safer)
That “dry within hours” guidance shows up repeatedly in air plant care recommendations, including botanical garden resources. The Missouri Botanical Garden emphasizes that Tillandsia should be shaken out after soaking and allowed to dry thoroughly to avoid rot (Missouri Botanical Garden, 2022).
3) Keep the wall composition readable from across the room
A sunroom is usually viewed from a doorway, a sofa, or a breakfast table. Design for a 10–15 foot viewing distance. From that far away, tiny plants disappear unless you build contrast. Mix:
- Bold silhouettes (xerographica, streptophylla)
- Fine textures (ionantha clumps, fuchsii)
- One “anchor” element (a 36-inch driftwood branch or a 24×36-inch cork panel)
Layout strategies for three wall styles (choose your framework)
Option A: Floating rail system (best for renters)
Use two horizontal picture ledge rails or a slim mounting rail system so you can rearrange hooks and holders without drilling a dozen holes. A good baseline is:
- 2 rails, each 48 inches long, installed 18 inches apart vertically
- Mount lightweight holders and driftwood pieces from S-hooks
Cost expectation: $30–$80 for rails and hooks depending on brand and finish, plus plants.
Option B: Cork panel mosaic (clean, modern, easy to expand)
Create a grid of cork tiles that becomes the visual backdrop. Example layout:
- Six cork tiles at 12×12 inches each = a 24×36 inch display area
- Attach tiles to a thin plywood backer for stability (or command-strip tiles individually for rentals)
Air plants can be tied on with clear fishing line or plant-safe wire, keeping them lifted for airflow.
Option C: Driftwood + “constellation pins” (organic, sculptural)
This is the most designer-looking approach: one main piece of driftwood and a scattering of individual mounts around it like a constellation.
- 1 driftwood piece around 30–40 inches long
- 10–14 micro mounts (small wire cradles, mini ring holders) spaced 8–12 inches apart
This layout reads like art even when you only have 8–10 plants to start. It’s also easy to add more over time.
A practical plant palette: specific Tillandsia varieties that behave well indoors
Air plants aren’t all the same. Some are “silver” types with more trichomes (they handle brighter light and drier air), and some are greener types that prefer slightly more humidity and gentler light. A smart wall mixes both, placing the silver plants closer to the brightest zones.
Reliable “hero” specimens (use 1–3 as anchors)
- Tillandsia xerographica (1 large focal point): Bold rosette, sculptural, tolerant of bright light; looks intentional from across the room.
- Tillandsia streptophylla (1–2 medium anchors): Curly leaves, dramatic when thirsty; great visual movement.
- Tillandsia capitata ‘Peach’ (1–2 for color): Blush tones under good light; holds presence without being huge.
Workhorse plants (fill in your grid with these)
- Tillandsia ionantha (buy 5–9): Compact, hardy, colors up; excellent for repeating rhythm across the wall.
- Tillandsia fuchsii (3–5): Fine texture that softens the composition; good in brighter spots.
- Tillandsia stricta (3–5): Consistent growth, reliable bloom; holds shape nicely on mounts.
Shadier/softer-light picks (use deeper into the room)
- Tillandsia bulbosa (1–3): Sculptural, a bit more forgiving in moderate light; place where it won’t be over-soaked.
- Tillandsia brachycaulos (1–3): Greener body, colors with brighter light but still adapts well.
Buying tip: start with 12–18 plants for a 24×36-inch panel or a 60×84-inch partial-wall layout, then grow the collection gradually. Typical retail pricing ranges from $6–$12 for small ionantha and $25–$60 for larger xerographica depending on size.
Comparison table: mount methods for a sunroom air plant wall
| Mount method | Best for | Typical spacing | Approx. cost (materials) | Notes on airflow & watering |
|---|---|---|---|---|
| Cork panel + wire ties | Clean, modular walls; easy rearranging | 6–10 inches between plants | $25–$70 for a 24×36-inch area | Excellent airflow if plants are lifted 1–2 inches off surface |
| Driftwood branch + hooks | Organic, sculptural focal point | 4–8 inches along branch; 8–12 inches around it | $20–$90 depending on wood source | Great drying; remove plants for soaking if needed |
| Geometric wire holders | Modern look; easy to expand | 10–12 inches between holders | $4–$15 per holder | Choose open wire forms; avoid deep cups that trap water |
| Magnetic mounts (on metal board) | Renters; frequent rearranging | 6–10 inches | $40–$120 for board + magnets | Airflow depends on spacer; add 1-inch bumpers behind board |
Step-by-step: build a 24×36-inch “starter wall” that looks finished
This is the version I recommend most often because it’s scalable, affordable, and you can complete it in an afternoon. It’s also the least risky if you’re still learning your sunroom’s light and humidity patterns.
- Choose placement and height: Mark a rectangle 24 inches wide × 36 inches tall with painter’s tape. Aim to center it around 57–60 inches from the floor (average eye level).
- Install a backer: Use a thin plywood panel (about 1/4 inch thick) painted matte white, warm gray, or charcoal. Attach to studs if possible; if renting, use heavy-duty removable strips rated for 16–20 lb total load (follow the manufacturer’s limits).
- Add cork tiles: Arrange six 12×12 inch cork tiles on the backer (2 across × 3 tall). Keep seams aligned; it reads intentional.
- Create stand-off points: Screw in small hooks or eyelets so plants sit 1–2 inches off the cork. This protects airflow and prevents damp spots.
- Place anchor plants first: Mount one medium/large plant (like xerographica or streptophylla) slightly above center, offset by 4–6 inches for a designer asymmetry.
- Repeat your workhorses: Place 5–7 ionantha in a loose rhythm (think diagonal line or crescent). Keep 6–8 inches between them.
- Add fine texture: Tuck 3 fuchsii near the edges to soften the rectangle’s boundary.
- Test removal: Before you finalize ties, remove each plant once. If it’s annoying to take off, you won’t maintain it.
- Do a “dry run” watering: Mist lightly and watch for dripping. Adjust angles so water doesn’t collect in plant bases or run down the wall.
Budget planning (and DIY swaps that still look polished)
A display wall can be done on a tight budget without looking like a craft project. The trick is to spend on one focal plant or one strong structural element, then save on the rest.
- Starter budget: $80–$150 for 12–15 small/medium plants, cork tiles, hooks, and line.
- Mid-range: $180–$350 including one large xerographica, nicer holders, and a finished backer panel.
- Statement wall: $400–$900 for 25–40 plants, premium driftwood, multiple panels, and upgraded mounting hardware.
DIY alternatives that hold up visually:
- Found wood (properly cleaned and dried) instead of purchased driftwood.
- Stainless steel wire cut into simple cradles rather than buying many holders.
- Secondhand picture ledges repainted matte black or warm white.
Design reality check: three scenarios you can copy
Scenario 1: Rental sunroom with rules—no drilling, minimal mess
You have one bright wall section beside sliding doors, but the lease is strict. Build a removable system:
- Use a 24×36-inch lightweight backer panel attached with removable strips (stay under the rated load).
- Choose 12–14 smaller plants so the entire installation stays light.
- Watering method: hand-mist 2–3 times/week plus a monthly sink soak for the plants you can easily remove.
Plant picks: ionantha, stricta, fuchsii, and one capitata for color. These handle minor fluctuations and still look crisp.
Scenario 2: Family sunroom with pets/kids—durable, higher placement
If you’ve got a dog who wags near walls or a cat who thinks every plant is an invitation, design for height and resilience.
- Mount the bottom edge of the display at least 60–66 inches from the floor.
- Use a rail system so nothing fragile sits at grab height.
- Avoid tiny loose plants that can be batted down; use holders that fully cradle the base.
Plant picks: xerographica (up high, as a focal), streptophylla, and clusters of ionantha tied firmly. Skip ultra-delicate species until the wall proves it can survive family life.
Scenario 3: West-facing sunroom with harsh afternoon sun—heat-smart placement
West light through glass can be intense. If the wall gets direct sun from, say, 3–7 p.m., you’ll see stress quickly: bleaching, crispy tips, plants drying too fast after misting (then struggling to rehydrate).
- Pull the display 18–24 inches away from the hottest window zone, or add a sheer curtain.
- Favor silver species (more trichomes) closer to the bright side; place greener species deeper into the room.
- Watering method: weekly soak 20–30 minutes for most plants, with an extra light mist on the hottest weeks.
Plant picks: silver-leaning options like xerographica, capitata, fuchsii. Use bulbosa and brachycaulos in slightly more protected positions.
Maintenance you can actually stick to
A display wall should feel like a pleasure, not a chore. Expect 15–30 minutes per week for a 12–20 plant setup once it’s dialed in.
Weekly routine (simple and consistent wins)
- Mist or rinse: 2–3 light mistings per week in drier homes, or 1–2 in more humid sunrooms.
- Soak (optional but useful): Every 1–2 weeks, soak removable plants for 20–30 minutes, then shake upside down to clear water from bases.
- Drying check: After watering, confirm plants dry within 4 hours. If not, increase airflow (small fan on low, or reduce misting).
Seasonal tasks (the stuff that prevents slow decline)
- Winter: Heating dries air; increase soaking frequency slightly and keep plants away from hot air vents by 36 inches if possible.
- Summer: If the sunroom gets hotter, watch for faster drying and sun scorch. Consider adding a sheer curtain during peak sun hours.
- Every 2–3 months: Rebalance the composition—swap plants that are stretching for light or getting too intense sun.
“The most successful indoor plant displays are designed around maintenance access—if you can’t reach it comfortably, it won’t be cared for consistently.” — Lauren Dunec Hoang, landscape designer and author (as quoted in discussions of maintenance-forward residential design principles, 2020)
That principle is exactly why I keep repeating: test removal, build in stand-offs, and don’t overpack the wall. Beautiful plant design is often just good maintenance design in disguise.
Common design mistakes (and the fixes that keep the wall looking sharp)
Mistake: Mounting plants flat against the wall.
Fix: Add 1–2 inch stand-offs (hooks, wire cradles) so air circulates behind plants.
Mistake: Too many tiny plants evenly spaced—looks like a store display.
Fix: Use one large anchor, repeat one small variety (like ionantha) for rhythm, and add negative space.
Mistake: Water dripping down the wall and staining paint.
Fix: Remove plants to water in the sink, or place a slim drip ledge beneath the panel. A 2-inch deep picture ledge under the display can catch drips and visually “grounds” the installation.
Mistake: Plants declining slowly (curling, browning bases).
Fix: Increase drying speed (fan/spacing), reduce trapped water, and shift greener species away from hottest light zones. Missouri Botanical Garden notes that rot is commonly linked to water trapped in the plant base and insufficient drying (Missouri Botanical Garden, 2022).
Sources that inform real-world success
Two references I regularly lean on for practical indoor plant and Tillandsia care guidance:
- Royal Horticultural Society (RHS). Indoor plant growing conditions and light considerations. 2023.
- Missouri Botanical Garden. Tillandsia (Air Plant) cultural care. 2022.
Now step back across the room and look at your wall the way a guest would. If you see one strong focal form, a repeated rhythm of smaller plants, and enough breathing room that everything feels airy, you’ve got it. Over the next few weeks, you’ll make small shifts—one plant nudged into brighter light, another moved a few inches away from glass—and the display will start to feel less like something you installed and more like it belongs to the architecture of the sunroom itself.