Balcony Edible Flower Garden Ideas
The first warm evening of the season is when you notice it: your balcony is either a blank rectangle of concrete or a chaotic pile of pots you can’t comfortably walk through. You want beauty, scent, and something you can actually eat—but you’ve got railings, wind, neighbors’ sightlines, and maybe only one good patch of sun. Let’s design a balcony edible flower garden that feels intentional, cooks beautifully, and still leaves room for a chair and your morning coffee.
I’m going to walk you through layout decisions like a small landscape project: measure, choose an “anchor,” define circulation, then layer plants by height and light needs. Along the way, I’ll give specific plant varieties, spacing, and a few real-life balcony scenarios so you can see how the same principles adapt to different spaces and budgets.
Design principles that make a balcony edible-flower garden work
1) Start with a measured “living room” footprint
Before you buy plants, decide what part of the balcony is for you. On most balconies, you can spare a clear walkway of 24 inches (comfortable pass-through) and still garden richly. If your balcony is narrow (say 3 feet wide), aim for a 18-inch clear lane and keep pots tight to the railing and walls.
Quick rule: treat the open floor as sacred. Plants go vertical (rail planters, shelves, trellises) and to the perimeter (long troughs). This makes even a 4 ft x 8 ft balcony feel like a designed space instead of a storage area.
2) Design for sun hours, not hope
Edible flowers follow the sun. Most bloom best with 6+ hours of direct light; some tolerate 3–5 hours. Track your balcony for a day (or use a sun-tracking app) and label zones:
- Hot/Full sun: 6–8 hours (often the outer edge by the railing)
- Bright/Part sun: 3–5 hours (near walls, under overhangs)
- Shade: under 3 hours (often behind balcony dividers)
Plant the highest-bloom “performers” where light is strongest, then tuck shade-tolerant edible flowers into the calmer corners.
3) Think in layers: rail, mid, and vertical
Balconies reward layered planting. Here’s a layout strategy that works on most footprints:
- Rail layer: trailing edible flowers and compact bloomers in rail boxes
- Mid layer: 10–14 inch pots with bushy plants you’ll harvest often
- Vertical layer: a trellis or obelisk for climbers (the “wow” factor)
Keep the tallest element in a corner so it doesn’t visually “cut” the space in half.
4) Use repetition like a designer (it looks calmer and grows better)
On a balcony, too many different plants can feel fussy. Choose 3 hero edible flowers you repeat, plus 2 supporting plants (like herbs) to anchor the edible theme. Repetition also simplifies care because water and feeding needs are aligned.
5) Plan for wind and watering—balcony realities
Wind is often the hidden reason balcony gardens struggle. Use heavier containers (ceramic or thick plastic), cluster pots so they shelter each other, and add a trellis panel as a semi-windbreak. For watering, assume containers in full sun can need water daily in summer; self-watering planters can stretch this to every 2–4 days depending on heat.
Safety note: if you garden above street level, secure rail planters with brackets and avoid placing heavy items where they could tip.
Three layout blueprints (pick one, then adapt)
Layout A: The “Railing-to-Wall Runner” (best for narrow balconies)
Ideal for: 3–4 ft wide balconies, renters, anyone who wants a clean walkway.
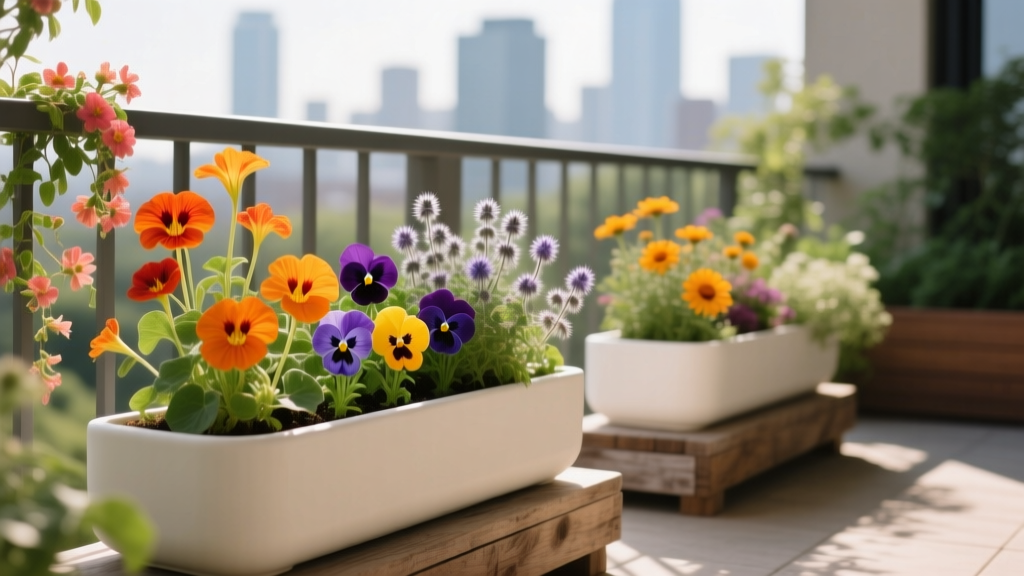
Place a 36-inch long trough along the railing, a second trough along the wall, and keep the center open. Add one vertical trellis in a back corner. This layout gives you two continuous planting strips—like a mini border garden—without tripping over pots.
Layout B: The “L-Shaped Lounge Garden” (best for entertaining)
Ideal for: 5–7 ft wide balconies where you want a chair or bistro set.
Build an L with planters: one side along the railing, one side along the far wall. Tuck a 24-inch round café table in the open corner. The plants become a living privacy screen and you still get a usable outdoor room.
Layout C: The “Vertical Pantry Wall” (best for low floor space)
Ideal for: tiny balconies and people who want maximum plants per square foot.
Use a wall-mounted grid (or freestanding ladder shelf), with small pots for edible flowers that don’t need deep soil. Add 1–2 larger floor pots for anchor plants. This approach also keeps foliage up at eye level—great for harvesting and fragrance.
Plant selection: edible flowers that thrive in containers (and taste great)
Before we get specific: only eat flowers you can identify with certainty, grown without pesticides labeled for ornamentals. The University of Minnesota Extension emphasizes careful identification and avoiding flowers from florists or roadsides due to potential chemical residues (University of Minnesota Extension, 2020).
Top balcony-friendly edible flowers (with varieties and reasons)
Nasturtium (Tropaeolum majus)
Why it works: fast, forgiving, thrives in containers, edible leaves and flowers with a peppery bite.
- Varieties: ‘Alaska’ (variegated leaves), ‘Empress of India’ (deep red), ‘Jewel Mix’ (compact, colorful)
- Spacing: 10–12 inches between plants in a trough
- Sun: 5–8 hours (more sun = more flowers)
Calendula / Pot marigold (Calendula officinalis)
Why it works: steady blooms, petals used for color in salads and butter; cool-season friendly.
- Varieties: ‘Pacific Beauty’ (large blooms), ‘Resina’ (high resin, traditional use), ‘Pink Surprise’ (soft tones for design)
- Spacing: 8–10 inches
- Sun: 4–6+ hours
Viola & pansy (Viola spp.)
Why it works: excellent for part sun and cooler balconies; delicate flavor; makes desserts look intentional.
- Varieties: ‘Johnny-Jump-Up’ (classic, prolific), ‘Cool Wave’ (trailing), ‘Delta Premium’ (compact pansies)
- Spacing: 6–8 inches (tight planting looks lush)
- Sun: 3–6 hours; appreciates afternoon shade in hot climates
Borage (Borago officinalis)
Why it works: star-shaped blue flowers taste lightly of cucumber; magnets for pollinators; dramatic texture.
- Variety: standard borage (most seed strains similar)
- Container: at least 12 inches deep (it gets substantial)
- Spacing: one plant per 12–14 inch pot
- Sun: 6+ hours
Chive blossoms (Allium schoenoprasum)
Why it works: edible purple pom-poms + a perennial herb; very small footprint.
- Varieties: common chives; garlic chives (Allium tuberosum) for white flowers
- Container: 6–8 inch pot minimum
- Sun: 4–8 hours
Signet marigold (Tagetes tenuifolia)
Why it works: citrusy edible petals, compact habit, continuous bloom in heat.
- Varieties: ‘Lemon Gem’, ‘Tangerine Gem’
- Spacing: 8 inches
- Sun: 6–8 hours
Edible flowers that also act like design elements
- Scarlet runner bean (Phaseolus coccineus): edible flowers and pods; climbs a trellis fast for privacy.
- Squash blossoms (Cucurbita pepo): possible on large balconies—needs big containers and sun, but the flowers are culinary gold.
- Lavender (Lavandula angustifolia ‘Munstead’): edible buds for syrups and baking; structured, architectural form.
A quick comparison table: choose plants by conditions
| Edible flower | Best sun (hrs/day) | Container size | Spacing | Flavor/use |
|---|---|---|---|---|
| Nasturtium | 5–8 | 8–10 in deep trough | 10–12 in | Peppery; salads, herb butter |
| Calendula | 4–6+ | 8+ in pot | 8–10 in | Petals for color; rice, tea blends |
| Viola/Pansy | 3–6 | 6–8 in pot | 6–8 in | Mild/sweet; desserts, salads |
| Borage | 6+ | 12+ in deep pot | 1 per pot | Cucumber note; drinks, garnish |
| Chive blossoms | 4–8 | 6–8 in pot | Clump | Oniony; vinegar, omelets |
Step-by-step setup: a designer’s sequence that prevents costly do-overs
This sequence keeps the balcony usable and reduces plant loss. You can complete it in an afternoon, plus soil mixing time.
- Measure and sketch: note balcony width/length and door swing. Mark a 24-inch circulation path.
- Pick your anchor: choose one vertical element (trellis, obelisk, or tall pot) and place it in a corner.
- Choose container types: one trough for the railing (e.g., 36 inches long), 2–4 mid pots (10–14 inches wide), and 1 deeper pot for a “feature” plant (borage or runner bean).
- Confirm weight and drainage: add saucers or trays; elevate pots slightly on pot feet to prevent staining and improve drainage.
- Soil mix: use quality potting mix (not garden soil). Blend in compost at about 20–30% by volume for fertility.
- Plant by light zone: put sun-lovers at the railing edge; part-sun plants closer to walls.
- Mulch lightly: a 1-inch layer of fine bark or straw reduces evaporation.
- Water deeply: water until you see drainage. Then check again in 30 minutes—windy balconies sometimes shed water unevenly.
- Add a simple harvest routine: keep snips and a small bowl by the door. The more you pick, the more many plants bloom.
Costs, budgets, and smart DIY alternatives
You can build a beautiful edible flower balcony at different price points. Here are realistic numbers you can plan around:
- Starter build: 6 plants at $4–$7 each = $24–$42; 2 bags potting mix at $12 each = $24; simple plastic trough $18–$30. Total: roughly $70–$110.
- Mid-range build: upgraded pots (3–5 containers at $20–$45 each), trellis $25–$60, soil and compost $40–$60. Total: roughly $160–$350.
- DIY saver: repurpose food-safe buckets (drill drainage holes), use a $12 roll of jute twine for a wall trellis, and shop end-of-season perennials (lavender, chives) at 30–50% off.
One budget note that actually improves design: fewer, larger containers often outperform many small ones. A single 36-inch trough can look more “built-in” than six mismatched little pots—and it’s easier to keep evenly moist.
Three real-world balcony scenarios (with plant palettes and layouts)
Scenario 1: A windy, sunny high-rise balcony (4 ft x 10 ft)
Challenge: wind dries pots fast; plants can snap or scorch.
Layout: “Railing-to-Wall Runner” with heavier containers. Place a trellis panel in the windiest corner to break airflow.
Plant palette:
- Rail trough: nasturtium ‘Alaska’ (spaced 12 inches) + signet marigold ‘Lemon Gem’ (spaced 8 inches)
- Mid pots: calendula ‘Pacific Beauty’ + chives (for sturdy structure)
- Vertical feature: scarlet runner bean on trellis (flowers + privacy)
Practical tweak: use a self-watering trough or add ollas/watering spikes; in peak summer, expect watering 5–7 days/week if it’s hot and breezy.
Scenario 2: A bright-but-not-sunny rental balcony (north or shaded, 3–4 hours sun)
Challenge: you want flowers, but the light is limited.
Layout: “Vertical Pantry Wall” so plants sit in the brightest part of the balcony, often higher up near the balcony edge.
Plant palette:
- Hero bloomers: violas (‘Johnny-Jump-Up’ and ‘Cool Wave’) for long flowering in cooler conditions
- Support: chives (edible blossoms) and mint (not a flower focus, but great for drinks—keep it in its own pot)
- Season extender: calendula in spring/fall when temperatures are mild
Practical tweak: prioritize reflective surfaces—light-colored pots or a pale wall trellis can bounce extra brightness. Keep expectations realistic: you’ll harvest fewer blooms than a full-sun balcony, but you can still have a steady garnish supply.
Scenario 3: A family balcony that must stay functional (6 ft x 8 ft with a chair)
Challenge: you need a place to sit, and you don’t want tripping hazards.
Layout: “L-Shaped Lounge Garden.” Put planters along two edges, leaving the center clear.
Plant palette:
- Corner vertical: borage in a 12–14 inch pot (or runner bean if you want height without width)
- Edge planters: nasturtiums + calendula for reliable color
- Fragrant accent: lavender ‘Munstead’ in a dedicated pot (great structure year-round in many climates)
Practical tweak: make harvesting part of daily use: keep a small bowl on the café table; pinch flowers while you’re already outside. This helps plants rebloom and keeps the space tidy.
Expert guidance to keep your edible flower garden safe and high quality
Edible flowers are not just “pretty salad.” Safety and plant quality matter—especially in tight urban spaces.
“Only eat edible flowers that have been grown without pesticides and have been properly identified as safe to eat.” — University of Minnesota Extension, 2020
For pesticide clarity: many ornamental plants sold at big-box stores are treated in ways not intended for food use. Buy starts labeled edible, grow from seed, or source from a nursery that sells culinary herbs and vegetables.
Also note that pollinators love many edible flowers. The Royal Horticultural Society highlights that open, nectar-rich flowers are valuable for bees and other insects (RHS, 2023). On a balcony, that means your flowering choices can support urban biodiversity while feeding you, too.
Maintenance expectations: what it really takes (and when)
Plan on 30–60 minutes per week for a small balcony edible flower garden once it’s established, plus quick watering checks. During peak summer heat or wind, watering becomes the main task.
Weekly rhythm
- Water: check daily in warm weather; water deeply when the top 1 inch of mix feels dry.
- Harvest: pick flowers 2–3 times/week (morning is best). Frequent picking encourages more blooms for nasturtiums, calendula, and violas.
- Groom: remove spent flowers (deadheading) to keep plants blooming instead of setting seed.
Seasonal tasks
- Spring (setup): refresh the top few inches of potting mix; add compost; start cool-season flowers (violas, calendula).
- Early summer: pinch back leggy growth; add stakes or ties on climbers; start heat lovers (nasturtium, marigold, borage).
- Midsummer: feed with a balanced liquid fertilizer every 2–4 weeks if bloom slows (especially in containers that leach nutrients).
- Fall: pull tired annuals; replant violas and calendula for cool-weather bloom in mild climates.
If you want the lowest-maintenance version, prioritize perennial chives and lavender, plus one or two annual workhorses like nasturtium and calendula that you can re-seed each year.
Putting it all together: a sample “designer’s planting plan” you can copy
If you want a ready-made plan for a common balcony size (4 ft x 8 ft) with at least 6 hours of sun, try this:
Containers: one 36-inch railing trough, two 12-inch pots, one 14-inch deep pot, one trellis panel.
- Railing trough: 2 nasturtium ‘Empress of India’ (ends) + 3 signet marigold ‘Lemon Gem’ (center, spaced 8 inches)
- Pot 1 (12-inch): calendula ‘Pacific Beauty’ (3 plants, spaced 9 inches)
- Pot 2 (12-inch): chives + violas tucked around the edge for spring/fall (swap to heat-tolerant blooms in summer if needed)
- Deep pot (14-inch): borage (single plant) or runner bean at the trellis base
This plan gives you a steady harvest of petals and blossoms for salads, drinks, and simple garnishes, plus enough structure to look designed from inside your living room.
On the first evening you sit down—without moving a single pot to make space—you’ll feel the difference. The garden reads as a border, a screen, and a small edible pantry all at once. And when you step back inside with a bowl of nasturtiums and violas, it won’t feel like you “decorated” the balcony. It will feel like you built a tiny landscape that happens to be delicious.
Sources: University of Minnesota Extension (2020), “Edible flowers”; Royal Horticultural Society (RHS) (2023), guidance on pollinator-friendly gardening and nectar-rich flowers.