Cabin Garden Plants That Thrive in the Woods
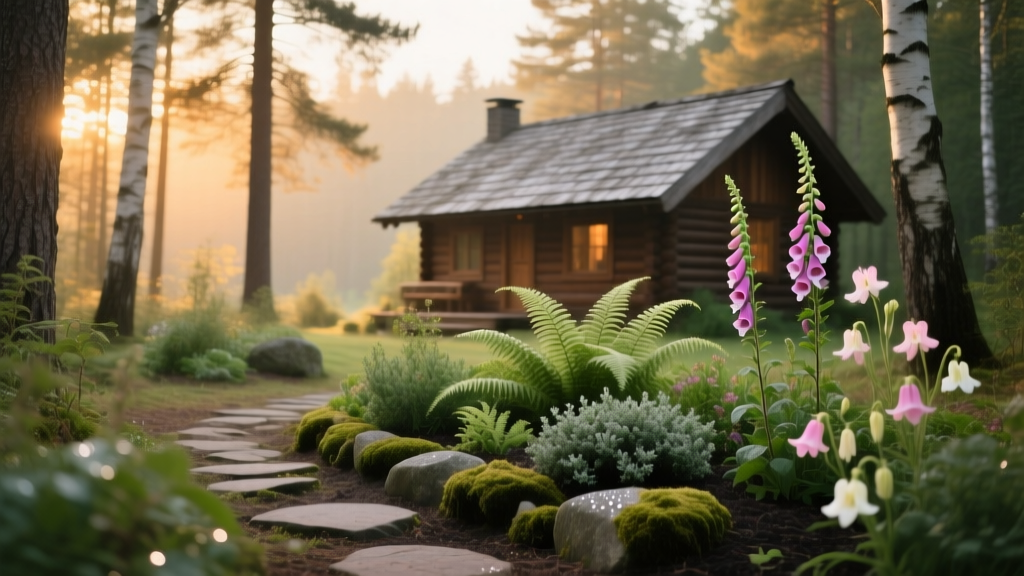
The first night you spend at a cabin in the woods is always perfect—until morning shows you what you’re working with: a yard stitched together from roots, rocks, and shade. The “lawn” is really moss and pine needles. The sunny patch you imagined is actually a moving target, showing up for two hours and vanishing behind hemlocks. And where you do get light, deer have already left their calling card.
That’s not a dead end; it’s a design brief. Woodland cabin gardens succeed when you stop fighting the forest and start borrowing its rules: layered planting, soil protection, and plants that look beautiful in low light. I’m going to walk you through layouts that feel intentional (not “we tossed a few hostas by the steps”), plus a plant palette—specific varieties—that actually thrive with 2–6 hours of sun, root competition, and erratic weekend-only watering.
Read the site like a designer: light, water, and foot traffic
Before you buy plants, do one simple mapping exercise. Woodland light is patchy, and your cabin use patterns matter more than textbook “full shade.”
Step 1: Map sun hours with a cheap, repeatable method
- Pick a clear day and check three times: 9 a.m., 12 p.m., and 3 p.m.
- Sketch a simple plan of your cabin area (even on notebook paper). Mark where direct sun hits at each time.
- Count direct sun hours for each zone. Most cabin sites land in these bands: deep shade (0–2 hours), bright shade (2–4 hours), and dappled/edge (4–6 hours).
Concrete example: around a typical 24 ft x 24 ft cabin footprint, you might find a 6 ft x 10 ft “morning window” on the east side (about 3 hours of sun), and a 4 ft x 8 ft hot spot by the driveway edge that gets 5–6 hours.
Step 2: Find the water line—where runoff naturally goes
Wooded sites often shed water fast, but roof runoff concentrates it. During a rain, watch where drips hit and where puddles form. A simple gravel drip edge (12–18 inches wide) can stop splashing and erosion, and it creates a perfect planting strip for moisture-tolerant shade plants.
Step 3: Mark “use zones” so plants don’t get trampled
Cabin gardens are social: you step out with coffee, haul firewood, rinse muddy boots, and carry coolers. Give those routes a durable surface first, then plant around them. If you skip this, the best plants will fail under foot traffic.
Layout strategies that make a woodland cabin garden look intentional
Strategy A: The 3-layer woodland border (works on almost any side of the cabin)
A forest edge has structure: groundcover, perennials/ferns, then shrubs. Recreate that in a 5–8 ft deep border and everything feels “native” to the setting—even if you include a few showier cultivars.
Typical dimensions: Run a border 30 ft long x 6 ft deep along the approach side of the cabin. Keep plants off the siding: leave a 18–24 inch maintenance strip (mulch or gravel) for airflow and easy access.
- Groundcover layer (0–8 inches tall): knit soil, reduce weeds, soften edges.
- Mid layer (12–30 inches): ferns and perennials for texture and seasonal interest.
- Shrub layer (3–6 ft): anchors the design and frames windows/steps.
Strategy B: The “arrival triangle” at the steps (small budget, big impact)
If you rent the cabin or only want one tight project, do this: build a triangular bed from the steps to the nearest corner of the cabin. It reads like landscape architecture because it guides the eye and makes the entry feel cared for.
Dimensions: a triangle roughly 8 ft x 8 ft x 10 ft (about 32 sq ft). One shrub at the back corner, three mid-layer plants, then groundcover to fill in.
Cost range: DIY install is often $120–$350 depending on plant sizes and whether you add edging stone. (Tip: in woodland shade, spending on soil and mulch often matters more than buying large plants.)
Strategy C: The “loop path” for cabins with kids, dogs, or frequent guests
If your site gets weekend traffic, people will create desire paths. Give them a loop so they stop cutting through your planting beds.
Dimensions and materials: a 36-inch wide path feels comfortable for two people passing. Use wood chips for a woodland look; plan on a 3–4 inch chip depth. For a 50 ft loop, you’ll cover about 150 sq ft—roughly 1.5 cubic yards of chips.
“Mulch is not just decorative; it’s a practical tool to conserve moisture, moderate soil temperature, and reduce erosion.” — U.S. Forest Service guidance on soil and watershed protection (USFS, 2020)
Soil prep that respects tree roots (and keeps you out of trouble)
Woodland soils are often acidic and low in available nutrients because organic matter breaks down slowly under shade. Many cabin owners make the same mistake: they dig big holes, cut roots, and then wonder why plants struggle and trees decline. Don’t trench through roots; build on top.
Use “top-dress and plant” instead of deep digging
- Rake back leaves/needles (save them for mulch).
- Add 1–2 inches of compost over the bed area.
- Top with 2–3 inches of shredded bark or leaf mulch (keep mulch 3 inches away from stems).
- Plant by cutting through the mulch and compost layer, digging only as deep as needed for the root ball.
Real data: A 2 cu ft bag of compost often costs $6–$10; shredded bark mulch runs $4–$7 per 2 cu ft bag, or less by the yard. For a 100 sq ft bed, 2 inches of compost is about 16–17 cu ft, and 3 inches of mulch is about 25 cu ft.
For soil reaction, remember that many woodland ornamentals prefer slightly acidic soil. Clemson University notes that many azaleas and rhododendrons perform best around pH 4.5–6.0 (Clemson Cooperative Extension, 2019). If you don’t know your pH, a basic test kit is usually $10–$20, and it prevents expensive plant mismatches.
Plant selection that thrives under trees (specific varieties and why they work)
In woodland gardens, performance comes down to three traits: tolerance of shade, ability to compete with roots, and resilience when watering is inconsistent. The plants below are reliable across many temperate regions; always confirm hardiness for your zone.
Reliable shrubs for structure (the “bones”)
1) Oakleaf hydrangea (Hydrangea quercifolia) ‘Ruby Slippers’
Why it works: Handles bright shade to part sun, has strong stems, and brings four-season interest—summer blooms, fall color, and exfoliating bark. Place it where it gets 3–5 hours of light for best flowering. Space 4–5 ft apart.
2) Inkberry holly (Ilex glabra) ‘Shamrock’
Why it works: Evergreen presence in shade, tolerates moist woodland edges, and stays tidy without constant pruning. Great near entries and along paths. Space 3–4 ft apart.
3) Virginia sweetspire (Itea virginica) ‘Little Henry’
Why it works: Thrives in moist shade and stabilizes soil on gentle slopes. Fragrant white flowers and dependable fall color. Space 3 ft apart for a low hedge effect.
4) Rhododendron ‘PJM’
Why it works: Cold-hardy, evergreen, and reliable in acidic woodland soil. Give it morning sun or bright shade (avoid harsh afternoon sun). Space 4–6 ft depending on cultivar size.
Perennials and ferns that look right in the woods
1) Hosta ‘June’
Why it works: Thick leaves, strong performance in shade, and a refined look near cabins. In deer-heavy sites, expect nibbling—use it where you can protect it. Space 24–30 inches.
2) Brunnera macrophylla ‘Jack Frost’
Why it works: Silvered foliage brightens deep shade, and spring flowers are a bonus. Prefers consistent moisture but tolerates average woodland soils once established. Space 18–24 inches.
3) Christmas fern (Polystichum acrostichoides)
Why it works: Semi-evergreen, tough, and native to many eastern woodlands. Excellent under trees with dry shade once established. Space 18–24 inches.
4) Japanese painted fern (Athyrium niponicum var. pictum) ‘Pictum’
Why it works: Color without sun—silvery fronds with burgundy midribs. Ideal for the “arrival triangle” where you want detail up close. Space 18 inches.
5) Foamflower (Tiarella cordifolia) ‘Spring Symphony’
Why it works: A woodland-native look, spreads gently, and covers soil under shrubs. Great substitute for fussy groundcovers. Space 12–18 inches.
Groundcovers that handle roots and reduce weeding
1) Allegheny spurge (Pachysandra procumbens)
Why it works: A more woodland-appropriate alternative to Japanese pachysandra in many regions, with mottled leaves and spring blooms. It tolerates dry shade once rooted in. Space 10–12 inches for fill-in over 1–2 seasons.
2) Barrenwort (Epimedium x rubrum)
Why it works: One of the best “tree root competitors.” It shrugs off dry shade, has delicate spring flowers, and forms a handsome low mat. Space 12 inches.
3) Wild ginger (Asarum canadense)
Why it works: Dense, heart-shaped leaves cover soil in rich shade and look right next to stone steps. Space 12–18 inches.
A practical comparison: pick plants by light and deer pressure
| Plant | Best Light (direct sun hours) | Spacing | Deer Resistance (typical) | Best Use Near a Cabin |
|---|---|---|---|---|
| Inkberry holly ‘Shamrock’ | 2–6 | 3–4 ft | Medium | Evergreen structure by entry/path |
| Oakleaf hydrangea ‘Ruby Slippers’ | 3–6 | 4–5 ft | Low–Medium | Foundation anchor, seasonal drama |
| Epimedium x rubrum | 0–4 | 12 in | High | Dry shade under trees |
| Brunnera ‘Jack Frost’ | 0–4 | 18–24 in | Low | Brighten dark corners near steps |
| Christmas fern | 0–4 | 18–24 in | High | Natural woodland edges, low fuss |
Three real-world cabin scenarios (and what I’d plant)
These are patterns I see repeatedly—match your situation and borrow the layout and plant mix.
Scenario 1: Deep shade under evergreens, dry soil, weekend watering only
Site cues: needles on the ground, shallow roots, and that “nothing grows here” feeling. Light is often 0–2 hours of direct sun.
Design move: keep the bed shallow and wide—more like a woodland floor than a “flower garden.” Use a 4 ft deep sweep along one side of the path and repeat the same plants in drifts so it reads intentional.
Planting recipe (per 20 ft x 4 ft bed):
- 7 Christmas ferns (18–24 in spacing)
- 12 Epimedium x rubrum (12 in spacing)
- 6 Allegheny spurge (12 in spacing) to knit gaps near rocks
Why it works: ferns and epimedium tolerate root competition and dry shade better than most flowering perennials, and the groundcover reduces the need to weed during short cabin weekends.
Scenario 2: A bright, shady entry with deer traffic
Site cues: You’ve got 3–4 hours of direct light near the front steps, but deer treat it like a salad bar.
Design move: build the “arrival triangle” and prioritize plants deer usually ignore. Add one physical deterrent element that doesn’t look like fortress gardening: a 24–30 inch-tall rustic twig fence or a line of dense shrubs that makes browsing less convenient.
Planting recipe (8 ft x 8 ft x 10 ft triangle):
- 1 Inkberry holly ‘Shamrock’ at the back corner
- 3 Japanese painted ferns ‘Pictum’ along the midline
- 10 Epimedium x rubrum to fill the front edge
Why it works: you get evergreen structure plus fine texture up close, and the epimedium is a workhorse in deer country. If you love hostas, plant them in containers on the porch where you can protect them.
Scenario 3: A wet spot from roof runoff and a mossy side yard
Site cues: splash marks on siding, puddling during storms, and slippery moss where you’d rather have a stable bed.
Design move: install a gravel drip edge (12–18 inches wide) and plant moisture-tolerant shrubs and perennials just beyond it. If runoff is heavy, consider a simple rain chain into a small rock basin.
Planting recipe (30 ft long strip, 6 ft deep):
- 5 Virginia sweetspire ‘Little Henry’ (3 ft spacing)
- 9 Foamflower ‘Spring Symphony’ (15 in spacing)
- 12 Wild ginger (15 in spacing) nearest the shadiest section
Why it works: sweetspire thrives where water collects, while foamflower and ginger create a living mulch that prevents soil splash and keeps the strip looking finished.
Step-by-step setup for a weekend cabin garden install
- Lay out the bed with a hose or rope. Keep curves gentle—woodland gardens look best with broad, relaxed arcs.
- Define the maintenance strip. Leave 18–24 inches from siding for airflow and access.
- Top-dress with compost (1–2 inches). Don’t excavate around roots; build soil on top.
- Place plants in pots first. Step back 20 feet and check proportions. Put shrubs in first, then mid-layer, then groundcovers.
- Plant and water deeply. For new plants, aim for a slow soak that wets the root ball thoroughly. If you’re only there on weekends, water extra on planting day.
- Mulch 2–3 inches. Use shredded leaves, bark, or pine fines to match the site and reduce watering needs.
- Add a simple path edge if needed. A line of stones or logs can keep chips from migrating and protect plant crowns.
Budget planning and DIY alternatives (so you don’t overspend)
A woodland cabin garden can be done in phases without looking unfinished. Here’s how I’d allocate a modest budget.
Example budget for a 100 sq ft bed:
- Compost: 8–9 bags (2 cu ft each) = $50–$90
- Mulch: 12–13 bags (2 cu ft each) = $50–$90
- Plants: 1–2 shrubs ($35–$60 each) + 12–18 perennials/groundcovers ($8–$18 each) = $170–$420
- Optional edging stone or gravel: $40–$150
DIY alternatives that still look designed:
- Use leaf mulch you already have. Shred fall leaves with a mower and apply as a 2–3 inch mulch layer. It looks natural and feeds the soil.
- Buy smaller plants. A 1-gallon shrub establishes quickly in woodland conditions and often catches up within 2–3 seasons.
- Divide and repeat. Many woodland perennials (hosta, brunnera, ferns) can be divided after a couple years to expand beds without expanding costs.
Maintenance expectations for part-time cabin gardeners
The best cabin gardens are low-drama. Plan for 30–60 minutes per week during the first growing season if you’re there, mostly for watering and quick weeding. After establishment (year two onward), many woodland beds settle into 15–30 minutes per week plus seasonal chores.
Spring (1–2 hours total over a couple visits)
- Rake gently—don’t strip all leaf litter; keep a thin layer as natural mulch.
- Cut back last year’s fern fronds and perennial stems.
- Top-dress with 1 inch compost if growth looked weak last year.
Summer (15–30 minutes weekly when on-site)
- Water new plantings: deep soak 1–2 times per week during dry spells; established beds need less.
- Hand-weed while soil is moist—groundcovers reduce this dramatically by year two.
- Watch for deer browse and adjust: swap vulnerable plants for epimedium, ferns, or inkberry if pressure is high.
Fall (1–2 hours total)
- Mulch with shredded leaves to reach a consistent 2–3 inch layer.
- Plant shrubs in early fall if soil is still warm—often the best establishment window in wooded sites.
Winter (hands-off, but observe)
- Notice where snow piles slide off roofs and crush plants; move delicate perennials away from those drop zones.
- Check for salt spray near driveways—avoid sensitive plants in that corridor.
One last practical note: if you’re gardening around mature trees, keep mulch rings modest and never mound mulch against trunks. The goal is a stable forest-floor layer, not a volcano of bark.
If you build your cabin garden like the woods builds itself—layers, repetition, and soil protection—you’ll get a space that feels calm and rooted. Start with one bed you see every visit (the entry triangle is perfect), choose plants that enjoy the conditions you actually have, and let the garden expand outward as your time and budget allow. After a season or two, the forest stops feeling like an obstacle and starts feeling like your design partner.
Sources: U.S. Forest Service (USFS), 2020; Clemson Cooperative Extension, 2019.