Poolside Planting: Safe and Beautiful Options
The first time you notice it, it’s usually on a sunny afternoon: a trail of dropped leaves stuck to wet feet, bees investigating a sugary fallen fruit, and a patch of slick green algae where the sprinkler overshot the coping. Pool areas are unforgiving that way—every plant choice shows up immediately in your water, on your deck, and in your maintenance time. The good news is you can have a lush, resort-like poolside without turning your skimmer basket into a compost bin.
I’m going to walk you through a poolside planting plan the way I’d sketch it for a client: start with how people move, respect safety clearances, then layer in plants that handle sun, reflected heat, and occasional splash—without thorns, aggressive roots, or nonstop litter.
Start with the “pool perimeter zones” (this layout trick prevents most regrets)
Instead of thinking “plants around the pool,” break the space into three rings. This keeps the deck clean, protects the shell and plumbing, and makes plant selection much easier.
Zone 1: The Clean Deck Strip (0–3 feet from the water’s edge)
This is your splash zone and foot-traffic zone. Keep it visually soft, but physically simple. I aim for 0–36 inches from coping to the first planting edge (or pot), depending on your deck size. In this zone, prioritize:
- No thorns (safety for bare feet and kids).
- Low litter (few dropping leaves/flowers/seed pods).
- Non-aggressive roots (avoid damage to decking and plumbing).
- Containers or raised planters if you want greenery closer than 3 feet.
Zone 2: The Planting Band (3–8 feet from water)
This is where your “resort feeling” lives: texture, screening, movement, fragrance. Most homeowners have enough space here for a mixed border with repeating clusters. Keep plants far enough back that you’re not brushing wet foliage as you walk, and so pruning doesn’t become a weekly negotiation.
Zone 3: The Backdrop (8–15+ feet from water)
This zone is for taller screening, small trees (with careful species selection), and anything that might drop some litter but isn’t right next to the pool. If you want privacy, place screening here so it frames views rather than crowding the deck.
Hardscape-first rules that make pool plantings safer
Poolside planting isn’t only a plant problem—it’s circulation, drainage, and surfaces. These principles keep the space comfortable and reduce slip hazards and chemical overspray issues.
Keep a clear walking lane and a “no-prickle” rule
Plan for a minimum 4-foot clear path for the main traffic side of the pool. On tighter layouts, 3 feet can work, but you’ll feel it when more than two people pass.
Also: skip anything with spines, sharp leaf tips, or irritating sap within reach of swimmers. Many agaves and some yuccas look sculptural, but the injury risk isn’t worth it in a barefoot zone.
Design for drainage and deck cleanliness
Make sure planting beds are slightly lower than the deck so soil doesn’t wash onto paving. A modest grade change—1–2 inches from deck edge down into the bed—helps. If you’re retrofitting an existing pool, a narrow gravel strip (about 6–10 inches wide) between deck and soil can reduce splash-mud and keep mulch from migrating.
Respect utilities and shell protection
Roots rarely “hunt” for pipes in perfect conditions, but they exploit moisture. Keep woody plants and trees a safe distance from underground plumbing runs, and avoid large trees too close to the shell. When in doubt, place trees in Zone 3 and choose smaller, non-invasive root systems.
“The roots of a tree typically extend well beyond the branch spread, often 2–3 times the radius of the canopy.” — International Society of Arboriculture, Tree Root Systems (ISA, 2020)
That’s why even a “small” ornamental tree can cause headaches if it’s squeezed right beside hardscape. Give it room—or use large containers with root barriers.
Sun, heat, and pool chemistry: match plants to microclimate
A pool deck reflects light and heat like a pizza stone. Measure your sun before you buy plants. Most pools get 6–10 hours of direct sun in summer; corners might drop to 4 hours if the house or fences shade them.
Also, chlorinated splash-out and occasional backwash mean salts and chemicals can accumulate in nearby beds—especially in arid climates. Salt tolerance becomes important if you have a saltwater pool. The CDC notes that typical pool free chlorine is maintained around 1–3 ppm for many pools (CDC, 2023), which is safe for swimmers but still a factor for sensitive foliage if splashed constantly.
Citations: Centers for Disease Control and Prevention (CDC), “Pool Chemical Safety / Healthy Swimming” (2023). International Society of Arboriculture (ISA), “Tree Root Systems” (2020).
A layout approach that looks designed (not “plants placed along a fence”)
Here’s the designer trick: repeat plant groupings rather than collecting one-of-each. You’ll get a calmer, more intentional look and it’s easier to maintain.
Use the 60/30/10 planting ratio
- 60% structure: evergreen shrubs, architectural grasses, consistent forms.
- 30% seasonal interest: flowering perennials, color accents.
- 10% statement plants: a specimen palm (where climate allows), a large pot with a bold plant, or a sculptural clump of grass.
Spacing that prevents overcrowding (and pruning battles)
Poolside beds feel lush fast because of reflected heat and irrigation. Space for mature size:
- Small shrubs: 24–36 inches apart
- Medium shrubs: 36–60 inches apart
- Ornamental grasses: 24–48 inches apart depending on variety
- Accent clumps (like lomandra): 24–30 inches apart
Plant selection: safe, low-litter, pool-friendly favorites (with specific varieties)
These picks are chosen for cleaner habits, softer textures, and better behavior near paving. Always cross-check with your local extension service for invasiveness and cold-hardiness in your region.
Evergreen structure (clean foliage, tidy growth)
Lomandra longifolia ‘Breeze’ (mat rush): Soft, fountain-like leaves that don’t stab bare skin. Handles heat and drought once established, and it doesn’t constantly shed. Great in Zone 2 at 24–30 inch spacing.
Pittosporum tobira ‘Wheeler’s Dwarf’: Compact, rounded evergreen with relatively low litter. Use as a low hedge at 30–36 inch spacing. Place in Zone 2 or 3 to keep any occasional leaf drop out of the water.
Podocarpus macrophyllus ‘Maki’ (upright yew plum pine): A clean, dark-green screen option that’s less messy than many hedges. Use in Zone 3 for privacy, typically 3–4 feet apart for a hedge (wider if you want individual forms).
Ornamental grasses (movement without messy flowers)
Pennisetum alopecuroides ‘Hameln’ (dwarf fountain grass): Beautiful movement and soft texture. It does flower, so expect some seasonal plume drop—better in Zone 2 than right at the coping. Space 30–36 inches apart.
Festuca glauca ‘Elijah Blue’ (blue fescue): Tight blue mounds that behave nicely in borders and containers. Space 10–12 inches apart for a strong edging rhythm in Zone 2.
Flowering plants that won’t turn the pool into a bouquet
Lavandula angustifolia ‘Hidcote’ (English lavender): Fragrant, drought-tolerant, and loved for that Mediterranean poolside feel. It drops some blooms after flowering, so keep it in Zone 2 and shear once after bloom. Space 18–24 inches apart and give it 6+ hours of sun.
Salvia greggii ‘Hot Lips’: Long-blooming, heat tolerant, and a good “color engine” without heavy petal drop. Place in Zone 2, spacing 24–30 inches. (It will attract pollinators—place away from the main entry steps if you’re sensitive to bees.)
Dietes bicolor (African iris/fortnight lily): Tough strappy foliage, pretty flowers, and generally low mess. Great for modern borders; space 24–36 inches apart.
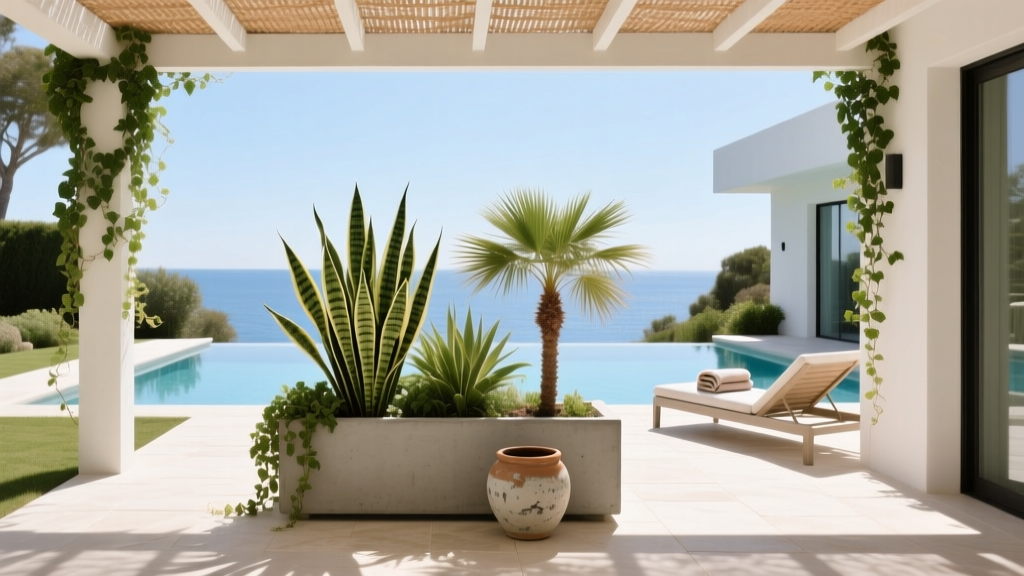
Container stars for the clean-deck strip (Zone 1)
If you want green close to the water, containers give you control over soil, roots, and litter. Look for “clean” foliage plants:
- Snake plant (Dracaena trifasciata): Excellent in bright shade to sun (depending on climate), architectural, minimal litter.
- Bird’s nest fern (Asplenium nidus): Great for shaded pools (4 hours or less of direct sun). Soft texture, tidy.
- Dwarf citrus in pots? Usually no—fallen fruit and blossoms are a pool-cleaning headache.
Quick comparison table: smart poolside picks by priority
| Plant | Best Zone | Sun Needs | Litter Level | Notes for Pools |
|---|---|---|---|---|
| Lomandra ‘Breeze’ | 2 | Full sun to part shade (6–8 hrs ideal) | Low | Soft leaves; great near paths; drought tolerant once established |
| Podocarpus ‘Maki’ | 3 | Sun/part shade (5–8 hrs) | Low | Clean screening; avoid tight spacing right at coping |
| Lavender ‘Hidcote’ | 2 | Full sun (6+ hrs) | Medium | Shear after bloom to keep tidy; fragrant seating-area plant |
| Dietes bicolor | 2 | Sun/part shade (4–8 hrs) | Low | Great for modern lines; handles heat and occasional splash |
| Blue fescue ‘Elijah Blue’ | 2 (edging) / pots | Full sun (6+ hrs) | Low | Strong color contrast; use rhythmically along a border |
Three real-world layout scenarios (with numbers you can copy)
Let’s put this into real spaces. These scenarios mirror the most common pool areas I’m asked to improve: the narrow side yard pool, the windy exposed pool, and the shaded courtyard pool.
Scenario 1: Narrow side-yard pool (tight walkway, high splash)
Space: A rectangular pool with only 5 feet between pool edge and fence on one long side.
Design move: Keep the walkway clear and shift greenery into vertical layers.
- Zone 1: Skip in-ground planting; use 18–22 inch wide pots spaced every 6–8 feet with snake plant or bird’s nest fern (depending on sun).
- Zone 2: A slim bed only 18 inches deep along the fence: repeat Dietes bicolor at 30-inch spacing for clean strappy texture.
- Zone 3 (if any): Add a trellis panel and a non-thorny climber suited to your region; keep it off the deck to reduce leaf litter.
Why it works: Pots keep soil and mulch off the deck, and the repeating dietes gives a designed look without crowding the path.
Scenario 2: Full-sun, windy pool (plants get crispy, mulch blows)
Space: An open backyard pool with 10 hours of summer sun and constant breeze.
Design move: Use heavier mulch or gravel, and pick flexible, wind-tolerant plants.
- Zone 2: Drift plantings of Lomandra ‘Breeze’ and Salvia greggii ‘Hot Lips’ in groups of 3–5, spaced 24–30 inches apart.
- Zone 3: A screen of Podocarpus ‘Maki’ at 4-foot spacing to reduce wind and add privacy.
Why it works: Lomandra won’t snap in wind, salvia thrives in heat, and podocarpus filters wind without constant leaf drop into the pool.
Scenario 3: Shaded courtyard pool (algae risk, damp corners)
Space: A courtyard pool that gets 3–5 hours of direct sun.
Design move: Prioritize airflow, reduce overly dense hedges, and use shade-tolerant, tidy plants.
- Zone 1: Large ceramic pots (at least 16 inches diameter) with bird’s nest fern where splash is minimal.
- Zone 2: Use Podocarpus sparingly (not a solid wall). Add Dietes bicolor for structure and a restrained palette that doesn’t shed heavily.
Why it works: Shade means slower drying—so you don’t want dense plantings trapping moisture against the deck. Cleaner foliage also means less organic matter feeding algae.
Step-by-step: a DIY poolside planting setup that looks professional
- Measure your zones. Mark 3 feet from the coping around the pool as your clean strip. If your deck is narrower than that, plan on containers instead of in-ground plants near the edge.
- Track sunlight for one day. Note direct sun hours at 9am, noon, 3pm. If you get 6+ hours, you can use lavender/salvia; if 4 hours or less, lean into shade-tolerant pots and structural foliage.
- Plan irrigation that won’t overspray the deck. Dripline in beds is cleaner than sprays. Keep emitters 6–12 inches from plant crowns and avoid watering late evening to reduce slippery mildew near paving.
- Build the planting rhythm. Pick 2–3 “main” plants (like lomandra + dietes + one flowering accent). Repeat them in clusters. This is what makes the border read as intentional.
- Set plants out in pots first. Place nursery pots on top of the soil for a few days and live with the layout. Adjust spacing for traffic and views before digging.
- Plant, edge, and top-dress. Install an edge (steel, pavers, or a clean spade-cut line). Top-dress with a mulch that stays put—consider shredded bark in calm yards, or gravel in windier sites (check local codes and comfort underfoot).
Budget planning (with realistic numbers and easy swaps)
A poolside planting can be scaled. Here are typical cost ranges homeowners run into, plus DIY alternatives.
Plant costs (typical retail):
- 1-gallon perennials/grasses: $10–$18 each
- 5-gallon shrubs (pittosporum, podocarpus small sizes): $35–$75 each
- 24-inch decorative pots: $60–$180 each (resin tends to be cheaper than ceramic)
- Drip irrigation kit for a modest bed: $40–$120
Example budget: A 30-foot long border, planted with 10 lomandra (1-gal), 8 salvias (1-gal), and 5 shrubs (5-gal) might land around $350–$750 in plants depending on pot size and local pricing—before irrigation and mulch.
DIY alternatives that still look sharp:
- Use fewer shrubs and repeat grasses more—grasses are often cheaper per square foot of visual impact.
- Buy smaller sizes (1-gallon instead of 5-gallon) and plan for a fuller look in 12–18 months.
- Choose simple matte resin pots; they’re lighter to move and often cost less than glazed ceramic.
Maintenance expectations (so it stays clean, not chaotic)
A well-designed pool planting should not demand daily attention. Plan on 20–40 minutes per week in peak growing season for quick grooming: remove spent blooms, pick up occasional leaves, and check irrigation. In cooler months, you may drop to 10–20 minutes per week.
Seasonal task list
- Spring: Cut back ornamental grasses if your variety needs it; refresh mulch; check drip emitters for clogs.
- Summer: Light pruning to keep walkways clear; deadhead salvias and lavender; rinse salt/chlorine splash off sensitive foliage with a hose if you notice spotting (morning is best so leaves dry).
- Fall: Tidy leaf drop from nearby trees; thin dense shrubs to improve airflow around the deck.
- Winter: Protect tender container plants if temperatures dip; reduce irrigation frequency but don’t let pots fully dry out.
If you want the lowest-maintenance version of all: lean heavily on lomandra/dietes/podocarpus, keep flowers as small accents, and use containers only where you truly want greenery in Zone 1.
Small safety checklist I use before approving any pool planting plan
- Anything within arm’s reach of a swimmer is non-thorny and non-toxic for your household situation.
- No plant crowds steps, gates, or pool equipment access panels; maintain at least 36 inches clear around equipment for service access.
- Any plant known for heavy litter (pods, berries, constant leaf drop) is moved to Zone 3—or removed from the plan.
- Irrigation does not spray onto coping or decking.
When the layout respects traffic and clean zones, you can be generous with plants without feeling like you’re constantly cleaning. Aim for soft texture in the mid-zone, taller calm structure in the back, and keep the first few feet near the water as simple as you can stand. That’s how you get the “hotel pool” feeling at home—pretty from every angle, and still pleasant when you’re walking out barefoot with a dripping towel.