Suburban Garden Path Design Ideas
You step out the back door with a mug of coffee and immediately do the little sidestep—again—because the route to the shed is a muddy groove worn into the lawn. The dog has made it worse. The kids cut the corner. And every time it rains, your shoes pay the price. A garden path isn’t just a “nice-to-have” detail; it’s a practical piece of design that controls traffic, protects planting beds, and makes a suburban yard feel intentional rather than accidental.
Let’s walk through how I design paths for real suburban spaces: narrow side yards, builder-grade backyards, rental patios, and the classic “I need a path but I don’t want it to look like a sidewalk” problem. You’ll get layout strategies, plant pairings, concrete dimensions, cost ranges, and a few case examples that mirror what most homeowners and renters are dealing with.
Start with the route people already take
Before you buy a single paver, watch how the space is used. The best path design usually follows desire lines—the natural shortcuts people take when nobody’s watching. Mark those lines with a garden hose, a length of rope, or a can of marking paint, and live with it for a day or two.
If you force a path where people don’t want to walk, they’ll walk next to it and you’ll end up with two paths: the one you built and the one they made.
Core dimensions that make a path feel right
These numbers come up constantly in residential layouts:
- Main walkway width: 36–48 inches is comfortable for one person and for moving a wheelbarrow (a practical minimum is 36 inches).
- Two people side-by-side: aim for 54–60 inches if you have the room, especially from the driveway to the front door.
- Secondary garden path: 24–30 inches works for low-traffic routes like to a compost bin or veggie beds.
- Step spacing (comfortable stride): place stepping stones so the centers land about 18–24 inches apart, adjusting to your stride.
- Clearance: keep at least 6 inches of planting setback from each side of the walking surface, more for plants that spill.
Also plan for drainage. A subtle cross-slope of about 1–2% helps shed water (for a 48-inch-wide path, that’s roughly 1/2 to 1 inch of drop from one side to the other).
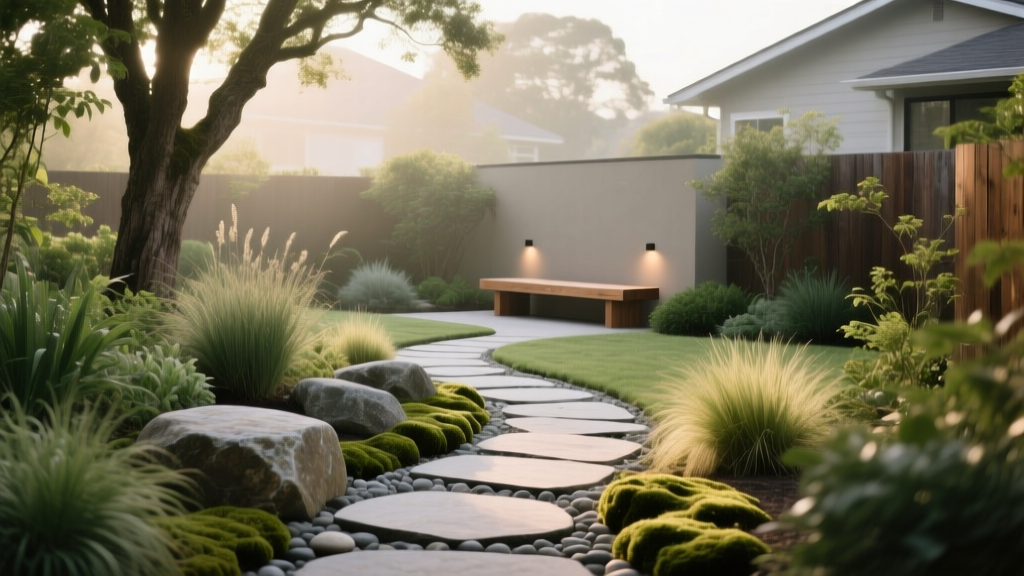
Layout strategies that make suburban paths look designed (not plopped in)
Use gentle curves for small yards—tight curves look fussy
In a typical 40-foot-deep backyard, a path that wiggles every 3 feet reads like indecision. One or two broad arcs feel calmer and more spacious. A good rule in compact yards: let curves be wide enough that you can still see the destination from the start. If you want mystery, use plants or a trellis to create a partial screen—don’t rely on a maze-like path.
Anchor the path with “stops”
Paths feel purposeful when they connect clear destinations: patio, grill, shed, gate, seating nook, raised beds, trash enclosure. If your only destination is “the fence,” the path will feel like an afterthought.
Design trick: create a small pad (a 4x4-foot square of pavers, or a 5-foot-diameter circle of gravel) at the end of a path. It gives you a place to stand, turn, and do something—open a gate, pick herbs, rinse tools.
Make transitions intentional at thresholds
Where the path meets a deck step, a patio edge, or a driveway, define it with a change in material or a border. A simple soldier course (a single line of pavers laid lengthwise) can make gravel feel finished. In rentals, a neat steel edging strip can be the difference between “temporary” and “tidy.”
Pick a path surface that matches how you live
Material choice is where budgets and reality meet. I like to decide based on three questions: How often will you walk it? What happens when it rains? How much maintenance can you tolerate?
| Path surface | Best for | Typical installed cost (US) | DIY friendliness | Maintenance notes |
|---|---|---|---|---|
| Compacted gravel (with edging) | Side yards, long runs, budget upgrades | $3–$8 per sq ft | High | Rake occasionally; top up every 1–3 years |
| Concrete pavers | Main paths, patios-to-shed routes, clean look | $10–$25 per sq ft | Medium | Re-sand joints; reset any settled pavers |
| Natural stone flagstone | High-end, organic style, focal paths | $15–$35 per sq ft | Medium | Weed joints; watch uneven settling |
| Mulch or wood chips | Informal garden trails, low commitment | $1–$3 per sq ft | High | Refresh annually; can float in heavy rain |
| Stepping stones set in groundcover | Low-traffic, cottage feel, narrow spaces | $5–$15 per sq ft | High | Mow/trim edges; maintain groundcover |
Cost ranges vary by region and site prep, but these numbers are realistic starting points for planning. The biggest “hidden cost” isn’t the surface—it’s base preparation and drainage corrections.
A note on accessibility and safety
If anyone in the household uses a walker, stroller, or wheelchair, prioritize smooth, stable surfaces and generous widths. The Americans with Disabilities Act (ADA) sets common-sense thresholds used widely in design: running slopes of 5% or less are generally considered “walkways” (not ramps), and stable, slip-resistant surfaces are recommended (U.S. Department of Justice, 2010).
“Firm, stable, and slip-resistant surfaces aren’t just for public spaces—they’re what makes a walkway feel safe in every season.” — U.S. Department of Justice, 2010 ADA Standards for Accessible Design
Step-by-step: a practical DIY layout and build sequence
Here’s the sequence I use for a typical suburban path (works for gravel, pavers, or stepping stones). This keeps you from building first and regretting the alignment later.
- Mark the route. Use a hose to lay out curves. For straight lines, use stakes and string. Walk it both directions.
- Confirm widths. Measure: 36 inches minimum for primary routes; 24–30 inches for secondary.
- Check grade and drainage. After rain, note where water sits. Plan a 1–2% slope to shed water off the path.
- Excavate. For gravel paths: remove 4–6 inches of soil. For pavers: typically 7–9 inches total (base + sand + paver thickness) depending on soil and frost.
- Add base and compact. Use 3–6 inches of compacted crushed stone (often called “road base” or “dense grade”). Compact in lifts.
- Install edging. Metal, composite, or paver edging keeps the path crisp and prevents spreading.
- Lay surface. Add gravel (often 2–3 inches), or set pavers on a screeded sand bed, or place stepping stones level with grade.
- Lock it in. For pavers, sweep polymeric sand into joints. For gravel, top with finer gravel for a tighter finish.
- Plant edges last. Keep plants slightly back from the path so you can still edge and sweep.
If you want a single number to remember: a 30-foot-long, 3-foot-wide path is 90 sq ft. That’s enough to start comparing materials and estimating costs quickly.
Planting along paths: varieties that behave well and look intentional
Path plants have a specific job: soften edges, guide movement, and hold the design together without flopping into your walking space. I choose plants based on sunlight hours, root behavior, and how often you’re willing to trim.
Sunny paths (6–8+ hours of sun)
For bright suburban front walks and exposed side yards, go for drought-tolerant edging and plants that look good even when you miss a week of watering.
- Lavandula angustifolia ‘Hidcote’ (English lavender): compact, fragrant, great for a 24–36 inch planting band. Space plants 18–24 inches apart for airflow. Works because it stays relatively upright and doesn’t need rich soil.
- Salvia nemorosa ‘Caradonna’: vertical purple spikes that read well from the sidewalk. Space 18 inches apart. Strong form makes a path feel “guided.”
- Nepeta ‘Walker’s Low’ (catmint): soft spill without being a tripping hazard if you give it room. Space 24–30 inches apart and shear after bloom for a tidy edge.
- Festuca glauca ‘Elijah Blue’ (blue fescue): neat mounds, great for repeating rhythm. Space 12–18 inches apart.
- Thymus serpyllum (creeping thyme): perfect between stepping stones in full sun; tolerates light foot traffic and releases scent when brushed.
Part shade paths (3–5 hours of sun)
This is the classic suburban side yard: bright for part of the day, then shaded by the house and fence. You want plants that don’t sulk.
- Heuchera ‘Caramel’ or ‘Palace Purple’ (coral bells): reliable foliage color, tidy mounds. Space 14–18 inches apart. Works because it gives you season-long interest without constant flowers.
- Hakonechloa macra ‘Aureola’ (Japanese forest grass): graceful arching texture that softens hard edges. Space 18–24 inches apart; keep it 6–8 inches off the path edge so it can move without blocking.
- Hydrangea paniculata ‘Bobo’: compact shrub for a path “moment” near a corner. Give it a 3-foot pocket and prune in late winter.
- Carex oshimensis ‘Evergold’: an easy edging sedge that stays neat; space 12–18 inches.
Shady paths (2–3 hours of sun or dappled light)
Shade paths are where texture and leaf shape do the heavy lifting.
- Hosta ‘June’ or ‘Halcyon’: bold leaves that make a narrow path feel lush. Space 24–36 inches depending on variety; keep them set back if slugs are common so you can monitor.
- Dryopteris erythrosora (autumn fern): coppery new growth, tidy clumps. Space 18–24 inches.
- Brunnera macrophylla ‘Jack Frost’: silver leaves brighten shady runs; space 18–24 inches.
- Pachysandra terminalis or sweet woodruff (Galium odoratum): groundcovers for between stepping stones in shade; choose based on local invasiveness concerns and your tolerance for spread.
Planting tip: keep the tallest plants (shrubs, grasses) on the outside curve of a path, and lower plants on the inside curve. This preserves sightlines and prevents the “hidden corner” feeling.
Three real-world suburban path scenarios (with layouts you can copy)
Scenario 1: The narrow side yard that turns into a mud chute
Space: 4 feet wide by 35 feet long between house and fence, part shade (about 4 hours of sun).
Goal: clean access from front to back without feeling like a service corridor.
Layout solution: a 30-inch compacted gravel path centered in the corridor, with steel edging. Leave 6–9 inches of planting strip on either side where possible. At the back gate, widen into a 4x4-foot paver pad so you can pause and turn.
Planting: repeat Carex ‘Evergold’ every 16 inches on the fence side for rhythm; tuck Heuchera on the house side where downspouts might splash. Add a single Hakonechloa ‘Aureola’ clump near the midpoint as a “soft landmark.”
Budget reality: 35 ft x 2.5 ft = 87.5 sq ft. At $3–$8/sq ft for DIY gravel, you’re roughly $260–$700 plus edging. This is one of the best returns-on-effort projects in a suburban yard because it immediately changes daily movement.
Scenario 2: The builder-grade backyard where the patio feels disconnected
Space: patio to shed is 28 feet, lawn in between, full sun (about 7+ hours).
Goal: stop wearing a trail into turf and make the yard feel “composed.”
Layout solution: a 42-inch paver path from patio to shed, with one gentle curve that avoids the wettest spot (you’ll find this after a rain). Place a small landing at the shed door: 5 feet wide by 5 feet deep if you can—enough for potting soil bags and a person to pass.
Planting: line the outside curve with Salvia ‘Caradonna’ (spaced 18 inches) for structure, then fill behind with Nepeta ‘Walker’s Low’ (spaced 24–30 inches) for softness. Add Lavender ‘Hidcote’ near the patio edge where you’ll brush it walking out.
Budget reality: 28 ft x 3.5 ft = 98 sq ft. Pavers at $10–$25/sq ft put you around $980–$2,450 installed-equivalent. DIY can reduce labor costs significantly, but don’t skimp on base depth.
Scenario 3: A rental patio where you want a path without “permanent construction”
Space: small backyard with a gate to the parking area; you need a clean route for groceries and trash bins, mixed sun (about 3–6 hours depending on season).
Goal: a tidy, removable path that doesn’t require excavation or concrete.
Layout solution: set large-format stepping stones (or concrete square pavers) on a thin leveling layer of sand over landscape fabric. Keep the width to 24–30 inches by using two pavers side-by-side or a single large format. Edge with a simple spade-cut line and add mulch or gravel around it to prevent wobble.
Planting: use pots to soften edges—compact rosemary in sun, heuchera in part shade. If you can plant in-ground, choose well-behaved clumps like carex and avoid aggressive spreaders that will annoy the next tenant (or your landlord).
Cost reality: a set of 12 concrete 16x16-inch pavers covers about 21 sq ft. Depending on local prices, you might spend $50–$150 on pavers plus a bag or two of sand and a roll of fabric. It’s one of the most rental-friendly upgrades because it can be lifted and moved.
Details that separate a “path” from a designed garden feature
Edging is not optional (if you want clean lines)
Without edging, gravel migrates, mulch drifts, and your path grows fuzzy. Steel edging is sleek; composite edging is easier to handle; paver edging is the most robust for formal looks. If budgets are tight, even a crisp spade-cut edge maintained every few weeks can work for mulch paths.
Lighting: a little goes a long way
For suburban safety and atmosphere, low-voltage path lights spaced about 8–12 feet apart create rhythm without looking like an airport runway. If you prefer subtlety, use downlighting from a fence or pergola, or tuck small shielded lights into planting beds aimed at the path surface.
Respect tree roots and existing utilities
If you’re near mature trees, avoid deep excavation that damages roots. Consider a raised gravel path or stepping stones on grade. Always check local utility marking services before digging.
Maintenance expectations (so the path stays attractive)
A well-designed path reduces maintenance because it concentrates foot traffic where it belongs. Still, every material has a rhythm.
- Weekly time: plan on 15–30 minutes per week in the growing season to sweep, snip encroaching stems, and pull small weeds before they root deeply.
- Gravel paths: rake smooth monthly; top up lightly every 1–3 years depending on traffic and rainfall.
- Paver paths: sweep joints; reapply joint sand as needed; spot-treat moss in shade. Power washing is fine occasionally, but it can remove joint sand—use it carefully.
- Mulch paths: refresh annually (often in spring). If mulch floats during storms, switch to larger chip size or add edging and a slightly crowned profile.
- Seasonal tasks: in late winter, cut back perennials bordering the path to keep widths true; in fall, keep leaves off to prevent slippery surfaces and staining.
If you live where freeze-thaw cycles are common, expect a little movement. That’s normal. Design for easy reset: modular materials (pavers, gravel, stepping stones) are forgiving and repairable.
Budget-minded design moves that still look professional
Not every suburban path needs a full paver install. The smartest budgets focus on base prep and edge control, then choose a surface that matches the moment.
- Hybrid approach: do pavers only where it matters—at doors, gates, and landings—and connect with gravel in between. You get stability where you step most and save money on long runs.
- DIY base, hired finish: pay for a pro to lay pavers perfectly, but do excavation and base compaction yourself if you’re comfortable. That’s often where labor costs accumulate.
- Use repeated modules: repeating the same 12x24-inch paver (or the same 3-foot plant spacing) creates a designed look without expensive complexity.
One more practical note: if you’re designing a front path that connects to public sidewalks, check local codes and HOA rules. Many municipalities guide walkway slopes and surfaces for safety; the ADA standards are a widely referenced benchmark even for residential best practices (U.S. Department of Justice, 2010).
And for the plant side of the equation, selecting species that fit your sun and soil reduces water use and replacement costs. As the U.S. Environmental Protection Agency notes, outdoor water use can account for a significant portion of household water demand, and efficient landscaping practices can reduce waste (U.S. EPA, 2023). A path that organizes planting beds and irrigation zones is part of that efficiency.
The most satisfying suburban paths feel like they’ve always been there. They follow the way you move, they drain well, and they pull planting into a coherent border rather than a scattered collection of “nice plants.” Start with the route, commit to clean edges, and choose plants that behave near foot traffic. Then, the next time it rains, you’ll walk to the shed without thinking about your shoes—exactly the kind of design success that quietly improves everyday life.
Sources: U.S. Department of Justice. 2010 ADA Standards for Accessible Design (2010). U.S. Environmental Protection Agency. Outdoor Water Use in the United States (2023).