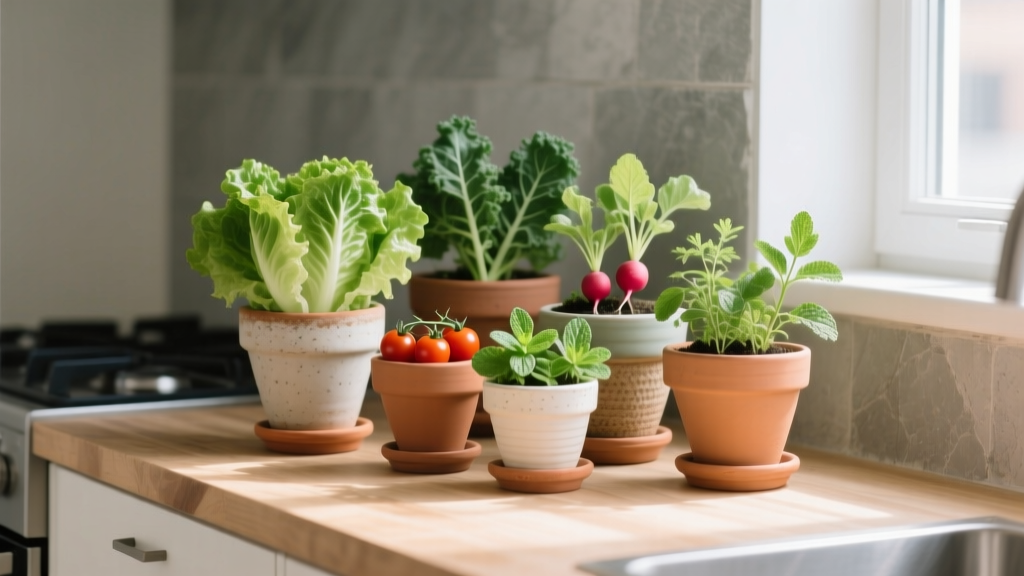
Kitchen Salad Garden in Pots
It’s 6:12 p.m., dinner is halfway decided, and you’re holding a sad clamshell of lettuce that went slick in the fridge two days ago. The recipe wants “a handful of fresh greens,” but the store is a 15-minute drive, the sun is still up, and you’re staring at a balcony, stoop, or postage-stamp patio that could be doing more. A kitchen salad garden in pots fixes that daily friction: it turns your nearest outdoor square footage into a living produce drawer—snip, rinse, eat—without committing to a full bed.
Think like a landscape designer for a moment: we’re not just placing plants, we’re designing an efficient, repeatable routine. The goal is a compact layout that keeps greens tender, harvests frequent, and maintenance light—while still looking like you meant to do it.
Start with the “door-to-bowl” layout
The best salad gardens behave like an outdoor pantry. Place your pots where you’ll actually use them: within 10–20 feet of the door you exit for cooking, if possible. The closer the greens are to your kitchen, the more often you’ll harvest, and the less likely you’ll overgrow into bitterness.
Choose a footprint that matches your real space
Here are three practical footprints that work for most renters and homeowners. Pick one and commit; you can always add a pot later.
- Micro footprint: a 2 ft x 4 ft (0.6 m x 1.2 m) strip along a railing or wall—ideal for 4–6 pots.
- Classic footprint: a 4 ft x 4 ft (1.2 m x 1.2 m) patio square—fits 8–12 pots with a stepping gap.
- Maximized footprint: a 2 ft x 8 ft (0.6 m x 2.4 m) run—excellent for a linear “salad bar” with staggered harvests.
Leave at least 18 inches of walking space if you’ll be stepping between pots; 12 inches works if you’ll access from one side only.
Sunlight: design for 4–6 hours, not perfection
Salad crops are forgiving. Most leafy greens produce well with 4–6 hours of sun, especially if that sun is morning light. Full sun (6–8+ hours) can push bolting in warm weather; partial sun often makes sweeter leaves.
For planning, assume:
- 4 hours: lettuce, arugula, spinach (cool weather), chives, parsley.
- 6 hours: plus basil, dill, cilantro (though cilantro bolts in heat), baby kale.
- 8 hours: possible, but build in shade cloth or afternoon shade for summer tenderness.
Leafy greens prefer cool-to-mild conditions. As the USDA notes, many salad greens are cool-season crops that perform best in spring and fall (USDA, 2019).
Pot geometry: create a “salad bar” with tiers
Instead of scattering containers randomly, arrange them in tiers: tall at the back, medium in the middle, low at the front. This keeps light even and makes harvesting intuitive. If your space is visible from indoors, the tiering also reads as deliberate design—order is beauty.
Recommended container sizes (with spacing)
For consistent results, standardize your pots. A mismatched collection can work, but uniform sizing makes watering and planting simpler.
- Leafy greens (lettuce, arugula, spinach): 10–12 inch diameter pot, or a window box 24 inches long. Space plants 6–8 inches apart for leaf harvest.
- Herbs (basil, parsley, cilantro, chives): 8–10 inch pot per herb, or shared in a 12–14 inch pot if you respect spacing. Basil likes 8–10 inches.
- Cut-and-come-again kale: 12–14 inch pot per plant, 10–12 inches spacing.
- Radishes (for crunch): 8–10 inch deep pot; thin to 2 inches apart.
Depth matters. Aim for 8 inches minimum for most salad greens; 10–12 inches gives you more buffer for heat and watering.
Drainage and soil: performance over thrift (with a DIY compromise)
Use a quality potting mix—not garden soil. Containers need air space and consistent drainage. Penn State Extension emphasizes that containers require a soilless potting mix for best aeration and water management (Penn State Extension, 2023).
If budget is tight, a workable compromise is:
- 80% potting mix
- 20% finished compost
Avoid filling pots with straight compost; it can compact and hold too much water in some conditions.
Layout strategies that keep harvests steady
A salad garden fails when everything matures at once, bolts at once, or gets forgotten. Your layout should bake in succession planting and “re-set” space for new seedlings.
Strategy 1: The 3-zone harvest rhythm
Divide your pots into three functional zones. Even in a small space, zoning improves the rhythm of harvesting.
- Zone A (Ready Now): 2–3 pots of fast greens you cut weekly (leaf lettuce, arugula).
- Zone B (Growing In): 2 pots where seedlings are establishing (new lettuce starts, spinach).
- Zone C (Flavor + Height): 2–3 herb pots and one taller accent (like a trellised nasturtium or a dwarf tomato if you want to stretch beyond salads).
When Zone A looks tired, you pull and replant from Zone B timing, then reseed Zone B. It’s the same principle as a professional planting plan: staggered peak interest, but edible.
Strategy 2: Pair crops by water needs
Group thirstier greens together so you’re not overwatering Mediterranean herbs. Basil enjoys more water than rosemary; parsley likes steadier moisture than thyme. Put “moisture lovers” in the same tray or micro-zone.
Strategy 3: Use vertical edges for herbs and edible flowers
If you have a railing or fence, hang 2–3 slim planters for quick snips: chives, thyme, trailing nasturtiums. This frees your floor pots for higher-yield greens.
“Good design is as little design as possible.” — Dieter Rams (often cited in design studies and interviews; principle widely published)
For a salad garden, that means fewer, better-placed pots—each one easy to reach, water, and harvest.
Plant selection: reliable varieties for pots (and why they work)
Variety choice is where container salad gardens go from “cute” to productive. Look for compact habits, heat tolerance, and regrowth after cutting.
Lettuces (the bulk greens)
- ‘Black Seeded Simpson’ (leaf lettuce): fast, forgiving, great cut-and-come-again. Leaves stay tender in partial sun.
- ‘Red Sails’ (leaf lettuce): color contrast, holds texture well, and tolerates cool nights.
- ‘Little Gem’ (mini romaine): compact heads for pots; harvest whole or leaf-by-leaf.
Spicy and bold greens (small space, big flavor)
- Arugula ‘Astro’: quick to harvest (often 25–35 days baby-leaf), thrives in pots, excellent in morning-sun spots.
- Mustard ‘Mizuna’: feathery texture, strong regrowth after cutting, tolerates cool weather well.
Texture and nutrition anchors
- Kale ‘Dwarf Blue Curled’: sturdy in containers; pick outer leaves weekly. More heat-tolerant than spinach.
- Swiss chard ‘Bright Lights’: surprisingly ornamental; cut outer leaves and it keeps producing.
Herbs that earn their footprint
- Basil ‘Genovese’: classic for salads; pinch tips weekly to keep it bushy.
- Parsley ‘Italian Flat Leaf’: steady producer, handles partial sun, great filler green.
- Chives: perennial in many regions; reliable “always available” garnish.
- Dill ‘Bouquet’: airy height, good for cucumber salads; let one plant flower for beneficial insects.
Crunch and garnish upgrades
- Radish ‘French Breakfast’: fast crunch (often 25–30 days), good for narrow pots.
- Nasturtium ‘Alaska’: edible peppery leaves and flowers; trails nicely over pot edges and attracts pollinators.
Comparison table: container options that actually matter
| Container type | Best for | Typical size | Approx. cost (USD) | Notes |
|---|---|---|---|---|
| Plastic nursery pot (upcycled) | Testing varieties, renters, low cost | 10–12 in diameter | $0–$3 | Lightweight; use a saucer to protect decks. |
| Fabric grow bag | Heat management, strong root health | 3–5 gal | $4–$8 | Dries faster; great for basil and kale. |
| Window box planter | Baby greens “carpet” planting | 24 in long x 8 in deep | $12–$25 | Ideal for succession sowing; watch drainage. |
| Self-watering container | Busy schedules, hot balconies | 12–16 in diameter | $20–$45 | More consistent moisture; less bolting risk. |
Step-by-step setup: build your salad garden in one afternoon
This is the reliable workflow I use when designing small edible container layouts: fast to install, easy to adjust.
- Measure your usable footprint. Mark a rectangle with painter’s tape: try 4 ft x 4 ft if you have it, or 2 ft x 4 ft for tight spaces.
- Choose 8 core containers. A strong starter set is six 12-inch pots plus two 24-inch window boxes.
- Add pot feet or risers. Lift pots 1/2–1 inch to improve drainage and prevent deck staining.
- Fill with potting mix. Leave 1 inch headspace at the top for watering.
- Plant your “Ready Now” zone. Use nursery starts for instant payoff: 2 pots of leaf lettuce (3 plants per pot, spaced 6–8 inches).
- Sow your “Growing In” zone. Seed arugula and mizuna thickly in a window box; plan to thin to 2–3 inches for baby-leaf harvest.
- Plant herbs in dedicated pots. Basil gets a warm spot; parsley and chives can take slightly less sun.
- Water deeply. Water until it runs out the bottom; then check again after 10 minutes and top up if the mix settled.
- Mulch lightly (optional). A 1/2-inch layer of fine bark or straw reduces evaporation on hot patios.
- Label and date. A simple plant tag with sowing date prevents the “mystery pot” problem.
Budgets and DIY alternatives (without sacrificing results)
A realistic starter budget depends on how much you already have. Here are numbers you can plan around.
- Potting mix: 2 cubic feet often fills about two 12-inch pots (varies by shape). Expect $8–$15 per bag.
- Containers: upcycled can be free; new pots typically run $3–$12 each; self-watering options $20–$45.
- Seed packets: usually $2–$5 each, and one packet can last multiple sowings.
- Starts (nursery seedlings): commonly $3–$6 per 4-pack.
- Simple fertilizer: a small bottle of liquid organic feed often costs $10–$18 and lasts a season.
DIY container ideas that work well: 5-gallon buckets (drill 8–10 drainage holes), storage totes (add holes and don’t exceed 10–12 inches soil depth without extra drainage), and sturdy food-grade containers. Avoid anything that held chemicals.
Three real-world layouts (steal these exactly)
Use these as templates—each one is designed to prevent the two classic problems: uneven watering and “everything ready at once.”
Scenario 1: The renter’s balcony (2 ft x 6 ft, 5 hours of sun)
Layout: two 24-inch window boxes against the railing + four 12-inch pots on the floor. Keep a 12-inch access lane along the inside edge.
Planting plan:
- Window box #1: arugula + mizuna (succession sow every 2 weeks)
- Window box #2: baby spinach in spring/fall; swap to heat-tolerant lettuce in summer
- Pots: ‘Little Gem’ romaine (2 pots), basil (1 pot), parsley + chives (1 pot shared)
Why it works: railing planters catch the best light; floor pots hold moisture a bit longer and stabilize the layout in wind.
Scenario 2: The small patio outside the kitchen door (4 ft x 4 ft, 6–7 hours of sun)
Layout: eight 12-inch pots arranged in a U-shape, open side facing the door. Put taller herbs at the back corners to frame the view.
Planting plan:
- 2 pots: ‘Black Seeded Simpson’ + ‘Red Sails’ (mix for color)
- 1 pot: kale ‘Dwarf Blue Curled’
- 1 pot: Swiss chard ‘Bright Lights’ (ornamental and edible)
- 1 pot: basil ‘Genovese’
- 1 pot: dill ‘Bouquet’
- 1 pot: chives
- 1 pot: nasturtium ‘Alaska’ trailing over the edge
Why it works: the U-shape is a working garden “room.” You can stand in one spot and reach most pots, which makes quick harvests realistic.
Scenario 3: The front stoop with morning sun only (3–4 hours, heat reflected from brick)
Layout: three larger containers (16-inch) instead of many small ones, plus one narrow window box on the coolest edge. Larger soil volume buffers heat and drying.
Planting plan:
- 16-inch pot #1: lettuce mix (leaf lettuces spaced 6–8 inches)
- 16-inch pot #2: parsley + chives
- 16-inch pot #3: kale (1 plant) underplanted with a few lettuce starts
- Window box: arugula (seeded thickly for baby leaf)
Why it works: morning sun supports sweet greens; afternoon shade reduces bolting. Bigger pots mean fewer emergency watering sessions.
Maintenance: what it really takes (and how to keep it pleasant)
A kitchen salad garden should feel like a small ritual, not a chore. Plan on 30–60 minutes per week in mild weather. In peak summer heat or windy balconies, it can be closer to 10 minutes per day for watering checks—unless you use self-watering containers.
Weekly routine (simple and effective)
- Water: check moisture 1 inch down. Most pots need water 3–5 times per week in warm weather; daily in heat waves.
- Feed: liquid fertilizer every 2 weeks at label rate, especially for heavy harvesters like basil and chard.
- Harvest: pick lettuce and greens at least weekly. Frequent cutting delays bolting and keeps leaves tender.
- Re-seed: sow one small area or one pot every 2–3 weeks to keep the pipeline full.
Seasonal tasks that prevent disappointment
- Spring: start with spinach, arugula, lettuces, cilantro. Watch for late frosts; pots cool faster than ground soil.
- Summer: shift toward heat-tolerant lettuces, basil, chard, and kale. Add 30–40% shade cloth if greens turn bitter quickly.
- Fall: your best salad season—reseed lettuces and arugula as nights cool. Growth is steadier and flavor improves.
- Winter (mild climates): protect pots against hard freezes; greens may continue slowly in sheltered spots. In cold climates, treat this as planning season and sanitize pots for spring.
Troubleshooting by design (not by panic)
If your greens flop midday, that’s often a design issue: pot size too small, soil too light, or sun too intense for the variety. Shift the pot 12 inches into shade rather than assuming failure. If leaves are bitter, harvest younger and increase watering consistency.
Pests happen, but container gardens are easier to manage. A quick rinse and regular harvesting prevents a lot of issues. If aphids show up, a strong water spray in the morning and removing heavily infested tips usually restores balance.
A salad garden that looks intentional
One last designer trick: repeat materials and colors. Use the same pot color (even if they’re inexpensive plastic) and repeat a plant form—like two basil pots or two red lettuces—to create rhythm. Add one trailing plant (nasturtium) and one upright plant (dill) so the arrangement has a “front, middle, back” like a border planting.
When the layout is clear and the harvest cycle is built in, the garden becomes part of cooking instead of a separate hobby. The next time dinner needs “something fresh,” you’ll step outside with scissors, take what you need, and come back in with a bowl that smells like you planned ahead.
Sources: USDA (2019) guidance on cool-season vegetables and home gardening principles; Penn State Extension (2023) container gardening recommendations emphasizing soilless potting media and drainage.