Patio Outdoor Bar Garden Screening
The first time you try to enjoy a drink outside and realize your neighbor’s upstairs window has a perfect view of your patio, it changes the mood fast. Add a trash bin in the corner, a glaring security light, and a gust of wind that knocks over napkins—suddenly your “outdoor bar” feels more like a loading dock than a retreat. The fix isn’t to hide indoors; it’s to design a screen that works like a garden: layered, beautiful, and functional, with a layout that respects your space and your budget.
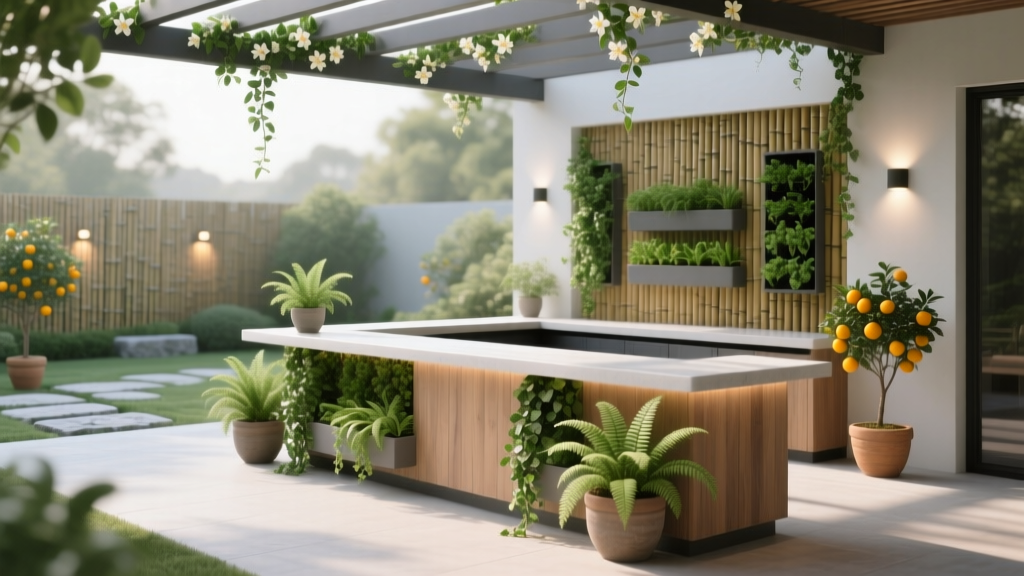
In this project, we’ll build a patio bar zone that feels tucked-in without feeling boxed-in. You’ll get a clear path for serving, a backdrop that blocks sightlines, and planting that softens hard surfaces—while still leaving enough airflow so your bar doesn’t become a stagnant corner.
Start with the sightlines: screen what matters, not everything
Before you buy a single panel, stand where you’ll actually sit or serve—typically 24–30 inches (61–76 cm) from the bar edge. Now identify what needs screening: windows, shared walkways, an AC unit, a parking spot, or a plain fence. Most patios don’t need a full perimeter wall. A targeted screen, placed where sightlines cross, usually feels more elegant and costs less.
Privacy math: height, distance, and “seated vs. standing” views
For a seated guest, eye level is often around 42–48 inches (107–122 cm). For standing conversations, assume 60–66 inches (152–168 cm). A screen height of 72 inches (183 cm) is a practical sweet spot: it blocks most upper-body views without overpowering a small patio.
As a rule of thumb, place the screen 12–24 inches behind the bar stools so people don’t feel pressed against it, and so you have room for planters or a narrow planting strip. If you’re working with a tight balcony, even 6–10 inches behind the stools can work if you use slim planters and keep the screen visually light (slats, trellis, or tall grasses).
Layout strategies that make a patio bar feel intentional
A great outdoor bar isn’t just a counter—it’s a tiny room with circulation, storage, and atmosphere. The screening is the “wall,” and your layout determines whether it feels welcoming or cramped.
Choose one of three proven bar-and-screen layouts
These layouts scale up or down, from renter balconies to family patios.
- Backdrop Wall: Bar runs parallel to the screen, making a clear “service side” and “guest side.” Best for narrow patios.
- L-Shape Nook: Screen wraps one corner, creating a cozy pocket. Best for patios with an exposed corner or diagonal views from neighbors.
- Floating Bar Island + Screen Strip: Bar floats forward, and a planted screen sits behind it (or to one side). Best when you want airflow and a layered garden feel.
Dimension rules that prevent bottlenecks
Use these numbers to keep the space workable:
- Bar counter height: 42 inches (standard bar height).
- Bar depth: 18–24 inches; aim for 24 inches if you want room for plates and a small prep board.
- Clear walkway behind the bartender: 36 inches minimum; 42 inches feels generous in active use.
- Stool spacing: 24 inches per stool (center-to-center) for comfortable elbows.
- Planter strip depth for screening plants: 14–20 inches for grasses and narrow shrubs; 20–24 inches if you want bamboo alternatives or mixed perennials.
Also consider sun: most screening plants look best with 6+ hours of sun, but several choices below thrive in 3–5 hours (common on patios with buildings nearby).
Screening materials: match the vibe, wind, and permanence
Think of screening as a toolkit. You can combine materials—like a slatted panel behind a row of grasses—to get privacy without the “solid fence” feeling.
| Screen Type | Best For | Typical Height | Approx. Cost (USD) | Notes |
|---|---|---|---|---|
| Wood slat panel (cedar or treated pine) | Modern patios, high privacy with airflow | 6 ft (72 in) | $120–$280 per 6x3 ft panel | Stain/seal every 2–3 years; great wind performance if slatted |
| Metal trellis + vines | Soft, garden-forward look | 5–7 ft | $60–$200 per panel (plus plants) | Privacy improves over 1–2 seasons; choose non-invasive vines |
| Outdoor curtain on tension rod | Renters, temporary privacy | 7–8 ft drop | $30–$120 total | Moves in wind; use weighted hems; quick seasonal swap |
| Tall planters with grasses/shrubs | Natural screening, flexible placement | 24–36 in planter + plant height | $45–$250 per planter (plus soil/plants) | Best for balconies where attaching panels is restricted |
Wind matters more than most people expect. A solid panel can act like a sail; slats or lattice reduce pressure. If you’re on an upper-level balcony, plan for heavier planters (or add ballast) and avoid top-heavy shrubs that become unstable.
Step-by-step setup: build the bar zone first, then layer the screen
This is the order I use on real patios because it prevents the common mistake of placing screens that block circulation or make the bar feel jammed into a corner.
- Tape the footprint. Use painter’s tape or string to mark the bar depth (24 inches), stool line, and a 36-inch service path.
- Choose the “anchor wall.” Pick the edge that needs screening most (neighbor view, harsh light, unattractive fence).
- Set the bar height and shade. Place the bar so the prep side isn’t in full glare during the hours you’ll use it (often 5–9 pm). If you get strong afternoon sun, plan a small umbrella or shade sail.
- Install hard screening first. Slat panels, trellis, or curtain hardware go in now, before pots and furniture.
- Add the green layer. Place planters 6–12 inches in front of the screen to create depth and hide the bottom gap.
- Light it like a room. Add warm LEDs at eye level and one low light near plants. Avoid a single overhead glare.
- Finish with “bar behavior.” Add a narrow side shelf for a tray, hooks for towels, and a small bin for bottle caps—details that keep the area tidy.
Plant selection: privacy, texture, and the right root systems
Outdoor bar screening plants have to do more than look pretty: they must tolerate reflected heat from paving, irregular watering, and tight root space. When in doubt, pick plants that thrive in containers and have predictable habits (not rampant spreaders).
“The right plant in the right place is the most important factor in landscape success.” — American Horticultural Society, quoted principle widely used in residential design (AHS, 2017)
Best container plants for fast screening (sun: 6+ hours)
If your patio gets strong sun, you can build a thick screen in one season.
- Feather reed grass ‘Karl Foerster’ (Calamagrostis x acutiflora): Upright, narrow, and reliable. In containers, aim for a pot at least 16–20 inches wide; space pots 18–24 inches apart for a continuous screen. Stays tidy in winter.
- Switchgrass ‘Northwind’ (Panicum virgatum): Taller, strong vertical lines, good movement. Use 20–24 inch planters for stability; great for modern slat backgrounds.
- Bay laurel (Laurus nobilis), multi-stem or standard: Gives you evergreen structure and a culinary bonus for cocktails and cooking. Best in mild climates or overwinter indoors in cold regions.
- Rosemary ‘Arp’ or ‘Tuscan Blue’: Aromatic, drought-tolerant, and works near seating (scent). Use as a lower foreground layer rather than the whole screen.
Best screening plants for part shade (sun: 3–5 hours)
Many patios are bright but not sunny. These choices stay attractive without stretching or thinning too much.
- Clumping bamboo ‘Fargesia rufa’: A bamboo look without aggressive running (still verify your local rules). Prefers protection from hot afternoon sun, making it ideal for side-yard patios and shaded balconies. Use long planters 24 inches deep if possible.
- Japanese forest grass (Hakonechloa macra ‘Aureola’): Not tall privacy on its own, but excellent as the soft “skirt” layer in front of a trellis or slats.
- Hydrangea paniculata ‘Bobo’: Compact blooms, good for softening a screen edge. Needs consistent moisture; best where you can water easily.
- Star jasmine (Trachelospermum jasminoides) on trellis: Evergreen in warm climates, fragrant, and well-behaved compared to some vines. Give it a trellis panel and guide ties early.
Avoid these common screening mistakes
These are the choices that look great in photos and disappoint in patio reality:
- Running bamboo in open ground (or large beds) without containment—can spread aggressively. Many extension services warn about this; for example, the University of Maryland Extension notes that some bamboos can be invasive and difficult to control (University of Maryland Extension, 2023).
- Overly thirsty plants in small pots (they scorch fast on hot paving).
- Thorny shrubs near stool backs or tight walkways.
Three real-world scenarios (and how I’d screen each)
Let’s translate principles into layouts you can copy.
Scenario 1: Renter balcony, 5 ft x 10 ft, windy, rules against drilling
You want privacy, but you can’t attach a panel to the building. The move here is a planter-based screen plus a removable curtain.
Layout: Place a slim bar (18-inch depth) against the railing side, with stools facing inward. Behind the stools, line up three rectangular planters, each about 30–36 inches long. Fill with a mix of ‘Karl Foerster’ grasses and trailing plants to hide planter edges. Add an outdoor curtain on a tension rod between two freestanding posts (or a clothing-rack style frame).
Budget: A practical renter build can land around $220–$450: planters ($45–$150), potting mix ($20–$40), grasses ($12–$25 each), curtain ($30–$70), plus a few bungees for wind control.
Why it works: Weight sits low (good in wind), everything is movable, and the green layer makes the balcony feel like a garden instead of a screen installation.
Scenario 2: Suburban patio, 12 ft x 14 ft, neighbor window overlooks seating
This is the classic “exposed corner” problem. A single panel won’t cut it; you need a corner wrap and a planted buffer.
Layout: Build an L-shaped screen: two 6-ft slat panels meeting at the corner behind the bar. Keep the bar 18 inches forward so you can plant in front. Add a row of planters (or a 18–24 inch deep bed if you own the property) with switchgrass ‘Northwind’ for height and rosemary in front for scent.
Cost range: Two quality panels plus posts/hardware often runs $350–$700 depending on lumber and finishes. Add plants/soil at $120–$300. If you DIY the slats from treated pine, you can reduce panel costs substantially, trading money for time.
Why it works: The L blocks diagonal views (the hardest to solve), and the planting breaks up the big plane of wood so the patio still feels airy.
Scenario 3: Tight side yard, 6 ft wide, 20 ft long, part shade, needs to hide bins and AC
Side yards become utility corridors unless you give them a destination and a “clean wall.” Here, the bar can double as a concealment strategy.
Layout: Place a narrow bar run (24 inches deep) along the house wall. On the opposite fence, install a trellis screen (5–6 ft tall) and train star jasmine. In front of the AC/bins, use a short “service screen” (4 ft tall) plus two tall planters with clumping bamboo ‘Fargesia rufa’ to blur the utility area. Keep a 36-inch clear path down the center for access.
Why it works: You preserve access, control the messy view, and create a long, green backdrop that reads as intentional the moment you step outside.
Sun, water, and container specs that keep plants alive behind the bar
Plants near patios experience heat spikes. Dark pavers can raise surface temperatures significantly on sunny days, and containers dry faster than beds. The simplest way to avoid stress is to upsize the container and use a soil mix that holds moisture without staying soggy.
- Minimum pot size for screening grasses: 16–20 inches diameter, or rectangular planters at least 10–12 inches wide and 14–18 inches deep.
- Soil volume target: For tall grasses or bamboo alternatives, aim for 10–20 gallons of soil per plant for stability and moisture buffering.
- Drip irrigation (optional but excellent): A basic patio drip kit often costs $35–$80 and saves plants during heat waves.
For water planning, expect containers in full sun to need watering 2–4 times per week in summer, especially when winds are drying. If you travel, use a timer. According to the U.S. Environmental Protection Agency, watering in the early morning reduces evaporation losses (EPA, 2021).
DIY alternatives when you want the look without the price tag
You can get a designer feel without custom carpentry—by borrowing the same composition: structure + softness + lighting.
Low-cost screen build ideas
- “Panel + planter” combo: Use one affordable lattice panel (often $25–$60) and paint it matte black or deep green. Put it behind two tall planters. Instant depth.
- Repurposed shelving as a plant wall: A narrow, outdoor-safe metal shelf becomes a living screen with trailing plants (ivy geraniums, sweet potato vine) and upright grasses.
- Rope and eyelets for a vine screen: If drilling is allowed, run stainless eyelets and tensioned wire. Train jasmine or clematis (choose non-invasive varieties). It’s inexpensive and visually light.
If you’re budgeting, decide where to spend: I’d put money into stable planters and good soil first, because they make plants succeed. Fancy panels can come later.
Maintenance expectations: what you’ll actually do each week
A bar garden should feel relaxing, not like a second job. Here’s a realistic maintenance rhythm.
Weekly (20–40 minutes): Check moisture in containers, deadhead where needed, wipe down the bar surface, and do a quick tidy of fallen leaves. If you’re in high heat, you may spend an extra 5 minutes on additional watering checks.
Monthly (30–60 minutes): Lightly feed container plants during the growing season, check trellis ties, and inspect wood panels for loose screws. Rotate pots if one side leans toward light.
Seasonal tasks:
- Spring: Cut back warm-season grasses (like switchgrass) before new growth. Refresh top 1–2 inches of potting mix. Re-tie vines to trellis.
- Summer: Watch for spider mites on stressed plants; rinse foliage occasionally. Increase watering frequency during heat waves.
- Fall: Decide whether you like winter structure—many grasses look great left standing. Clean gutters nearby so runoff doesn’t flood planters.
- Winter: Protect pots from freeze-thaw cycles by grouping them and raising them slightly off cold surfaces. In cold zones, move bay laurel or rosemary (if tender in your area) to a sheltered spot.
Lighting and finishing touches that make the screen feel like a room
Once the screen is up, you’ll notice something: privacy is only half the comfort story. The other half is atmosphere. Use warm lighting (around 2700K if you’re choosing bulbs) and keep it layered.
- One vertical light: A wall sconce or lantern near the bar for faces and pouring.
- One plant-level light: A small uplight aimed at grasses or a trellis to create shadow play on the screen.
- Optional task light: Under-counter LED strip if you prep food outside.
And don’t skip the practical details: a small hook rail on the screen post for towels, a narrow tray shelf for garnishes, and a dedicated bin for empties will keep the bar looking like a designed space—not a temporary setup.
When you step back, you’re looking for one thing: does the screen read as part of the garden rather than a barrier? If you’ve layered structure, plants, and light—and kept clearances like the 36-inch service path—you’ll feel it immediately. The bar becomes the destination, the screen becomes the backdrop, and the patio finally works the way you hoped it would the first time you carried a drink outside.
Citations: U.S. Environmental Protection Agency (EPA), 2021. University of Maryland Extension, 2023. American Horticultural Society (AHS), 2017.