Kitchen Zero-Waste Herb Regrowth
The most expensive “plant” in your kitchen is the one you buy over and over: a $2.99 bunch of cilantro that wilts before taco night, scallions that go limp in the crisper, basil that blackens near the fridge vent. Now picture this instead: you’re chopping dinner, and the scraps you used to toss—onion bases, herb stems, celery hearts—are already slotted into a tidy regrowth station by the sink. In the morning light, jars line up like a small greenhouse. A week later, you’re clipping fresh green tips again. No compost guilt, no last-minute grocery runs—just a deliberate, good-looking system that fits your exact space.
This is kitchen zero-waste herb regrowth as a design project. We’ll treat your counter, windowsill, balcony, or patio like a mini landscape: circulation paths, light mapping, repeated materials, and plant choices that behave well indoors. You’ll end with a layout that’s as practical as it is satisfying—because the best sustainable habit is the one that’s easy to keep.
Start With the Site: Light, Water, and Your Daily Routine
Before you pick containers, spend one day noticing what your kitchen already does well. Great garden design starts with observing flows, not shopping lists.
Map your light like a designer
Herb regrowth is forgiving, but it isn’t magic. Most regrown herbs will survive in medium light, yet they thrive (and stay less leggy) with stronger exposure.
- Bright window target: 4–6 hours of direct sun (south- or west-facing is usually best).
- Minimum workable: 2–3 hours of direct sun, or bright indirect light all day.
- Low-light fix: a simple LED grow light (often $20–$40) positioned 8–12 inches above the jars for 12–14 hours/day.
As a reference point, Cornell University notes that most herbs do best with “at least 6 hours of sunlight per day” for strong growth (Cornell University Cooperative Extension, 2020). Indoors, we can mimic that with a window plus supplemental light when needed.
Place the station where it’s “inevitable”
If you have to walk across the kitchen to change water, you won’t. Put your regrowth zone where you already pause daily:
- Between sink and cutting board (ideal for quick rinsing and water changes).
- On the windowsill above the sink (classic, as long as it’s not drafty in winter).
- On a narrow counter strip beside the stove (only if you can protect from heat blasts).
Design around mess control
Water jars and plant scraps can look cluttered fast. Make the setup feel intentional with a tray and consistent containers. This is the difference between “science experiment” and “mini indoor garden.”
Core Design Principles for a Zero-Waste Regrowth Layout
Principle 1: Contain the system (tray-first design)
Start with a tray that defines the footprint. A tray prevents rings, corrals drips, and visually unifies jars. For most kitchens, a tray around 18 inches long by 6 inches wide fits 4–6 jars without stealing the whole counter.
DIY option: a thrifted baking sheet or a shallow casserole dish. Add a folded dish towel underneath for a softer look and extra absorption.
Principle 2: Repeat materials to reduce visual noise
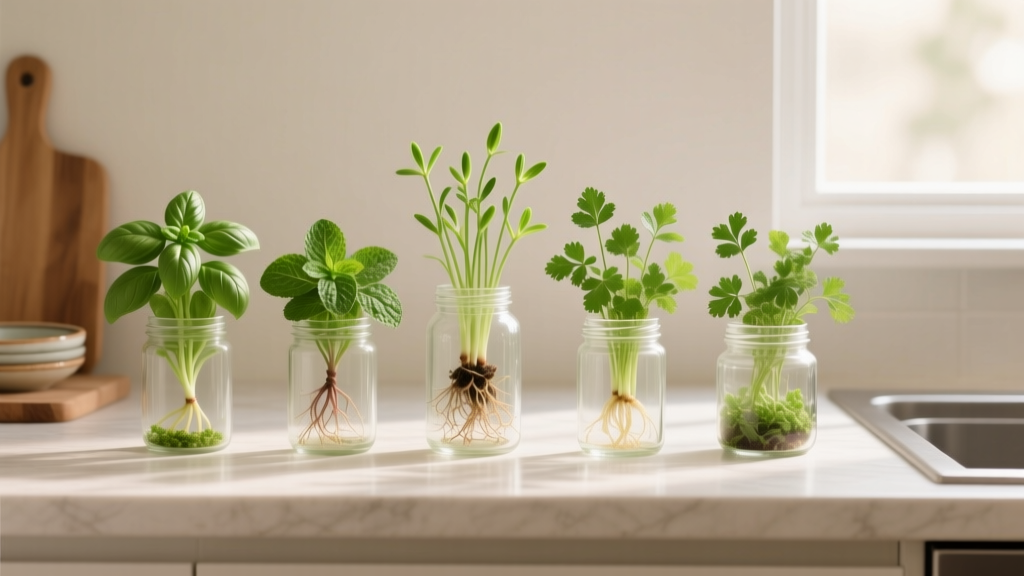
Choose one jar type and repeat it. Uniform height makes the whole station look designed. Wide-mouth jars are easiest to clean and stabilize stems.
- Jar size sweet spot: 12–16 oz for scallions, mint, cilantro stems.
- Taller jars: 24 oz for celery hearts or long basil stems.
Principle 3: Split “water-rooting” and “soil-finishing” zones
Many herbs regrow in water for a while, but longer-term productivity usually improves once they move to potting mix. Treat this like a two-stage nursery:
- Zone A: Water-rooting line (jars on tray, closest to sink)
- Zone B: Soil-finishing pots (small pots on a second tray or a narrow shelf near the brightest light)
University of Minnesota Extension emphasizes that many culinary herbs prefer well-drained media and bright light for best indoor performance (University of Minnesota Extension, 2019). Water is a rooting tool; soil is where you get repeat harvests.
Principle 4: Keep plant spacing realistic—even on a windowsill
Crowding causes mildew, weak growth, and pests. Use these spacing benchmarks when you move items to soil:
- Basil: 8–10 inches between plants (or 1 plant per 6-inch pot)
- Mint: 1 plant per 6–8-inch pot (it spreads; don’t share)
- Cilantro: 6 inches between clumps, or sow thickly in a 6–8-inch pot and harvest young
- Parsley: 6–8 inches between plants
Three Layout Strategies for Different Spaces
Layout 1: The “Sink-to-Sun” Counter Run (best for most kitchens)
Footprint: Two trays, each about 18" x 6". One sits by the sink (water-rooting), one sits by the brightest window (soil-finishing).
Why it works: You separate the wet work from the growth work. Water changes become a 30-second habit, and your potted herbs get maximum light.
Estimated cost: $15–$60 depending on whether you thrift jars and trays or buy new plus a small grow light.
Layout 2: The Windowsill “Living Backsplash” (for renters with zero counter space)
Footprint: One long tray 24" x 4" on the sill plus a clamp lamp. Use 6–8 identical jars for rooting, and 2–3 small square pots (4-inch) for finishing.
Why it works: It turns an unused strip into a productive edge. It’s also easy to remove without leaving marks—important for rentals.
Pro tip: Put a thin silicone mat under the tray to protect paint and catch drips.
Layout 3: The Balcony “Regrow + Grow-Up” Rail Plan (for apartment outdoor access)
Footprint: A narrow outdoor shelf or rail planter plus one indoor jar station for starting.
- Outdoor container depth: 8–10 inches for most herbs
- Sun target: 6+ hours outdoors (morning sun is gentler)
Why it works: You use the kitchen for propagation and the balcony for biomass. This is how you go from a few scallion snips to weekly herb bundles.
Plant Selection: What Regrows Well, What’s Worth Potting, and Which Varieties Behave
Not every herb is equally cooperative from kitchen scraps. Some regrow reliably from cut stems or bases; others are better started from seed. Below are the all-stars for a zero-waste regrowth layout, with varieties chosen for indoor performance, flavor, and repeat harvests.
Scallions (Green onions): the easiest win
Regrowth method: Save the white base with roots; stand in 1–2 inches of water.
Varieties to buy (for future planting): ‘Evergreen Hardy White’ (consistent regrowth, mild flavor), ‘Tokyo Long White’ (long shanks if you later grow in soil).
Why they work: They rebound fast—often visible growth in 48–72 hours—and tolerate indoor light better than many herbs.
Basil: great from cut stems, better when finished in soil
Regrowth method: Use a 4–6 inch cutting; remove lower leaves; water-root until roots are 1–2 inches long, then pot up.
Varieties:
- ‘Genovese’ (classic pesto, vigorous)
- ‘Greek Columnar’ (upright, space-saving habit—excellent for windowsills)
- ‘Prospera’ series (bred for downy mildew resistance; helpful in humid kitchens)
Why they work: Basil roots readily in warm kitchens and responds to frequent pinching, which keeps it compact and productive.
Mint: unstoppable—give it its own pot
Regrowth method: Root cut stems in water, then move to soil.
Varieties: ‘Spearmint’ (versatile), ‘Peppermint’ (strong flavor), ‘Moroccan’ (tea mint; compact).
Why it works: Mint roots fast and tolerates a range of light. It also spreads aggressively—design-wise, that means containment.
Cilantro: regrow stems for short-term, then switch to seed
Regrowth reality: Cilantro stems may root, but long-term leafy regrowth is inconsistent. The best “zero-waste” approach is to regrow briefly for a second flush, then use the system to start new plants from seed.
Varieties: ‘Slow Bolt’ (buys time before flowering), ‘Santo’ (reliable), ‘Calypso’ (uniform leaves).
Why it works: You can keep a rotating pot: one young batch coming on while the older batch bolts.
Parsley: slow but steady
Regrowth method: Best from nursery starts or seed; kitchen-stem regrowth is hit-or-miss. Still, parsley is excellent in the soil-finishing zone.
Varieties: ‘Giant of Italy’ (flat-leaf, strong flavor), ‘Forest Green’ (compact, tidy).
Celery heart: a fun regrow that becomes an herb-like accent
Regrowth method: Place the celery base in shallow water; once leaves emerge, pot into soil.
Why it works: It gives you leafy growth for soups and stocks. Think of it as “bonus greens,” not full stalk replacement.
Comparison Table: Water-Only vs Soil-Finished Regrowth
| Plant | Best Stage in Water | Move to Soil? | Typical Time to First Harvest | Notes for Design/Layout |
|---|---|---|---|---|
| Scallions | Long-term possible | Optional | 7–14 days | Keep 2–3 jars cycling; change water every 2–3 days to avoid odor. |
| Basil | Short-term rooting | Yes | 14–28 days | Needs brightest spot; pinch weekly to prevent legginess. |
| Mint | Short-term rooting | Yes | 14–21 days | One pot per plant; place a saucer under pot to protect surfaces. |
| Cilantro | Sometimes roots | Better from seed | 21–35 days (from seed) | Rotate pots; avoid hottest window in midsummer to slow bolting. |
| Celery base | Short-term sprouting | Yes | 14–30 days | Use a taller jar early, then pot; great near sink for frequent water refresh. |
Step-by-Step: Set Up Your Regrowth Station Like a Mini Landscape Install
Set this up once, then enjoy the rhythm.
- Choose your footprint. Aim for a tray area around 18" x 6" to start. If you’re tight on space, even 12" x 4" works with 2–3 jars.
- Gather containers. Start with 4–6 identical jars (12–16 oz). Add 2 small pots (4–6 inch) for soil-finishing.
- Add a drip strategy. Place a waterproof tray or baking sheet under jars; add a thin cloth liner for looks. This keeps the station “clean enough” to live in a kitchen.
- Prep cuttings correctly. For stem herbs, cut just below a node and strip leaves that would sit underwater (reduces rot).
- Fill jars with the right water depth. Submerge roots or the bottom 1 inch of stem; don’t drown the whole cutting.
- Label with a tiny tag. Painter’s tape works. Add the date so you know when to pot up.
- Set your maintenance trigger. Tie water changes to an existing habit: morning coffee or after dinner cleanup. Most jars need fresh water every 2–3 days.
- Pot up when roots are ready. When roots reach 1–2 inches, move to potting mix, water thoroughly, and place in the brightest available light.
A Designer’s Note on Sustainability: Water Hygiene Matters
“Successful indoor plant systems rely on reducing disease pressure—clean containers, fresh water, and good airflow are as important as light.” — Royal Horticultural Society (RHS), guidance on indoor plant care and hygiene (RHS, 2021)
That’s the unglamorous secret. Most regrowth fails from cloudy water and rotting stems, not from lack of luck. Treat jar-cleaning as part of the design: wide-mouth jars, easy access to the sink, and a tray that can be wiped quickly.
Real-World Scenarios: Three Setups That Actually Fit Real Lives
Scenario 1: The renter with one bright window and a strict lease
Space: 24-inch windowsill above the kitchen sink. Light: 3–5 hours of afternoon sun.
Design solution: A single 24" x 4" tray with 6 jars for scallions, basil cuttings, and mint starts, plus a clamp grow light to extend brightness in winter.
Budget: $0 if you reuse jars; $25 for a basic clamp light and LED bulb; $8–$12 for two 4-inch pots and a small bag of potting mix.
Why it works: Nothing gets mounted. Everything lifts away for cleaning or moving out.
Scenario 2: The homeowner with a dim kitchen but a sunny patio door
Space: Limited window light near the sink; strong light by a sliding door. Light: 6+ hours near the door.
Design solution: Two-zone setup: rooting jars at the sink for easy water changes, then a “finishing bench” (a narrow plant shelf) near the patio door with three 6-inch pots: basil, mint, and parsley.
Cost range: $30–$70 (shelf $20–$40, pots $10–$20, saucers $5–$10).
Bonus design move: Put a washable runner under the shelf. It reads like decor and catches the occasional drip.
Scenario 3: The small-house cook who uses herbs daily and wants real yield
Space: A 2-foot counter corner plus a balcony. Light: Kitchen gets 2 hours; balcony gets 7 hours.
Design solution: Start everything indoors in jars, then graduate to a balcony rail planter (8–10 inches deep). Keep the indoor station for scallions year-round and for rooting new basil/mint cuttings.
Budget strategy: Spend on one high-quality rail planter ($25–$45) and use recycled nursery pots inside it for flexibility.
Why it works: The balcony does the heavy lifting; the kitchen stays clean and efficient.
Budget Planning and DIY Alternatives That Still Look Designed
You can build a lovely regrowth station with almost no spending, or you can invest in a few pieces that make it feel like part of the kitchen.
- $0–$10 approach: Reuse salsa jars, set them on a thrifted plate, label with tape. Use a sunny window and rotate jars daily for even light.
- $20–$40 approach: Add a grow light (especially helpful in winter), plus matching jars from a discount store for a cohesive look.
- $50–$100 approach: Add a narrow two-tier shelf and a better LED bar light. This turns regrowth into a true micro-garden with consistent harvests.
DIY design upgrade: If you dislike the look of jar labels, paint the tray edge with chalkboard paint and write plant names on the rim. It’s tidy and erasable.
Maintenance Expectations: The Real Time Cost (and the Seasonal Rhythm)
This system is meant to be light-lift. If it feels like a chore, simplify—fewer jars, fewer species, better placement.
- Weekly time: about 15–30 minutes total (water changes, quick jar rinse, pinching basil/mint, checking for mushy stems).
- Every 2–3 days: refresh jar water (more often if it turns cloudy).
- Every 2 weeks: wipe trays, wash jars with soap, and trim any yellowing leaves.
- Monthly: top-dress potted herbs with a small amount of compost or a diluted liquid fertilizer (especially basil in active growth).
Seasonal notes:
- Winter: growth slows. Expect leggier herbs without supplemental light; consider a 12–14 hour/day LED schedule.
- Summer: watch heat near windows. Basil loves warmth, but jar water can get funky faster; change water more frequently.
- Shoulder seasons: drafts can chill cuttings on a windowsill. Move the tray 12 inches back from cold glass if leaves look stressed.
Troubleshooting by Design (Small Tweaks, Big Results)
If water smells or turns cloudy: You’ve got too much plant material underwater or too infrequent changes. Strip lower leaves, reduce water depth to 1 inch, and rinse jars. Consider switching to amber jars or keeping the tray out of direct hot sun to reduce algae.
If stems rot before rooting: Try younger cuttings, make a fresh cut under a node, and keep only the base submerged. Basil and mint root best with warmth and bright light.
If herbs are tall and floppy: That’s a light issue. Move to a brighter window, rotate jars daily, or add a grow light 8–12 inches above the tops.
If pests show up (especially indoors): Isolate the plant, rinse leaves, and improve airflow. Crowding is often the root cause—give pots breathing room and avoid wetting foliage late in the day.
Make It Feel Like Part of the Kitchen
The most successful zero-waste regrowth stations don’t look like a guilt project—they look like intentional decor that happens to feed you. Keep the palette simple: clear jars, one tray, two pot colors, and a repeating rhythm of greens. Let the plants be the texture.
As you settle into the routine, you’ll start saving scraps instinctively: scallion bases lined up like little lanterns, basil tips rooting for the next pot, mint cuttings ready for summer drinks. The system becomes a quiet loop—prep, regrow, pot, harvest—designed to fit your home instead of asking your home to change.
And one day, without thinking, you’ll reach for the scissors before you reach for your car keys.
Sources: Cornell University Cooperative Extension (2020); University of Minnesota Extension (2019); Royal Horticultural Society (RHS) indoor plant care guidance (2021).