How to Save Waterlogged Orchids
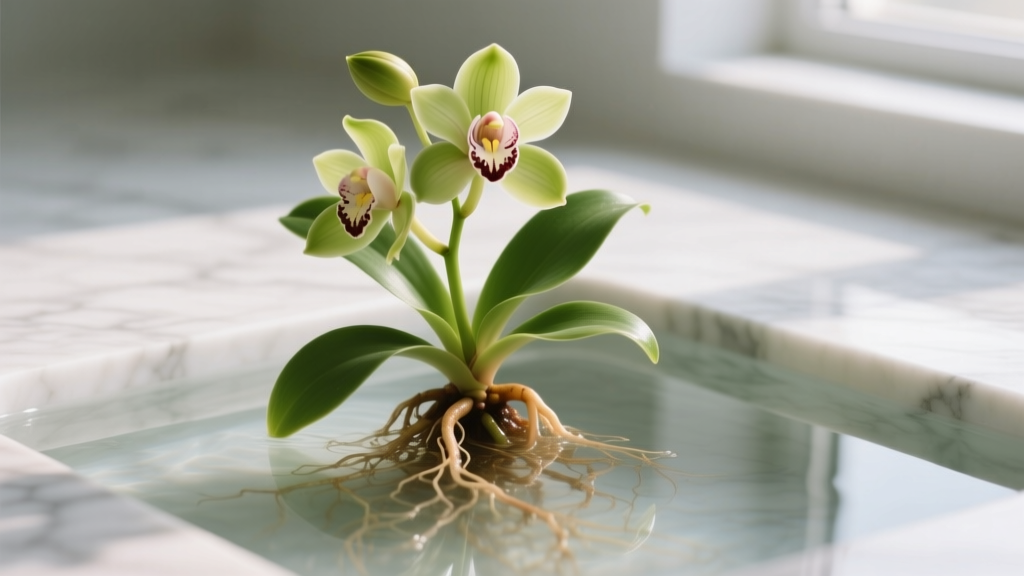
You water your orchid on a Sunday, feeling proud you’re being consistent. By Wednesday, the leaves look a little limp. By next week, a bottom leaf turns yellow, and when you lift the pot, there’s that sour, swampy smell. You pull the plant out and your stomach drops: roots that should be firm and green/silvery are brown, mushy, and sloughing off like wet paper.
Waterlogged orchids don’t die from “too much water” as much as they die from too little air around the roots. Orchid roots are built to breathe—especially common house orchids like Phalaenopsis (moth orchid). Once air spaces collapse and bacteria/fungi move in, the clock starts ticking. The good news: if you still have any firm roots or a healthy crown, you can usually pull the plant back with fast, practical triage.
This is the exact recovery plan I use when an orchid comes in soggy: assess, dry, cut, disinfect, repot, then adjust watering so it never happens again.
First: Confirm It’s Actually Waterlogged
Orchids can look “thirsty” even when they’re drowning. The quickest way to avoid the wrong fix is a simple root and pot check.
Fast symptom check (2 minutes)
- Roots: brown/black, mushy, hollow, or the outer layer (velamen) slides off when you pinch.
- Smell: sour, musty, “rotting vegetation” odor from the pot.
- Pot weight: still heavy 5–7 days after watering in a bark mix (too wet for too long).
- Leaves: limp or wrinkled even though the media is wet (roots can’t function).
- Crown (Phalaenopsis): water sitting in the center; yellowing from the top down can signal crown rot.
If your orchid is in a decorative cachepot with no airflow, or packed in tight sphagnum that stays wet for over a week, treat it as waterlogged until proven otherwise.
Emergency Triage: Save the Plant in the Next 30 Minutes
If roots are actively rotting, waiting “until it dries” inside the same pot often makes things worse. This is one of those times where gentle, decisive action saves plants.
Step-by-step rescue (what I do on the potting bench)
- Unpot immediately. Slide the orchid out and peel away all old media, especially any soggy moss packed around the core.
- Rinse the roots. Use lukewarm water (20–25°C / 68–77°F) so you can clearly see what’s viable.
- Trim rot. With sterilized scissors, cut off all mushy/hollow roots back to firm tissue. Firm roots feel wiry and resist a gentle tug.
- Disinfect your tool between cuts. Wipe blades with 70% isopropyl alcohol to avoid spreading pathogens.
- Let it air-dry. Set the plant bare-root on a clean towel for 30–90 minutes (out of direct sun). This “rest” helps wounds callus.
- Optional (often helpful): light peroxide rinse. If the rot was extensive, a quick rinse with 3% hydrogen peroxide can knock back surface microbes. Don’t soak for long—rinse and let it drain.
- Repot into fresh, airy mix. Use a pot with lots of holes. Match pot size to remaining roots (usually 10–13 cm / 4–5 in for a typical Phal). Avoid oversizing.
- Hold water briefly. After repotting, wait 2–4 days before the first thorough watering if you made many cuts. If only a few roots were trimmed, you can water the next day.
“Most orchid losses after overwatering come from suffocation and subsequent root rot, not from ‘watering’ itself. The goal is rapid drainage and oxygen at the root zone.” — American Orchid Society culture guidance (AOS, 2023)
Why the short dry period matters: freshly cut roots are open doors for pathogens. Giving them time to dry and seal reduces reinfection.
Scenario Playbook: Three Real-World Waterlogging Cases
Waterlogging isn’t one single problem. Here are three common home situations and the exact adjustment that makes the difference.
Scenario 1: “Ice cubes once a week” and the pot stays wet
This is common with grocery-store Phalaenopsis. A few ice cubes can keep the center of the pot cold and damp, especially in a dense plug of moss. Cold + wet slows root metabolism and invites rot.
- Fix: Switch to room-temperature watering (20–25°C) and only water when roots are silvery and the pot is light.
- Repot: Remove the tight nursery plug and replace with medium orchid bark. That plug is a silent killer.
Scenario 2: Decorative cachepot with no drainage
You water properly… then the inner pot sits in a puddle. The bottom third never gets oxygen.
- Fix: Empty the cachepot 10 minutes after watering. If you want a clean look, use a spacer or pebbles so the grow pot never sits in standing water.
- Upgrade: Use a slotted orchid pot; airflow matters as much as drainage.
Scenario 3: Winter low light + same summer watering schedule
In winter, orchids use less water because growth slows and evaporation drops. Watering “on schedule” (every 7 days no matter what) can waterlog even a bark mix.
- Fix: Let the media approach dryness before watering; in many homes that’s 10–14 days in winter for bark, sometimes longer.
- Light: Move closer to a bright window or add a grow light for 12–14 hours daily to keep metabolism steady.
Potting Media: The Make-or-Break Factor
Most waterlogged orchids are sitting in a mix that holds water too long for the home’s light and temperature. The right media isn’t “dry”—it’s airy.
Best media choices for recovery
- Medium-grade fir bark (classic): drains fast, easy to re-wet, great for most Phalaenopsis.
- Bark + perlite (about 80/20): more air, quicker dry-down if your home is cool or low light.
- Small bark + a little sphagnum (about 90/10): only if your home is very dry and warm; too much moss is how many orchids get waterlogged.
If your orchid came packed in pure sphagnum and you’re in a moderate-humidity home, treat that as high-risk. Many commercial growers use sphagnum successfully because they have strong light, warm temps, and controlled airflow—your living room isn’t a greenhouse.
Comparison table: Media and watering behavior (real-world expectations)
| Setup | Typical dry-down time indoors* | Waterlogging risk | Best for |
|---|---|---|---|
| Pure sphagnum moss (tightly packed) | 10–21 days | High | Very warm, bright, high-airflow spaces |
| Medium orchid bark | 5–10 days | Medium-Low | Most homes; good starter recovery mix |
| Bark + 20% perlite | 4–8 days | Low | Cooler rooms, winter conditions, heavy-handed waterers |
| Semi-hydro (LECA) in ventilated pot | Reservoir-based; refresh every 7–14 days | Low if managed; High if stagnant | Consistent growers who monitor salts and flushing |
*Dry-down time assumes typical home conditions around 20–23°C (68–73°F), moderate airflow, and a 10–13 cm pot. Your mileage varies with light, humidity, and pot style.
Data point worth remembering: the American Orchid Society notes that Phalaenopsis do best when allowed to approach dryness between waterings rather than staying constantly wet (AOS, 2023). That single habit prevents most repeat offenses.
Watering: How to Rehydrate Without Re-Drowning
After root rot, people swing to the opposite extreme and keep the orchid too dry. Recovery means rhythm: wet thoroughly, then let it breathe.
My reliable watering method (works for bark)
- Take the orchid to the sink.
- Run room-temperature water through the pot for 20–30 seconds, soaking all media.
- Let it drain completely for 2–3 minutes.
- Return it to its spot—never sitting in runoff.
How to tell when to water (don’t use a calendar)
- Root color: silvery = approaching dry; green = still moist (in clear pots).
- Pot weight: light = time to water. Heavy = wait.
- Skewer test: insert a bamboo skewer; if it comes out cool/damp after 10 minutes, hold off.
Concrete target: In average homes, a bark-potted Phalaenopsis often lands at watering every 6–10 days in brighter months and every 10–14 days in winter. If yours takes 14+ days to dry in bark, you likely need more light, more airflow, or a more ventilated pot.
Light and Airflow: The Hidden Levers That Prevent Waterlogging
Watering problems are often light problems in disguise. In low light, the plant uses less water, and the pot stays wet longer.
Light targets that actually help recovery
- Bright, indirect light near an east window is ideal for many Phalaenopsis.
- If using a grow light, aim for 12–14 hours daily and keep the fixture at a safe distance per manufacturer guidance (often 20–40 cm depending on output).
- Avoid hot direct midday sun on stressed plants; sunburn plus rot is a rough combo.
Airflow tips (simple, not fussy)
- A gentle fan in the room (not blasting the plant) speeds drying and reduces fungal pressure.
- Keep leaves dry overnight; if water splashes into the crown, blot it out with tissue.
University of Florida IFAS Extension notes that good air movement reduces disease pressure in orchids and helps media dry appropriately (UF/IFAS Extension, 2021).
Feeding After Root Rot: Less, Later, and Consistent
Right after trimming roots, feeding hard is like making someone run a marathon while they’re on crutches. Wait until you see new root tips or a new leaf starting.
A practical feeding schedule for recovering orchids
- Pause fertilizer for 2–3 weeks after major root work.
- Then feed at 1/4 strength once every 2–4 weeks during active growth.
- Flush with plain water every 4th watering to prevent salt buildup (especially important if using tap water).
If your water is very hard, consider using rainwater, distilled, or reverse-osmosis and adding a complete orchid fertilizer at low dose. Salt buildup in a stressed root system can stall recovery.
Troubleshooting: Symptoms and Exact Fixes
This is where most people get stuck—because waterlogged orchids can show confusing signals. Match the symptom to the fix.
Symptom: Leaves limp and wrinkled, but media is wet
- Likely cause: root rot—roots can’t take up water.
- Fix: unpot, trim rot, repot into airy bark, then water only when nearing dryness. Increase light slightly and add gentle airflow.
Symptom: Yellow bottom leaf (just one)
- Likely cause: normal leaf aging or stress from root loss.
- Fix: check roots. If most roots are firm, don’t panic—improve watering rhythm. If many are mushy, treat as waterlogged.
Symptom: Black or mushy center (crown) on Phalaenopsis
- Likely cause: crown rot, often triggered by water sitting in the crown in cool conditions.
- Fix: blot out all moisture immediately. Keep the crown dry. Improve airflow. If tissue is actively rotting, carefully remove soft tissue and keep the plant warm (22–26°C / 72–79°F) and dry at the crown. Severe cases may not be recoverable, but some will basal-keiki (baby plant) if roots remain.
Symptom: White fuzzy growth on media or roots
- Likely cause: saprophytic fungi feeding on decomposing media; indicates mix staying wet too long.
- Fix: repot into fresh mix, improve airflow, and shorten wet time. Don’t “treat” your way out of a cultural problem.
Symptom: Media smells sour; pot stays wet 10+ days in bark
- Likely cause: poor drainage, decomposed bark, or pot too large.
- Fix: downsize the pot if needed, use a slotted pot, and replace old bark (bark breaks down and holds more water over time). Many home growers repot bark every 12–18 months to keep structure and airflow.
Method A vs Method B: Two Recovery Approaches Compared (with Numbers)
You’ll see two common schools of thought after rot: keep it very dry, or keep it slightly moist to encourage roots. Here’s my grounded take with real-world outcomes.
Method A: “Dry-out and barely water”
- What it is: minimal watering for weeks to avoid repeat rot.
- Best for: orchids with plenty of remaining roots.
- Risk: orchids with few roots dehydrate fast and stall.
Method B: “Airy mix + thorough watering when nearly dry” (my preferred baseline)
- What it is: repot into airy media, water fully, then allow near-dry before watering again.
- Best for: most home environments; supports steady hydration without suffocation.
- Risk: if light is too low, even airy mix can stay wet too long—adjust light/airflow or add perlite.
Comparison with typical timing: In a 20–23°C room, Method B usually produces a predictable cycle of 6–10 days between waterings in bark, which is long enough for oxygen return and short enough to prevent chronic dehydration. Method A often stretches watering to 14–21 days, which can be fine for robust root systems but is often too slow for rootless recoveries.
Special Case: Saving an Orchid with Very Few Roots
If you trimmed and you’re left with only 1–2 short roots (or none), the plan changes. Your job is to keep the plant hydrated without keeping the base wet and rotten.
“Humidity tent” approach (simple version)
- Use a clear plastic bin or large bag as a tent.
- Keep the orchid above a slightly damp layer of sphagnum (don’t bury the base).
- Vent daily for 10–15 minutes to prevent stale air and mold.
- Aim for warm temps: 22–26°C (72–79°F).
This is slow. Expect new root nubs in 3–8 weeks depending on season and light. Once you have several roots reaching 5–7 cm, pot into bark.
Common Problems That Lead to Waterlogging (and How to Stop the Repeat)
Most repeat cases come from the same handful of habits. Fix these once and you’ll stop cycling through rot and rescue.
Problem: Pot has no side holes
- Fix: switch to a slotted orchid pot or add extra holes. More oxygen = faster root recovery.
Problem: Water left in the crown or between leaves
- Fix: water early in the day. If water collects, blot it. In cool rooms (below 20°C / 68°F), be extra careful—wet crowns stay wet longer.
Problem: Old, broken-down bark
- Fix: repot on a schedule. Bark that’s 18+ months old indoors often starts retaining too much moisture and compacts around roots.
Problem: “One cup every week” watering
- Fix: stop measuring by cups. Water thoroughly, then wait. Partial watering often wets the top and leaves the center sour and stagnant.
North Carolina State Extension’s orchid culture resources emphasize that orchids require excellent drainage and should not remain constantly wet—good potting structure and drying cycles are core to preventing root diseases (NCSU Extension, 2020).
Repotting Tips That Make Recovery Stick
Repotting is where many rescues succeed or fail. A few small details matter a lot.
- Choose the right pot size: pick a pot that fits roots snugly. Too large = too wet.
- Keep the crown above the media line: don’t bury the stem on Phalaenopsis.
- Don’t pack the mix tight: settle bark with gentle taps; you want air pockets.
- Stake if needed: a wobbly orchid breaks new root tips. One bamboo stake can save weeks of recovery time.
If you do nothing else, remember this: airy media + a pot that breathes + watering only when approaching dryness will prevent most waterlogging disasters.
Saving a waterlogged orchid is rarely about a miracle product. It’s about restoring oxygen to the roots, removing rot promptly, and then matching watering to your light and temperature. Once you’ve done one successful rescue, you’ll recognize the early warning signs—heavy pot, sour smell, limp leaves with wet media—and you’ll fix it in days instead of losing the plant over months.
Sources: American Orchid Society culture guidance (AOS, 2023). University of Florida IFAS Extension, orchid care and disease-prevention guidance (UF/IFAS Extension, 2021). North Carolina State University Extension orchid culture resources (NCSU Extension, 2020).